Sony NEX-5 α Handbook - Page 23
Shooting images
 |
UPC - 027242797505
View all Sony NEX-5 manuals
Add to My Manuals
Save this manual to your list of manuals |
Page 23 highlights
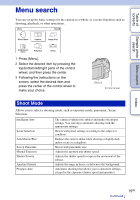
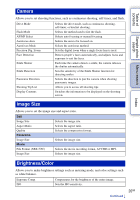
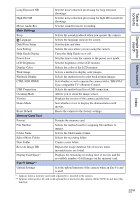
Table of contents Sample photo Menu search search Index Shooting images Shooting images with the settings in effect when you bought the camera is explained here. The camera makes decisions appropriate to the situation, and adjusts the settings. 1 Adjust the LCD monitor angle, and hold the camera. The Scene Recognition function begins to work. 2 To take still images, press the shutter button. To record movies, press the MOVIE button to start recording. Press the MOVIE button again to stop recording. Note • The angle of view of movies is narrower than that of still images. After you press the MOVIE button, the camera shows the actual range to be recorded by displaying an empty frame on the screen. You can check the frame for movies by selecting [Menu] t [Setup] t [Grid Line] t [On]. z On Scene Recognition The Scene Recognition function lets the camera automatically recognize the shooting conditions and allows you to shoot the image with appropriate settings. Scene Recognition icon and guide • The camera recognizes (Night View), (Tripod Night View), (Night Portrait), (Backlight), (Backlight Portrait), (Portrait), (Landscape), or (Macro), and displays the corresponding icon and guide on the LCD monitor when the scene is recognized. 23GB Continued r
-
 1
1 -
2
-
3
-
4
-
5
-
6
-
7
-
8
-
9
-
10
-
11
-
12
-
13
-
14
-
15
-
16
-
17
-
 18
18 -
 19
19 -
 20
20 -
 21
21 -
 22
22 -
 23
23 -
 24
24 -
 25
25 -
 26
26 -
 27
27 -
 28
28 -
29
-
30
-
31
-
32
-
33
-
34
-
35
-
36
-
37
-
38
-
39
-
40
-
41
-
42
-
43
-
44
-
45
-
46
-
47
-
48
-
49
-
50
-
51
-
52
-
53
-
54
-
55
-
56
-
57
-
58
-
59
-
60
-
61
-
62
-
63
-
64
-
65
-
66
-
67
-
68
-
69
-
70
-
71
-
72
-
73
-
74
-
75
-
76
-
77
-
78
-
79
-
80
-
81
-
82
-
83
-
84
-
85
-
86
-
87
-
88
-
89
-
90
-
91
-
92
-
93
-
94
-
95
-
96
-
97
-
98
-
99
-
100
-
101
-
102
-
103
-
104
-
105
-
106
-
107
-
108
-
109
-
110
-
111
-
112
-
113
-
114
-
115
-
116
-
117
-
118
-
119
-
120
-
121
-
122
-
123
-
124
-
125
-
126
-
127
-
128
-
129
-
130
-
131
-
132
-
133
-
134
-
135
-
136
-
137
-
138
-
139
-
140
-
141
-
142
-
143
-
144
-
145
-
146
-
147
-
148
-
149
-
150
-
151
-
152
-
153
-
154
-
155
-
156
-
157
-
158
-
159
 |
 |