Sony NEX-5N α Handbook - Page 162
Viewing images on a TV - hd
 |
View all Sony NEX-5N manuals
Add to My Manuals
Save this manual to your list of manuals |
Page 162 highlights
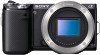
Table of contents Sample photo Menu Connecting with other equipment Viewing images on a TV To view images recorded on the camera on a TV, an HDMI cable (sold separately) and an HD TV equipped with an HDMI connector are required. Refer also to the operating instructions supplied with the TV. 1 Turn off both your camera and the TV. 2 Connect the camera to the TV with an HDMI 1 To the HDMI cable (sold separately). connector 3 Turn on the TV and switch the input. 4 Turn on the camera, then press the (Playback) button to select playback mode. Images shot with the camera appear on the TV screen. Select the desired image with the control wheel. HDMI cable 2 To the HDMI terminal Notes • Some devices may not work properly. • Sounds are output only while recording or playing back movies, when the camera is connected with an HDMI cable. • Use an HDMI cable with the HDMI logo. • Use an HDMI mini connector on one end (for the camera), and a plug suitable for connecting your TV on the other end. • Do not connect the output connector of the device with the HDMI terminal on the camera. This may cause a malfunction. • Even if the Peaking function is activated, the outline of in-focus ranges is not enhanced when the camera is connected using an HDMI cable. z On "PhotoTV HD" This camera is compatible with the "PhotoTV HD" standard. By connecting Sony's PhotoTV HD-compatible devices using an HDMI cable (sold separately), a whole new world of photos can be enjoyed in breathtaking Full HD quality. "PhotoTV HD" allows for a highly-detailed, photo-like expression of subtle textures and colors. For details, refer to the operating instructions supplied with the TV. Index 162GB Continued r
-
 1
1 -
2
-
3
-
4
-
5
-
6
-
7
-
8
-
9
-
10
-
11
-
12
-
13
-
14
-
15
-
16
-
17
-
18
-
19
-
20
-
21
-
22
-
23
-
24
-
25
-
26
-
27
-
28
-
29
-
30
-
31
-
32
-
33
-
34
-
35
-
36
-
37
-
38
-
39
-
40
-
41
-
42
-
43
-
44
-
45
-
46
-
47
-
48
-
49
-
50
-
51
-
52
-
53
-
54
-
55
-
56
-
57
-
58
-
59
-
60
-
61
-
62
-
63
-
64
-
65
-
66
-
67
-
68
-
69
-
70
-
71
-
72
-
73
-
74
-
75
-
76
-
77
-
78
-
79
-
80
-
81
-
82
-
83
-
84
-
85
-
86
-
87
-
88
-
89
-
90
-
91
-
92
-
93
-
94
-
95
-
96
-
97
-
98
-
99
-
100
-
101
-
102
-
103
-
104
-
105
-
106
-
107
-
108
-
109
-
110
-
111
-
112
-
113
-
114
-
115
-
116
-
117
-
118
-
119
-
120
-
121
-
122
-
123
-
124
-
125
-
126
-
127
-
128
-
129
-
130
-
131
-
132
-
133
-
134
-
135
-
136
-
137
-
138
-
139
-
140
-
141
-
142
-
143
-
144
-
145
-
146
-
147
-
148
-
149
-
150
-
151
-
152
-
153
-
154
-
155
-
156
-
 157
157 -
 158
158 -
 159
159 -
 160
160 -
 161
161 -
 162
162 -
 163
163 -
 164
164 -
 165
165 -
 166
166 -
 167
167 -
168
-
169
-
170
-
171
-
172
-
173
-
174
-
175
-
176
-
177
-
178
-
179
-
180
-
181
-
182
-
183
-
184
-
185
-
186
-
187
-
188
-
189
-
190
-
191
-
192
-
193
-
194
-
195
-
196
-
197
-
198
-
199
-
200
 |
 |