Sony RDR VX500 Operating Instructions - Page 31
Select Auto, and press ENTER
 |
UPC - 027242657441
View all Sony RDR VX500 manuals
Add to My Manuals
Save this manual to your list of manuals |
Page 31 highlights
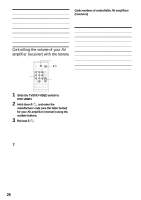
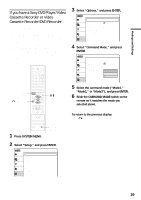
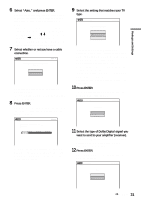
Hookups and Settings 6 Select "Auto," and press ENTER. The recorder will automatically search for a channel that carries a time signal when you turn off the recorder after finishing Easy Setup. • If broadcasters in your area are not yet sending time signals, select "Manual," and press ENTER. Press M/m to set the month and press ,. Set the day, year, hour, minutes, and AM/PM in the same way. The day of the week is set automatically. 7 Select whether or not you have a cable connection. Easy Setup Select the way in which you will receive channels. Antenna Cable If you use an antenna only (no cable TV), select "Antenna." If you use a cable connection without a cable box, select "Cable." 8 Press ENTER. The Tuner Preset function automatically starts searching for all of the receivable channels and presets them. Easy Setup Searching for receivable channels. 25 Please wait. To set the channels manually, see page 98. After the Tuner Preset is finished, the setup display for selecting the aspect ratio of the connected TV appears. 9 Select the setting that matches your TV type. Easy Setup 10:10 AM Select your TV screen type. 16 : 9 4 : 3 Letter Box 4 : 3 Pan Scan "4:3 Letter Box": For standard TVs. Displays "wide screen" pictures with bands on the upper and lower sections of the screen. "4:3 Pan Scan": For standard TVs. Automatically displays "wide screen" pictures on the entire screen and cuts off the sections that do not fit. "16:9": For wide-screen TVs or standard TVs with a wide screen mode. For details, see "Video Settings (Video)" on page 100. 10 Press ENTER. The setup display for selecting the type of Dolby Digital signal appears. Easy Setup 10:10 AM Dolby Digital D-PCM Dolby Digital 11 Select the type of Dolby Digital signal you want to send to your amplifier (receiver). If your AV amplifier (receiver) has a Dolby Digital decoder, select "Dolby Digital." Otherwise, select "D-PCM." 12 Press ENTER. The setup display for selecting the type of DTS signal appears. Easy Setup 10:10 AM DTS On Off ,continued 31
-
 1
1 -
2
-
3
-
4
-
5
-
6
-
7
-
8
-
9
-
10
-
11
-
12
-
13
-
14
-
15
-
16
-
17
-
18
-
19
-
20
-
21
-
22
-
23
-
24
-
25
-
 26
26 -
 27
27 -
 28
28 -
 29
29 -
 30
30 -
 31
31 -
 32
32 -
 33
33 -
 34
34 -
 35
35 -
 36
36 -
37
-
38
-
39
-
40
-
41
-
42
-
43
-
44
-
45
-
46
-
47
-
48
-
49
-
50
-
51
-
52
-
53
-
54
-
55
-
56
-
57
-
58
-
59
-
60
-
61
-
62
-
63
-
64
-
65
-
66
-
67
-
68
-
69
-
70
-
71
-
72
-
73
-
74
-
75
-
76
-
77
-
78
-
79
-
80
-
81
-
82
-
83
-
84
-
85
-
86
-
87
-
88
-
89
-
90
-
91
-
92
-
93
-
94
-
95
-
96
-
97
-
98
-
99
-
100
-
101
-
102
-
103
-
104
-
105
-
106
-
107
-
108
-
109
-
110
-
111
-
112
-
113
-
114
-
115
-
116
-
117
-
118
-
119
-
120
-
121
-
122
-
123
-
124
-
125
-
126
-
127
-
128
 |
 |
