Sony RDR VX500 Operating Instructions - Page 56
Recording from Connected Equipment without a Timer, recording mode.
 |
UPC - 027242657441
View all Sony RDR VX500 manuals
Add to My Manuals
Save this manual to your list of manuals |
Page 56 highlights
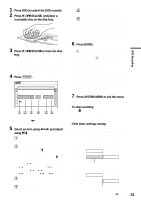
Recording from Connected Equipment without a Timer +RW -RWVR -RWVideo +R -R You can record from a connected VCR or similar device. To connect other VCR or similar device, see "Connecting Another VCR or Similar Device" on page 34. Use the DV IN jack on the front panel if the equipment has a DV output jack (i.LINK jack). DVD INPUT SELECT 4 Press REC MODE repeatedly to select the recording mode. Each time you press the button, the display changes on the TV screen as follows: HQ HSP SP LP EP SLP For more details about the recording mode, see page 47. 5 Select the line input audio. Set "Line Audio Input" of "Audio" to "Stereo" or "Main/Sub" in the "Setup" display (page 103). 6 Insert the source tape into the connected equipment and set to playback pause. 7 At the same time, press z REC on this recorder and the pause or play button on the connected equipment. Recording starts. To stop recording, press x STOP on this recorder. REC MODE x STOP z REC 1 Press DVD to control the DVD recorder. 2 Insert a recordable disc. 3 Press INPUT SELECT to select an input source according to the connection you made. The front panel display changes as follows: program position LINE1 LINE2 DV If you connect a digital video camera with a DV IN jack See "Dubbing from a DV Format Tape to a DVD" on page 94 for an explanation of how to record from the DV IN jack. Notes • When recording a video game image, the screen may not be clear. • Any program that contains a Copy-Never copy guard signal cannot be recorded. The recorder automatically stops recording after a few seconds. 56
-
 1
1 -
2
-
3
-
4
-
5
-
6
-
7
-
8
-
9
-
10
-
11
-
12
-
13
-
14
-
15
-
16
-
17
-
18
-
19
-
20
-
21
-
22
-
23
-
24
-
25
-
26
-
27
-
28
-
29
-
30
-
31
-
32
-
33
-
34
-
35
-
36
-
37
-
38
-
39
-
40
-
41
-
42
-
43
-
44
-
45
-
46
-
47
-
48
-
49
-
50
-
 51
51 -
 52
52 -
 53
53 -
 54
54 -
 55
55 -
 56
56 -
 57
57 -
 58
58 -
 59
59 -
 60
60 -
 61
61 -
62
-
63
-
64
-
65
-
66
-
67
-
68
-
69
-
70
-
71
-
72
-
73
-
74
-
75
-
76
-
77
-
78
-
79
-
80
-
81
-
82
-
83
-
84
-
85
-
86
-
87
-
88
-
89
-
90
-
91
-
92
-
93
-
94
-
95
-
96
-
97
-
98
-
99
-
100
-
101
-
102
-
103
-
104
-
105
-
106
-
107
-
108
-
109
-
110
-
111
-
112
-
113
-
114
-
115
-
116
-
117
-
118
-
119
-
120
-
121
-
122
-
123
-
124
-
125
-
126
-
127
-
128
 |
 |
