Sony RDR VX500 Operating Instructions - Page 53
Recording from Connected Equipment with a Timer (Synchro Rec), Select RecTo using
 |
UPC - 027242657441
View all Sony RDR VX500 manuals
Add to My Manuals
Save this manual to your list of manuals |
Page 53 highlights
5 Press ENTER. The date, start and stop times, channel, and recording mode appear. The c indicator lights up in the front panel display, and the recorder is ready to start recording. If the c indicator flashes in the front panel display, check that a recordable disc is inserted. Timer - Standard 10:10 AM NoNoR.1ec To 01 DVD Date 06/14 Start End Source Mode Edit 09:00PM 10:00PM CH8 LP 02 ReDcVTDo Da0t6e/14 St0a9r:t15PM S0to9:p45PM CCHH1 MLoPde 03 DV-D-- 11/1--5/-- 9 :--0:-0- PM 11 -:-0:-0- PM CH---8- 3 L--P- 04 --- --/-- --:-- --:-- ---- --- 05 --- VCR -P-/l-u- s+ --:-- --:-- ---- --- 06 --- --/-- --:-- --:-- ---- --- 6 Select "RecTo" using
-
 1
1 -
2
-
3
-
4
-
5
-
6
-
7
-
8
-
9
-
10
-
11
-
12
-
13
-
14
-
15
-
16
-
17
-
18
-
19
-
20
-
21
-
22
-
23
-
24
-
25
-
26
-
27
-
28
-
29
-
30
-
31
-
32
-
33
-
34
-
35
-
36
-
37
-
38
-
39
-
40
-
41
-
42
-
43
-
44
-
45
-
46
-
47
-
 48
48 -
 49
49 -
 50
50 -
 51
51 -
 52
52 -
 53
53 -
 54
54 -
 55
55 -
 56
56 -
 57
57 -
 58
58 -
59
-
60
-
61
-
62
-
63
-
64
-
65
-
66
-
67
-
68
-
69
-
70
-
71
-
72
-
73
-
74
-
75
-
76
-
77
-
78
-
79
-
80
-
81
-
82
-
83
-
84
-
85
-
86
-
87
-
88
-
89
-
90
-
91
-
92
-
93
-
94
-
95
-
96
-
97
-
98
-
99
-
100
-
101
-
102
-
103
-
104
-
105
-
106
-
107
-
108
-
109
-
110
-
111
-
112
-
113
-
114
-
115
-
116
-
117
-
118
-
119
-
120
-
121
-
122
-
123
-
124
-
125
-
126
-
127
-
128
 |
 |

53
DVD Recording
5
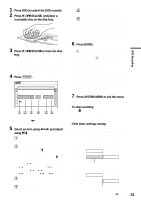
Press ENTER.
The date, start and stop times, channel, and
recording mode appear.
The
c
indicator lights up in the front panel
display, and the recorder is ready to start
recording. If the
c
indicator flashes in the
front panel display, check that a recordable
disc is inserted.
6
Select “RecTo” using
<
/
,
and select
“DVD” using
M
/
m
, and press ENTER.
If you want to change other settings, press
<
/
,
to select the item and press
M
/
m
to change
the setting.
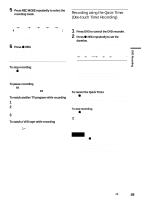
7
Press SYSTEM MENU to exit the menu.
To stop recording
Press
x
STOP twice.
Note that it may take a few seconds for the
recorder to stop recording.
If the timer settings overlap
See page 51.
To confirm, change, or cancel timer recording
See “Checking/Changing/Canceling DVD Timer
Settings (Timer List)”
on page 55.
z
Hint
You can also display the Timer programming menu as
follows:
1
Press SYSTEM MENU.
The System Menu appears.
2
Select “Timer,” and press ENTER.
3
Select “Timer – VCR Plus+,” and press ENTER.
Notes
•
When the PlusCode number is incorrect, “Invalid
code” appears on the TV screen.
•
Before the timer recording starts, “TIMER REC”
flashes in the front panel display.
•
Even if a timer recording is started in the condition with
the recorder power on, the recorder power is automatically
turned off when the timer recording finishes.
•
If you attempt to make a timer recording of a copy
protected broadcast, a black screen is recorded.
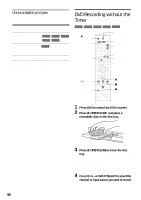
Recording from Connected
Equipment with a Timer
(Synchro Rec)
You can set the recorder to automatically record
programs from connected equipment that has a
timer function (such as a satellite tuner). Connect
the equipment to the LINE 1 IN jacks of the
recorder (page 35).
When the connected equipment turns on, the
recorder starts recording a program from the LINE
1 IN jacks.
1
Press DVD to control the DVD recorder.
2
Insert a recordable disc.
3
Select the line input audio.
Set “Line Audio Input” of “Audio” to
“Stereo” or “Main/Sub” in the “Setup”
display (page 103).
No
Mode Edit
01
02
04
05
06
03
10:10 AM
Timer – Standard
RecTo
Date
Start
Stop
CH
Mode
No.1
:
PM
DVD
PM
:
11/15
9
00
11
00
CH 83
LP
VCR Plus+
+
RW
+
R
-
RW
VR
-
RW
Video
-
R
M
/
m
,
ENTER
SYNCHRO
REC
x
STOP
REC MODE
SYSTEM
MENU
DVD
,
continued