Sony SLT-A55VL Instruction Manual (Large File - 12.49 MB) - Page 151
Changing other settings, MENU button, Audio signals], Select the desired, setting, Help Guide Display]
 |
UPC - 027242798816
View all Sony SLT-A55VL manuals
Add to My Manuals
Save this manual to your list of manuals |
Page 151 highlights
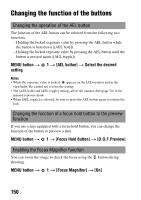
Changing your setup Changing other settings Setting the sound on/off Selects the sound produced when the shutter is locked, during self-timer countdown, etc. MENU button t 2 t [Audio signals] t Select the desired setting Removing the Help Guide from the screen You can turn off the Help Guide that is displayed when you operate the camera. This is convenient when you want to perform the next operation quickly. MENU button t 1 t [Help Guide Display] t [Off] Setting the time to turn the camera to the power save mode You can set different time intervals for the camera to switch to power save mode (Power Save). Pressing the shutter button halfway down returns the camera to the shooting mode. MENU button t 1 t [Power Save] t Select the desired time Note • Regardless of the setting here, the camera turns to power save mode after 30 minutes when the camera is connected to a TV or the drive mode is set to [Remote Cdr.]. Releasing the shutter when no lens is attached You can release the shutter when no lens is attached. Select this when you attach the camera on an astronomical telescope, etc. MENU button t 1 t [Release w/oLens] t [Enable] 151
-
 1
1 -
2
-
3
-
4
-
5
-
6
-
7
-
8
-
9
-
10
-
11
-
12
-
13
-
14
-
15
-
16
-
17
-
18
-
19
-
20
-
21
-
22
-
23
-
24
-
25
-
26
-
27
-
28
-
29
-
30
-
31
-
32
-
33
-
34
-
35
-
36
-
37
-
38
-
39
-
40
-
41
-
42
-
43
-
44
-
45
-
46
-
47
-
48
-
49
-
50
-
51
-
52
-
53
-
54
-
55
-
56
-
57
-
58
-
59
-
60
-
61
-
62
-
63
-
64
-
65
-
66
-
67
-
68
-
69
-
70
-
71
-
72
-
73
-
74
-
75
-
76
-
77
-
78
-
79
-
80
-
81
-
82
-
83
-
84
-
85
-
86
-
87
-
88
-
89
-
90
-
91
-
92
-
93
-
94
-
95
-
96
-
97
-
98
-
99
-
100
-
101
-
102
-
103
-
104
-
105
-
106
-
107
-
108
-
109
-
110
-
111
-
112
-
113
-
114
-
115
-
116
-
117
-
118
-
119
-
120
-
121
-
122
-
123
-
124
-
125
-
126
-
127
-
128
-
129
-
130
-
131
-
132
-
133
-
134
-
135
-
136
-
137
-
138
-
139
-
140
-
141
-
142
-
143
-
144
-
145
-
 146
146 -
 147
147 -
 148
148 -
 149
149 -
 150
150 -
 151
151 -
 152
152 -
 153
153 -
 154
154 -
 155
155 -
 156
156 -
157
-
158
-
159
-
160
-
161
-
162
-
163
-
164
-
165
-
166
-
167
-
168
-
169
-
170
-
171
-
172
-
173
-
174
-
175
-
176
-
177
-
178
-
179
-
180
-
181
-
182
-
183
-
184
-
185
-
186
-
187
-
188
-
189
-
190
-
191
-
192
-
193
-
194
-
195
-
196
-
197
-
198
-
199
-
200
-
201
-
202
-
203
 |
 |
