Sony STR-DA2ES Operating Instructions - Page 20
Connecting the AC, power cord
 |
View all Sony STR-DA2ES manuals
Add to My Manuals
Save this manual to your list of manuals |
Page 20 highlights
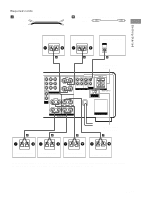
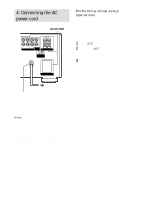
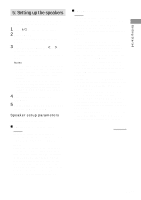
4: Connecting the AC power cord AC OUTLET* FRONT SURROUND CENTER OUT L FRONT B -+ L R SURROUND BACK PRE OUT SUB WOOFER R SPEAKERS IMPEDANCE USE 4-16Ω 4 Ω 8 Ω IMPEDANCE SELECTOR AC OUTLET b To a wall outlet AC power cord * Except for models of area code KR. The configuration, shape, and number of AC outlets vary according to the model and country to which the receiver is shipped. Notes • The AC OUTLET(s) on the rear of the receiver is a switched outlet, which supplies power to the connected component only while the receiver is turned on. • Make sure that the total power consumption of the component(s) connected to the receiver's AC OUTLET(s) does not exceed the wattage stated on the rear panel. Do not connect high-wattage electrical home appliances such as electric irons, fans, or TVs to this outlet. This may cause a malfunction. Performing initial setup operations Before using the receiver for the first time, initialize the receiver by performing the following procedure. This procedure can also be used to return settings you have made to their factory defaults. 1 Press ?/1 to turn off the receiver. 2 Hold down ?/1 for 5 seconds. "ENTER to Clear All" appears in the display. 3 Press DOOR OPEN to open the door of the front panel, then press ENTER. After "MEMORY CLEARING..." appears in the display for a while, "MEMORY CLEARED!" appears. The following are reset to their factory settings. • All settings in the SET UP, CUSTOMIZE, SURROUND, LEVEL, and EQ menus. • The sound field memorized for each function and preset station. • All preset stations. • All index names for functions and preset stations. 20GB
-
 1
1 -
2
-
3
-
4
-
5
-
6
-
7
-
8
-
9
-
10
-
11
-
12
-
13
-
14
-
 15
15 -
 16
16 -
 17
17 -
 18
18 -
 19
19 -
 20
20 -
 21
21 -
 22
22 -
 23
23 -
 24
24 -
 25
25 -
26
-
27
-
28
-
29
-
30
-
31
-
32
-
33
-
34
-
35
-
36
-
37
-
38
-
39
-
40
-
41
-
42
-
43
-
44
-
45
-
46
-
47
-
48
-
49
-
50
-
51
-
52
-
53
-
54
-
55
-
56
-
57
-
58
-
59
-
60
-
61
-
62
-
63
-
64
-
65
-
66
-
67
-
68
-
69
-
70
-
71
-
72
 |
 |
