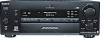
Sony STR-DA2ES Operating Instructions - Page 64
Using S-LINK CONTROL S, system
 |
View all Sony STR-DA2ES manuals
Add to My Manuals
Save this manual to your list of manuals |
Page 64 highlights
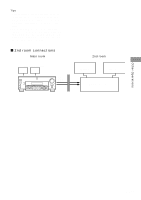
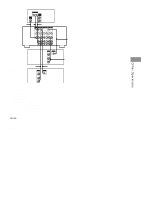
CONTROL A1 /S-LINK control system (continued) x Synchronized recording This function lets you conduct synchronized recording between the selected source and recorder components. 1 Set the function selector on the amplifier (or receiver) to the source component. 2 Set the source component to pause mode (make sure both the N and X indicators light together). 3 Set the recorder component to the RECPAUSE mode. 4 Press PAUSE on the recorder component. The source component is released from the pause mode, and recording begins shortly thereafter. When playback ends from the source component, recording stops. Notes • Do not set more than one component to the pause mode. • Certain recorder components may be equipped with a special synchronized recording function that uses the CONTROL A1 Control System, like "CD Synchro Dubbing". In this case, refer to the operating instructions supplied with the recorder component. Using S-LINK CONTROL S system (Models of area code U, CA only) If you have a S-LINK CONTROL Scompatible Sony TV, satellite tuner, monitor, DVD player or VCR, use an audio/video/ control S connecting cord (supplied) or a control S connecting cord (supplied) to connect the CTRL S (STATUS) IN (for TV, satellite tuner, or monitor) or OUT (for VCR, etc.) jack on the receiver to the appropriate S-LINK jack on the respective component. Refer to the operating instructions supplied with your TV, satellite tuner, monitor, VCR, etc., for details. The following illustration is an example of S-LINK CONTROL S hookups between the receiver, a TV, a VCR, and a DVD player. When your TV is connected to the receiver as shown below, the TV input mode will change to video input whenever you turn on the receiver. When you connect the receiver as shown below, input mode of the receiver changes to VIDEO 1 or DVD/LD whenever you play your VCR or DVD. The following connections also change the input mode of the receiver to TV whenever you operate your TV. 64GB
-
 1
1 -
2
-
3
-
4
-
5
-
6
-
7
-
8
-
9
-
10
-
11
-
12
-
13
-
14
-
15
-
16
-
17
-
18
-
19
-
20
-
21
-
22
-
23
-
24
-
25
-
26
-
27
-
28
-
29
-
30
-
31
-
32
-
33
-
34
-
35
-
36
-
37
-
38
-
39
-
40
-
41
-
42
-
43
-
44
-
45
-
46
-
47
-
48
-
49
-
50
-
51
-
52
-
53
-
54
-
55
-
56
-
57
-
58
-
 59
59 -
 60
60 -
 61
61 -
 62
62 -
 63
63 -
 64
64 -
 65
65 -
 66
66 -
 67
67 -
 68
68 -
 69
69 -
70
-
71
-
72
 |
 |
