Sony STR-K750P Operating Instructions - Page 11
Other hookups - speakers
 |
View all Sony STR-K750P manuals
Add to My Manuals
Save this manual to your list of manuals |
Page 11 highlights
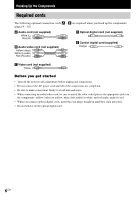
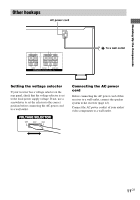
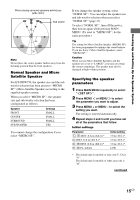
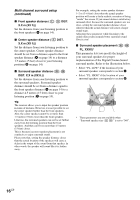
Hooking Up the Components Other hookups AC power cord RL RL RL RL FRONT CENTER SURROUND SPEAKERS IMPEDANCE USE 8 - 16Ω b To a wall outlet Setting the voltage selector If your receiver has a voltage selector on the rear panel, check that the voltage selector is set to the local power supply voltage. If not, use a screwdriver to set the selector to the correct position before connecting the AC power cord to a wall outlet. VOLTAGE SELECTOR 120V 220V 240V Connecting the AC power cord Before connecting the AC power cord of this receiver to a wall outlet, connect the speaker system to the receiver (page 12). Connect the AC power cord(s) of your audio/ video components to a wall outlet. 11GB
-
 1
1 -
2
-
3
-
4
-
5
-
 6
6 -
 7
7 -
 8
8 -
 9
9 -
 10
10 -
 11
11 -
 12
12 -
 13
13 -
 14
14 -
 15
15 -
 16
16 -
17
-
18
-
19
-
20
-
21
-
22
-
23
-
24
-
25
-
26
-
27
-
28
-
29
-
30
-
31
-
32
-
33
-
34
-
35
-
36
-
37
-
38
-
39
-
40
-
41
-
42
-
43
-
44
-
45
-
46
-
47
-
48
-
49
-
50
-
51
-
52
 |
 |
Hooking Up the Components
11
GB
Connecting the AC power
cord
Before connecting the AC power cord of this
receiver to a wall outlet, connect the speaker
system to the receiver (page 12).
Connect the AC power cord(s) of your audio/
video components to a wall outlet.
Other hookups
Setting the voltage selector
If your receiver has a voltage selector on the
rear panel, check that the voltage selector is set
to the local power supply voltage. If not, use a
screwdriver to set the selector to the correct
position before connecting the AC power cord
to a wall outlet.
120V
220V
240V
VOLTAGE SELECTOR
VOLTAGE SELECTOR
SPEAKERS
IMPEDANCE USE 8
–
16
Ω
FRONT
CENTER
SURROUND
R
R
L
L
R
R
L
L
b
AC power cord
To a wall outlet