Sony VRDMC5 Operating Instructions
Sony VRDMC5 - DVDirect DVD Recorder Manual
 |
UPC - 718122688807
View all Sony VRDMC5 manuals
Add to My Manuals
Save this manual to your list of manuals |
Sony VRDMC5 manual content summary:
- Sony VRDMC5 | Operating Instructions - Page 1
IT 2-661-941-02 (1) 7819901257B Video Recordable DVD Drive Operating Instructions JP FR DE ES IT CS VRD-MC1 © 2005 Sony Corporation - Sony VRDMC5 | Operating Instructions - Page 2
instructions, cable recommended in this manual must be used with Support Overview" on page 54. The telephone number below is not for customer service but only for official purposes. Declaration of Conformity Trade Name: SONY Model No.: VRD-MC1 Responsible Party: Sony power. Please ensure - Sony VRDMC5 | Operating Instructions - Page 3
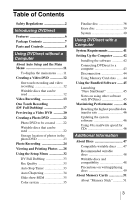
7 Parts and Controls 8 Using DVDirect without a Computer About Auto Setup and the Main Menu 11 To display the main menu .......11 Creating a Video DVD 12 One touch recording and video recording 12 Writable discs that can be used 12 Video Recording 13 One Touch Recording (DV Full Dubbing 17 - Sony VRDMC5 | Operating Instructions - Page 4
About the CompactFlash/SD/ xD-Picture Cards 52 Precautions 53 Support Overview 54 User support web site 54 Update the system software .... 54 Technical support 54 Specifications 55 4 - Sony VRDMC5 | Operating Instructions - Page 5
DVDirect. Our customer service and user support apply only under these product warranty conditions. ❑ Please note that we cannot accept responsibility for failure of the computer or other devices, incompatibility with special hardware, operating problems caused by improper installation of software - Sony VRDMC5 | Operating Instructions - Page 6
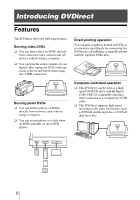
a slide show on DVDs playable on most DVD players. Computer-controlled operation ❑ This DVDirect can be used as a high speed DVD/CD drive with Hi-Speed USB (USB 2.0-compatible) interface when connected to a computer by a USB cable. ❑ This DVDirect supports high speed recording to the latest format - Sony VRDMC5 | Operating Instructions - Page 7
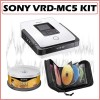
items. If any of these items are missing and/or damaged, please contact your dealer. • DVDirect • Hi-Speed USB cable • Power cord • AC adaptor (MPA-AC1) • Quick Start Guide • Operating Instructions (this document) • Software disc • Warranty card Note Make sure that you back up the supplied - Sony VRDMC5 | Operating Instructions - Page 8
panels A Display window Displays a menu screen, images from a playback device or photos from a memory card. B Mm - Sony VRDMC5 | Operating Instructions - Page 9
DC 12V IN Power cord AC adaptor Note • Be sure to use the supplied power cord. • Do not use damaged cables, such as cables with deformed connectors. B Mode switch Switch to [PC/PRINT] when connecting a printer or computer. C USB connector Connect the supplied USB cable when connecting DVDirect to - Sony VRDMC5 | Operating Instructions - Page 10
Duo slot until you hear a click. To remove, push the "Memory Stick Duo" and pull out. C Multi memory card slot Insert a "Memory Stick," SD Card or xD-Picture Card. Push each card into the multi memory card slot until you hear a click. To remove, push the card and pull out. D CompactFlash Card - Sony VRDMC5 | Operating Instructions - Page 11
About Auto Setup and the Main Menu DVDirect automatically detects input signals from video connection, memory card and DVD disc right after turning on the power, and displays the appropriate message for preparation of recording in the display window. By following the message, you can automatically - Sony VRDMC5 | Operating Instructions - Page 12
(Record). DVDirect controls the digital video camera for the whole process, and completes creation of the video DVD. * DV or Digital8 camcorder only. MICROMV camcorder is not supported. Writable discs that can be used To create a video DVD, you can use DVD+R, DVD+R DL (double layer disc), DVD-R, DVD - Sony VRDMC5 | Operating Instructions - Page 13
without a Computer Video Recording 1 Connect the supplied power cord and AC adaptor to DVDirect. 2 Connect your video device to DVDirect with an AV, S-VIDEO or DV (i.LINK) cable (not supplied). To LINE OUT or OUTPUT on VCR, DVR, etc. S video cable* AV cable Yellow White - Sony VRDMC5 | Operating Instructions - Page 14
PC/PRINT 5 Turn on DVDirect. The display window turns on. Power button 6 Press the eject button, and insert a disc. A new blank disc will be formatted automatically. Wait until [Formatting the disc.] in the display window disappears, and DVDirect becomes ready for recording. Formatting the disc - Sony VRDMC5 | Operating Instructions - Page 15
the video playback is not displayed), press Mm to select the correct input. 8 Press (Record) on DVDirect. [Recording] appears in the display window and recording. (Record) lights up during Video DVD z HQ Record Recording 00:00:03 PAUSE STOP Note If you stop playback on the video device during - Sony VRDMC5 | Operating Instructions - Page 16
It may take a few minutes to finalize. To pause recording Press (Record). To resume recording, press (Record) again. To stop recording Press (Stop). To further record videos If you eject a disc without finalizing or DVD+RW disc after recording videos, you can add videos on the same disc later - Sony VRDMC5 | Operating Instructions - Page 17
(DV Full Dubbing) Note Before you start recording, change the [DV Full Dubbing setting] to [ON] in the Setup menu. ( page 33) 1 Connect the supplied power cord and AC adaptor to DVDirect. 2 Connect your digital video camera* to DVDirect with a DV (i.LINK) cable (not supplied). DV IN DV - Sony VRDMC5 | Operating Instructions - Page 18
to the start and played back automatically, and DVDirect starts recording. [Recording] appears in the display window, and (Record) lights up during recording. DV DVD z HQ Record Recording 00:00:03 PAUSE STOP (Record) turns off and recording is completed. DV DVD HQ Menu Remaining 00:12:34 REC - Sony VRDMC5 | Operating Instructions - Page 19
To pause recording Press (Record). To resume recording, press (Record) again. To stop recording Press (Stop). Note If the DV (i.LINK) cable is disconnected during the recording procedure, DVDirect can no longer detect signals from the video camera depending on the model. In this case, turn on the - Sony VRDMC5 | Operating Instructions - Page 20
when previewing the disc in this DVDirect. • You cannot output video images to external devices such as TV. • You cannot play back a disc recorded on a device other than DVDirect or commercial DVD software. 1 Turn on DVDirect. The display window turns on. Power button 2 Press < to display the main - Sony VRDMC5 | Operating Instructions - Page 21
title you want to view. To stop playback, press (Stop). Hints • For a DVD+RW disc, the video titles appear in the display window, as in the case of a finalized disc. • If you insert a formatted video DVD first, the Auto Setup function ( page 11) activates and the video titles will be played - Sony VRDMC5 | Operating Instructions - Page 22
stored the photos (JPEG file) taken by a digital camera. You can preview the photo backup DVD created by DVDirect with the display window of DVDirect or computer DVD drives. Slide show DVD ( pages 24, 36) DVD with a photo slide show stored the photos (JPEG file) taken by a digital camera and can be - Sony VRDMC5 | Operating Instructions - Page 23
Using DVDirect without a Computer Storage location of photos in the photo DVD The following shows the folders and files of photos in the photo DVD on the computer screen. All photos are stored in the folder 100VRDMC. Desktop My Documents My Computer WinXP-J(C:) WinXP-E(D:) VRD_MC1(E:) AUDIO_TS - Sony VRDMC5 | Operating Instructions - Page 24
Photo Recording 1 Connect the supplied power cord and AC adaptor to DVDirect. 2 Insert the memory card into its corresponding Memory Stick Duo" with a Memory Stick Duo adaptor into the multi memory card slot. 3 Set the mode switch on the left side of DVDirect to [STANDALONE]. STANDALONE PC/PRINT 24 - Sony VRDMC5 | Operating Instructions - Page 25
DVDirect. The display window turns on. Power button 5 Press the eject button, and insert a disc. A new blank disc is formatted automatically. Wait until [Formatting the disc.] in the display window disappears and the display window the photos. Display a photo to record and press (Select) to release - Sony VRDMC5 | Operating Instructions - Page 26
add photos from another memory card on the same disc. In this case, change the memory card, and if you press (Record) after the new photo is displayed in the display window, recording will start. 8 Press < to display the main menu, and then press the eject button to eject the disc. 9 The following - Sony VRDMC5 | Operating Instructions - Page 27
time to complete the disc according to the number and size of photos. (E.g. It may take about 10 to 15 minutes to record 100 photo files on DVD.) 11 DVDirect starts finalizing, or a slide show is created and finalizing starts. Finalizing... 12 When finalizing is completed, the disc is automatically - Sony VRDMC5 | Operating Instructions - Page 28
You can also print out photos in a photo DVD or memory card by connecting this DVDirect to a PictBridge-compatible printer. Note You cannot output the photo images to external devices, such as TV. 1 Turn on DVDirect. The display window turns on. Power button 2 Press < to display the main menu, and - Sony VRDMC5 | Operating Instructions - Page 29
Using DVDirect without a Computer 4 Press the eject button and insert a photo recorded disc, or insert a memory card. Eject button 5 Press Mm to scroll and view the photos, or display a photo to print. One photo is displayed in the display window at a time. DVD The selected disc or memory card - Sony VRDMC5 | Operating Instructions - Page 30
the operating instructions of your printer for setup details. (See connection with a PictBridge-compatible device.) 8 Press (Record). The following message appears. Connect printer and check switch on left of unit. Menu Select 9 Connect your printer to DVDirect with the supplied USB cable. 10 - Sony VRDMC5 | Operating Instructions - Page 31
scroll and display the desired photo to print, and then press (Record). Notes on viewing or printing photos • You cannot view or print photos from a photo DVD created by a device other than DVDirect, i.e., a computer created disc. • With DVDirect, you can view and print photos complied with the JPEG - Sony VRDMC5 | Operating Instructions - Page 32
the Setup menu screen. The following shows the procedure to display the Setup menu. 1 Turn on DVDirect. The display window turns on. 2 Press - Sony VRDMC5 | Operating Instructions - Page 33
point the tape in the digital video camera has been stopped. Rec Quality To create video DVD, you can select the recording quality. Rec Quality Default setting Picture quality Recording time (approx.) Single layer Double layer disc disc HQ High 1 hour 2 hours HSP R 1.5 hours 3 hours - Sony VRDMC5 | Operating Instructions - Page 34
sub-sections, called chapters. When you create a video DVD with DVDirect, a title is created between the points where you start and stop a recording. When you create a photo DVD (slide show DVD) with DVDirect, a chapter is created for 10 photos. Video DVD Start Rec. Title 1 Stop/Start Stop Rec - Sony VRDMC5 | Operating Instructions - Page 35
without a Computer Slide show BGM To create photo DVD (slide show DVD), you can select if you record a background music on the disc. Setting Default setting ON OFF Note Only one background music is pre-installed in DVDirect and cannot be changed. Color system Select the color system - Sony VRDMC5 | Operating Instructions - Page 36
disc that has not been finalized when ejecting. ( page 38) Hint When you use a DVD+RW disc, you do not need to finalize it. 1 Insert a disc to finalize, appears. Finalize disc Disc will be playable, but not recordable. Setup OK Cancel Select 3 Press Mm to select [OK], and press (Select). 36 - Sony VRDMC5 | Operating Instructions - Page 37
takes a few minutes to complete finalizing. • For a slide show DVD, it takes more time to complete the disc according to the number and size of photos. (E.g. It may take about 10 to 15 minutes to record 100 photo files on DVD.) 5 Finalizing is completed. Finalization successful. Menu . Continued 37 - Sony VRDMC5 | Operating Instructions - Page 38
What is "Finalize disc"? To finalize the disc means to make the created disc playable on other DVD devices. When ejecting a disc immediately after recording, DVDirect gives a message to ask if you wish to finalize the disc or not ( page 16). You can select to finalize the disc or not according - Sony VRDMC5 | Operating Instructions - Page 39
Using DVDirect without a Computer Erase disc Erase all data recorded in DVD+RW or DVD-RW. The erased disc is reusable as a blank disc. 1 Insert a disc to erase, press m to select [Erase disc], and press , or (Select). Setup Slide showBGM - Sony VRDMC5 | Operating Instructions - Page 40
completed, the disc can be ejected. Successfully erased. Menu System You can check the system software version of DVDirect. Press m to select [System], and press , or (Select) to display the version in the display window. Hint The system software is the built-in software that makes DVDirect work. 40 - Sony VRDMC5 | Operating Instructions - Page 41
as Windows 2000), Windows XP Home Edition or Windows XP Professional (referred to as Windows XP) ❑ Hi-Speed USB (USB2.0) port 1) The above requirements are the minimum necessary requirements to write to disc normally. Under actual operating conditions, the requirements imposed by your software must - Sony VRDMC5 | Operating Instructions - Page 42
Setting Up the Computer Installing the software 1 Insert the supplied software disc into a drive on the computer. The installer will start automatically. 2 Click [INSTALL SUITE] button to install the software. Click [INSTALL SUITE]. 3 After installation is completed, continue to install other - Sony VRDMC5 | Operating Instructions - Page 43
computer 1 Connect the supplied USB cable, the power cord, and the AC adaptor to DVDirect. Using DVDirect with a Computer DC 12V IN Power cord AC adaptor USB Cable 2 Set the mode switch on the left side of DVDirect to [PC/PRINT]. STANDALONE PC/PRINT 3 Turn on DVDirect. Power button 4 Turn on - Sony VRDMC5 | Operating Instructions - Page 44
data may be damaged. Be sure to perform the procedure above before disconnecting the USB cable. Using Memory Card slots If you insert a memory card into the memory card slot of DVDirect when you use DVDirect as an external DVD drive, you can use the memory card as a removable disc for the computer - Sony VRDMC5 | Operating Instructions - Page 45
up window. Click what you intend to use. Notes on using other software with DVDirect • Using software other than the bundled software (such as commercially available software, shareware, or freeware) to write data to disc with this DVDirect is not under warranty and Sony provides no customer service - Sony VRDMC5 | Operating Instructions - Page 46
software We recommend using DVDirect with the latest system software (or referred as firmware) as some problems encountered when using DVDirect can be solved simply by updating the system software. The system software updates are available on the user support • This function does not guarantee a 48× - Sony VRDMC5 | Operating Instructions - Page 47
following writable discs are compatible with DVDirect. Disc type Logo Using without computer Video DVD Photo DVD creation creation Using with computer Write Read/ Playback DVD+R DVD+R DL (Double layer) DVD+RW DVD+RW High speed DVD-R DVD-R DL (Dual layer) R DL DVD-RW CD-R CD-RW CD-RW - Sony VRDMC5 | Operating Instructions - Page 48
list of writable discs for which operation with this DVDirect has been guaranteed at the user support web site (see page 54 for details). Note You on a CD player unless it is designed to be CD-RW compatible. DVD+R, DVD-R, DVD+R DL and DVD-R DL discs Data can be written to this type of disc only once - Sony VRDMC5 | Operating Instructions - Page 49
finalized with the DVDirect can be played back on almost all DVD drives. However depending on the combination of the type of your player/drive and the disc, playback/reading may not be supported or may not be possible. In addition, some drives do not support multi-session/multi-border DVD-ROM discs - Sony VRDMC5 | Operating Instructions - Page 50
. Because the drive plays back discs as determined by software manufacturers, some drive functions may not always perform as expected. When playing back DVD-Video, refer to the documentation accompanying each disc. About copy protected DVDs Most DVD-Video discs on the market are protected against - Sony VRDMC5 | Operating Instructions - Page 51
a*1 *1 Read/write of data that requires MagicGate functions cannot be performed with DVDirect. Note When formatting a "Memory Stick," use the format function of your digital camera. You can also use "Memory Stick Formatter" in the supplied software disc. To install the "Memory Stick Formatter" into - Sony VRDMC5 | Operating Instructions - Page 52
record, xD-Picture Cards With the multi memory card slot of DVDirect, you can use "Memory Stick," supported. Notes on use • You cannot use CompactFlash Cards with a power specification of 3V (3.3V or less) only. Do not insert other types of CompactFlash Card into the DVDirect's insertion slot. DVDirect - Sony VRDMC5 | Operating Instructions - Page 53
. If the temperature changes suddenly while using DVDirect, stop using it, but keep the power on for at least an hour. Handling discs • Handle discs only by the edges. Never touch the recording surface. • Do not affix labels on discs. • To protect important data, always keep discs in their cases - Sony VRDMC5 | Operating Instructions - Page 54
about the software supplied with DVDirect • Latest system software (firmware) • Frequently asked questions • Troubleshooting guide • Guaranteed compatible computers • Guaranteed compatible discs • Operating instructions • Others Accessing the user support web site Sony Storage Support web sites - Sony VRDMC5 | Operating Instructions - Page 55
Audio encoding Dolby Digital (2ch) Supported photo file (photo backup) JPEG, DCF2.0 compliant Printing PictBridge compliant, printer connection via USB port DVD/CD rewritable drive Maximum write speed* / Recordable discs DVD+R DL 8x, DVD+R 16x, DVD+RW 8x, DVD-R DL 4x, DVD-R 16x, DVD-RW 6x, CD-R 48x - Sony VRDMC5 | Operating Instructions - Page 56
Sony Corporation Printed in China
-
 1
1 -
 2
2 -
 3
3 -
 4
4 -
 5
5 -
 6
6 -
 7
7 -
8
-
9
-
10
-
11
-
12
-
13
-
14
-
15
-
16
-
17
-
18
-
19
-
20
-
21
-
22
-
23
-
24
-
25
-
26
-
27
-
28
-
29
-
30
-
31
-
32
-
33
-
34
-
35
-
36
-
37
-
38
-
39
-
40
-
41
-
42
-
43
-
44
-
45
-
46
-
47
-
48
-
49
-
50
-
51
-
52
-
53
-
54
-
55
-
56
 |
 |
Operating Instructions
© 2005 Sony Corporation
2-661-941-
02
(1)
7819901257B
IT
JP
FR
DE
ES
IT
CS
Video Recordable
DVD Drive
VRD-MC1