Sony XAV-AX8500 Operating Instructions
Sony XAV-AX8500 Manual
 |
View all Sony XAV-AX8500 manuals
Add to My Manuals
Save this manual to your list of manuals |
Sony XAV-AX8500 manual content summary:
- Sony XAV-AX8500 | Operating Instructions - Page 1
l'affichage de démonstration (Mode démo), reportez-vous à la page 6. Para cancelar la pantalla de demostración (Modo de prueba), consulte la página 6. Operating Instructions EN Mode d'emploi FR Manual de instrucciones ES XAV-AX8500(UC) https://rd1.sony.net/help/ev/xav-ax8500/h_zz/ XAV-AX8500 - Sony XAV-AX8500 | Operating Instructions - Page 2
and used in accordance with the instructions, may cause harmful interference to radio or modifications not expressly approved in this manual could void your authority to operate this equipment https://www.sony.com/electronics/support Contact: Sony Customer Information Service Center at 1-800-222 - Sony XAV-AX8500 | Operating Instructions - Page 3
communicating using BLUETOOTH wireless technology. • We do not take any responsibility for the leakage of information during BLUETOOTH communication. If you have any questions or problems concerning your unit that are not covered in this manual, consult your nearest Sony dealer. 3EN - Sony XAV-AX8500 | Operating Instructions - Page 4
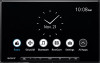
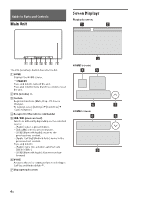
Guide to Parts and Controls Main Unit Screen Displays Playback screen: Ǵ ǵ Ƕ HOME1 screen: The VOL (volume) + button has a tactile dot. HOME Displays the HOME screen. Ƿ Ǹ STANDBY - Sony XAV-AX8500 | Operating Instructions - Page 5
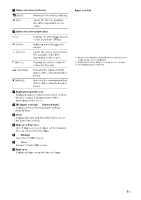
Status indication (left side) (back) (list) Returns to the previous display. Opens the list. The available lists differ depending on the source. Status indication (right side) Clock Displays the time which was set on the Date/Time setting. (mute) Lights up when the sound is muted. ( - Sony XAV-AX8500 | Operating Instructions - Page 6
3 To exit the setup menu, touch twice. (back) Updating the Firmware To update the firmware, visit the support site, then follow the online instructions. URL: https://www.sony.com/am/support To update the firmware with USB tethering mode When using the smartphone with tethering function, you can - Sony XAV-AX8500 | Operating Instructions - Page 7
wireless performance. • Check the Apple CarPlay website for supported iOS versions. Update to the latest iOS version before use. If you have any questions or problems concerning your unit that are not covered in this Operating Instructions, consult your nearest Sony dealer. Specifications FOR THE - Sony XAV-AX8500 | Operating Instructions - Page 8
Wi-Fi section Compatible standards: IEEE802.11 a/n/ac Radio frequency: 5 GHz band (5.725 GHz - 5.850 GHz) Output power: Max. conducted 16 dBm Frequency Tolerance: 20 ppm Power amplifier section Outputs: Speaker outputs Speaker impedance: 4 Ω - 8 Ω Maximum power output: 55 W × 4 (at 4 Ω) General - Sony XAV-AX8500 | Operating Instructions - Page 9
display may come loose. Periodically tighten these screws. • Do not make any changes or modifications to the unit other than those described in this manual. Note on the power supply lead (yellow) When connecting this unit in combination with other stereo components, the amperage rating of the car - Sony XAV-AX8500 | Operating Instructions - Page 10
Ensuring the mounting location of the unit Before installing the unit, consult the installer for details on the installation of the unit and the display. • Make sure that the distance from the front surface (reference surface) of the mounted unit to the surface of your car's center cluster is within - Sony XAV-AX8500 | Operating Instructions - Page 11
Parts List for Installation Power supply leads (1) Connection cables (Audio/Camera) (1) Mounting screw (5 × max. 9 mm (7/32 × max. 3/8 in)) (4) Microphone (1) Flat-mount base (1) Double-sided tape (1) USB Type-C extension cable (1) Cable for steering wheel remote input (RC- - Sony XAV-AX8500 | Operating Instructions - Page 12
Connection • To prevent short circuits, insulate leads with a cover or tape. • Note that the unit may be damaged if it is connected incorrectly or by short circuits at the leads. Blue Red Black FUSE 10A White White/black striped Gray Gray/black striped Green Green/black striped Purple - Sony XAV-AX8500 | Operating Instructions - Page 13
how to install the SiriusXM Connect Vehicle Tuner, consult the installation guide supplied with the tuner. *11 When connecting the iDataLink Maestro power antenna (aerial) or antenna (aerial) booster, or with a manually-operated telescopic antenna (aerial). To AMP REMOTE IN of an optional power - Sony XAV-AX8500 | Operating Instructions - Page 14
Camera Connection Installation of cameras (not supplied) is required before use. Connect the camera power cord (lead) to the accessory power terminal. When connecting the iDataLink Maestro module (not supplied) and you are using the Backup Camera Dynamic Guidelines function, adjust the guideline. - Sony XAV-AX8500 | Operating Instructions - Page 15
to install the GPS antenna (aerial) , bend the metal plate to fit a curved surface before installing. Black Green Brown • Refer to the support site for details, then connect each lead properly to the appropriate leads. Making an improper connection may damage the unit. URL: https://www - Sony XAV-AX8500 | Operating Instructions - Page 16
Using a USB device and/or an HDMI device Installation of the USB Type-C extension cable and/or an HDMI cable (HDMI Type-D or MicroHDMI) (not supplied) is required before mounting the unit in the dashboard. 1 Connect the USB Type-C extension cable to the USB port and/or an HDMI cable (not - Sony XAV-AX8500 | Operating Instructions - Page 17
Setting up the display The mounting positions of the display can be adjusted. Depth (within 20 mm (13/16 in), in 3 steps) Height (within 60 mm (2 3/8 in), in 7 steps) Angle (tilt) (-15° to +15°, continuously) Angle (swivel) (-15° to +15°, continuously) 2 Slide the connector bracket to decide - Sony XAV-AX8500 | Operating Instructions - Page 18
2 Adjust the mounting position of the screw located where the line () on the swivel cover is closest to the ground and oriented horizontally. ɸ Note Install the pre-installed screws in the correct positions. Installing the screws in incorrect positions will cause the display to rotate diagonally - Sony XAV-AX8500 | Operating Instructions - Page 19
3 At the desired position, tighten the 4 screws firmly to secure the connector bracket. 2 Slide the connector bracket to the left or right to decide the appropriate position. Adjustable width: within 25 mm (1 in) (), in 5 steps, in 12.5 mm (1/2 in) pitch (). ɸ ɹɹ ɸ ɹɹ Tighten the screws firmly - Sony XAV-AX8500 | Operating Instructions - Page 20
4 Turn the unit over, tighten the 1 screw firmly to secure the connector bracket. Attaching the display to the unit Be careful not to pinch your fingers or scratch the center cluster panel of your car when attaching the display to the unit. 1 Attach the display to the unit. Note Be sure to - Sony XAV-AX8500 | Operating Instructions - Page 21
much torque as doing so may damage the screw (the torque value should be from 1.5 N•m to 2.0 N•m). 4 Attach the rear panel covers along the guides for protection. • Do not adjust the display angle while driving. • Adjust the display angle so that the display does not obstruct moving parts of - Sony XAV-AX8500 | Operating Instructions - Page 22
or notices on the SOFTWARE. You may not share, distribute, rent, lease, sublicense, assign, transfer or sell the SOFTWARE. The software, network services or other products other than SOFTWARE upon which the SOFTWARE'S performance depends might be interrupted or discontinued at the discretion of the - Sony XAV-AX8500 | Operating Instructions - Page 23
ONE OR MORE CONTENT SERVICES ("CONTENT SERVICE"). USE OF THE SERVICE AND THAT CONTENT IS SUBJECT TO THE TERMS OF SERVICE OF THAT CONTENT SERVICE. IF YOU DECLINE navigation or communication systems, air traffic control, direct life support machines, or weapons systems, in which the failure of - Sony XAV-AX8500 | Operating Instructions - Page 24
THE SOFTWARE PROVE DEFECTIVE YOU ASSUME THE ENTIRE COST OF ALL NECESSARY SERVICING, REPAIR OR CORRECTION. SOME JURISDICTIONS DO NOT ALLOW THE EXCLUSION OF or concerning the validity of intellectual property rights. ARBITRATION INSTRUCTIONS (ONLY FOR UNITED STATES RESIDENTS) To begin arbitration, - Sony XAV-AX8500 | Operating Instructions - Page 25
ATTORNEY GENERAL ACTION, UNLESS ALL PARTIES INVOLVED IN THE DISPUTE SPECIFICALLY AGREE TO DO SO IN WRITING FOLLOWING INITIATION OF THE ARBITRATION. OPT-OUT INSTRUCTIONS (ONLY FOR UNITED STATES RESIDENTS) IF YOU DO NOT WISH TO BE BOUND BY THE BINDING ARBITRATION PROVISION AND/OR THE CLASS ACTION - Sony XAV-AX8500 | Operating Instructions - Page 26
UPGRADES/UPDATES OR BY ANY OTHER LEGALLY RECOGNIZABLE FORM OF NOTICE. If you do not agree to the amendment, you should promptly contact SONY for instructions. Your continued use of the SOFTWARE after the effective date of any such notice shall be deemed your agreement to be bound by such amendment - Sony XAV-AX8500 | Operating Instructions - Page 27
- Sony XAV-AX8500 | Operating Instructions - Page 28
des tiers Les services proposés par des tiers peuvent être modifiés, suspendus ou clôturés sans avis préalable. Sony n'assume aucune responsabilité dans ce genre de situation. À propos de la mise à jour des fonctions de l'appareil Pour les dernières fonctions, rapportez-vous au « Guide d'aide » sur - Sony XAV-AX8500 | Operating Instructions - Page 29
BLUETOOTH dans les endroits suivants. - endroits où du gaz inflammable est présent, dans un hôpital, un train, un avion ou une station-service - à proximité de portes automatiques ou d'un avertisseur d'incendie • Cet appareil prend en charge les capacités de sécurité conformes à la norme BLUETOOTH - Sony XAV-AX8500 | Operating Instructions - Page 30
Guide des pièces et commandes Appareil Principal Affichages à l'écran Écran de lecture : Ǵ ǵ Ƕ Écran HOME1 : La touche VOL (volume) + comporte un point tactile. Ƿ Ǹ HOME Permet d'afficher l'é - Sony XAV-AX8500 | Operating Instructions - Page 31
Indication d'état (côté gauche) (retour) (liste) Permet de revenir à l'affichage précédent. Permet d'ouvrir la liste. Les listes disponibles diffèrent selon la source. Indication d'état (côté droit) Horloge (sourdine) (option) Permet d'afficher l'heure réglée dans le réglage Date/Heure. S' - Sony XAV-AX8500 | Operating Instructions - Page 32
(retour). Mise à jour du micrologiciel Pour mettre à jour le micrologiciel, visitez le site d'assistance, puis suivez les instructions en ligne. URL: https://www.sony.com/am/support Pour mettre à jour le micrologiciel avec le mode modem USB Lors de l'utilisation d'un téléphone intelligent muni d'une - Sony XAV-AX8500 | Operating Instructions - Page 33
Informations complémentaires Précautions Note concernant la sécurité Respectez les règles, lois et règlements de conduite locaux. À propos du iPhone • Modèles iPhone compatibles : iPhone SE (3e génération), iPhone 13 Pro Max, iPhone 13 Pro, iPhone 13, iPhone 13 mini, iPhone 12 Pro Max, iPhone 12 Pro - Sony XAV-AX8500 | Operating Instructions - Page 34
Section Wi-Fi Normes compatibles : IEEE802.11 a/n/ac Fréquence radio : Bande 5 GHz (5,725 GHz à 5,850 GHz) Puissance de sortie : 16 dBm par conduction max. Tolérance de fréquence : 20 ppm Amplificateur de puissance Sorties : Sorties de haut-parleurs Impédance des haut-parleurs : 4 Ω à 8 Ω Puissance - Sony XAV-AX8500 | Operating Instructions - Page 35
à ne pas faire tomber l'écran pendant l'installation. • Lors de l'installation, veillez à ne pas vous couper les doigts avec les parties métalliques des supports et de la base de montage. • Ne vous coincez pas les doigts lorsque vous fixez l'écran à l'appareil. • N'installez pas l'appareil dans une - Sony XAV-AX8500 | Operating Instructions - Page 36
Choix de l'emplacement de montage de l'appareil Avant d'installer l'appareil, consultez l'installateur pour plus de détails sur l'installation de l'appareil et l'affichage. • Assurez-vous que la distance entre la surface avant (surface de référence) de l'appareil monté et la surface de console - Sony XAV-AX8500 | Operating Instructions - Page 37
Liste des pièces nécessaires à l'installation Câbles d'alimentation (1) Câbles de raccordement (Audio/Caméra) (1) Vis de montage (5 × max. 9 mm (7/32 × max. 3/8 po)) (4) Microphone (1) Base d'installation plate (1) Adhésif double face (1) Câble d'extension USB Type-C Câble - Sony XAV-AX8500 | Operating Instructions - Page 38
Raccordement • Pour éviter de causer un court-circuit, isolez les câbles avec un recouvrement ou du ruban. • Veuillez noter que l'appareil pourrait être endommagé s'il est raccordé incorrectement ou en cas de court-circuit au niveau des câbles. Bleu Rouge Noir FUSE 10A Blanc Rayé blanc/ - Sony XAV-AX8500 | Operating Instructions - Page 39
Installation du microphone » (page 14). *10 Pour plus d'informations sur la manière d'installer le récepteur SiriusXM Connect Voiture, consultez le guide d'installation fourni avec le récepteur. *11 Lors du raccordement du module iDataLink Maestro (non fourni), ne raccordez aucun appareil à la borne - Sony XAV-AX8500 | Operating Instructions - Page 40
Raccordement de la caméra L'installation des caméras (non fournies) est requise avant l'utilisation. Raccordez le cordon (câble) d'alimentation de caméra à la borne d'alimentation d'accessoire. Lors du branchement du module iDataLink Maestro (non fourni) en utilisant la fonction Caméra de recul avec - Sony XAV-AX8500 | Operating Instructions - Page 41
de détails, puis raccordez chaque câble correctement aux câbles adéquats. Un raccordement incorrect pourrait endommager l'appareil. URL: https://www.sony.com/am/support • Il est recommandé de consulter le détaillant ou un technicien spécialisé pour obtenir de l'aide. • Lors du raccordement du module - Sony XAV-AX8500 | Operating Instructions - Page 42
port USB et/ou un câble HDMI (non fourni) au terminal HDMI sur le panneau arrière de l'appareil. 2 Passez l'attache de câble à travers le support de câble, puis fixez l'attache de câble autour du câble d'extension USB Type-C et/ou d'un câble HDMI (non fourni). Le câble d'extension USB Type - Sony XAV-AX8500 | Operating Instructions - Page 43
Position vers l'extérieur 2 : Position intermédiaire 3 : Position vers l'intérieur 3 Dans la position souhaitée, serrez fermement les 3 vis pour fixer le support de connecteur. Largeur (dans les 25 mm (1 po), en 5 étapes) Réglage de la profondeur de la position de l'affichage 1 Desserrez les 3 vis - Sony XAV-AX8500 | Operating Instructions - Page 44
de l'affichage 1 Retirez les 4 vis pré-installées pour le réglage en hauteur (des deux côtés). 2-A 3-B 4-C 1-A Vis pré-installées 2 Faites glisser le support de connecteur vers le haut ou vers le bas afin de déterminer la position en hauteur appropriée. Hauteur réglable : dans les 60 mm - Sony XAV-AX8500 | Operating Instructions - Page 45
pas se déplacer vers la gauche ou vers la droite. 3 Dans la position souhaitée, serrez fermement les 2 vis sur le dessus afin de fixer le support de connecteur. Vis installée Serrez fermement les vis. Lorsque vous serrez une vis, veillez à ne pas appliquer une trop grande force, car cela pourrait - Sony XAV-AX8500 | Operating Instructions - Page 46
ou à ne pas égratigner le panneau central de votre voiture lorsque vous fixez l'écran sur l'appareil. 1 Fixez temporairement l'écran à l'appareil. Assurez-vous que les supports de connecteur de l'écran sont complètement insérés dans l'appareil. 2 Serrez les 4 vis (sur le dessus) pour fixer le - Sony XAV-AX8500 | Operating Instructions - Page 47
pourrait endommager la vis (le couple de serrage doit être de 1,5 N•m à 2,0 N•m). 4 Fixez les pièces de couvre panneau arrière le long des guides pour fournir une protection. Remarques • Assurez-vous d'utiliser les vis spécifiées. • Si l'écran semble trembler, serrez les vis de temps en temps - Sony XAV-AX8500 | Operating Instructions - Page 48
le LOGICIEL. Vous n'êtes pas autorisé à partager, distribuer, louer, céder en sous-licence, céder, transférer ou vendre le LOGICIEL. Le logiciel, les services de réseau ou les autres produits autres que le LOGICIEL, dont dépend la performance du LOGICIEL, pourront être interrompus ou abandonnés à la - Sony XAV-AX8500 | Operating Instructions - Page 49
votre demande de permettre la restauration des données et la résiliation du présent CLUF, en cas de votre utilisation illégitime du LOGICIEL. SERVICE DE CONTENU VEUILLEZ ÉGALEMENT NOTER QUE LE LOGICIEL PEUT ÊTRE CONÇU POUR ÊTRE UTILISÉ AVEC LE CONTENU DISPONIBLE PAR L'INTERMÉDIAIRE D'UN OU DE - Sony XAV-AX8500 | Operating Instructions - Page 50
ÉS, (C) QUE LE LOGICIEL N'ENDOMMAGERA PAS N'IMPORTE QUEL AUTRE LOGICIEL OU MATÉRIEL OU N'IMPORTE QUELLES DONNÉES, (D) QUE TOUT LOGICIEL, SERVICE DE RÉSEAU (Y COMPRIS INTERNET) OU PRODUITS (AUTRES QUE LE LOGICIEL) DONT DÉPEND LA PERFORMANCE DU LOGICIEL CONTINUERONT À ÊTRE DISPONIBLES, ININTERROMPUS - Sony XAV-AX8500 | Operating Instructions - Page 51
vous résidez aux États-Unis, l'arbitrage sera administré par les JAMS (services d'arbitrage judiciaire et de médiation) et les arbitres devront être choisis conformé , vous devrez rapidement communiquer avec SONY pour obtenir des instructions. La poursuite de l'utilisation du LOGICIEL après la - Sony XAV-AX8500 | Operating Instructions - Page 52
accéder à l'URL, puis sélectionnez le modèle « XAV-AX8500 ». Vous pouvez obtenir le code source, tel que requis par la GPLv2, sur un support physique pour une période de trois ans après notre dernière livraison de ce produit en faisant la demande à l'aide du formulaire à l'adresse http://www. - Sony XAV-AX8500 | Operating Instructions - Page 53
- Sony XAV-AX8500 | Operating Instructions - Page 54
Advertencia Para mayor seguridad, asegúrese de instalar esta unidad en el panel del auto ya que la parte trasera de la unidad se calienta durante el uso. Para obtener más información, consulte "Conexión/instalación" (página 9). La placa de características que indica el voltaje de funcionamiento, etc - Sony XAV-AX8500 | Operating Instructions - Page 55
CON O COMO CONSECUENCIA DEL USO DE ESTE PRODUCTO, SU HARDWARE O SU SOFTWARE. Estimado cliente, este producto incluye un transmisor de radio. Consulte el manual de instrucciones del vehículo o póngase en contacto con el fabricante del mismo o su concesionario antes de instalar el producto en su veh - Sony XAV-AX8500 | Operating Instructions - Page 56
Guía para las partes y los controles Unidad principal Visualizaciones en pantalla Pantalla de reproducción: Ǵ ǵ Ƕ Pantalla HOME1: El botón VOL (volumen) + tiene un punto táctil. HOME Muestra la pantalla HOME. Ƿ Ǹ STANDBY Manténgalo presionado para apagar la unidad. Manténgalo - Sony XAV-AX8500 | Operating Instructions - Page 57
Indicación de estado (lado izquierdo) (atrás) (lista) Vuelve a la pantalla anterior. Abre la lista. Las listas disponibles difieren según la fuente. Indicación de estado (lado derecho) Reloj Muestra la hora establecida en los ajustes Fecha/Hora. (mudo) Se enciende cuando se silencia el - Sony XAV-AX8500 | Operating Instructions - Page 58
ón del firmware Para actualizar el sistema, visite el sitio web de soporte técnico y luego siga las instrucciones en línea. URL: https://www.sony.com/am/support Para actualizar el sistema con el modo módem USB Cuando se usa el smartphone con la función módem, puede actualizar el sistema con el modo - Sony XAV-AX8500 | Operating Instructions - Page 59
de iOS antes de usarlo. Si desea realizar alguna consulta o solucionar algún problema con respecto a la unidad que no se traten en este manual de instrucciones, póngase en contacto con el distribuidor Sony más cercano. Especificaciones Sección del monitor Tipo de pantalla: monitor color LCD ancho - Sony XAV-AX8500 | Operating Instructions - Page 60
Sección Wi-Fi Estándares compatibles: IEEE802.11 a/n/ac Frecuencia de radio: Banda de 5 GHz (5,725 GHz a 5,850 GHz) Potencia de salida: Máx. 16 dBm conducida Tolerancia de frecuencia: 20 ppm Sección del amplificador de corriente Salidas: salidas de altavoz Impedancia del altavoz: 4 Ω - 8 Ω Salida de - Sony XAV-AX8500 | Operating Instructions - Page 61
. Apriete estos tornillos de forma periódica. • No realice cambios ni modificaciones en la unidad diferentes a los que se describen en este manual. Nota sobre el cable del sistema de alimentación (amarillo) Cuando conecte esta unidad junto con otros componentes estéreo, la capacidad nominal de - Sony XAV-AX8500 | Operating Instructions - Page 62
Asegurar la ubicación de montaje de la unidad Antes de instalar la unidad, consulte al instalador para obtener detalles sobre la instalación de la unidad y la pantalla. • Asegúrese de que la distancia de la superficie frontal (superficie de referencia) de la unidad montada a la superficie del panel - Sony XAV-AX8500 | Operating Instructions - Page 63
Lista de piezas para la instalación Cables de alimentación (1) Cables de conexión (Sonido/Cámara) (1) Tornillo para el montaje (5 × máx. 9 mm) (4) Micrófono (1) Base plana para montaje (1) Cinta adhesiva de doble cara (1) Cable extensor de USB Type-C Cable para entrada remota - Sony XAV-AX8500 | Operating Instructions - Page 64
Conexión • Aísle los cables con una cubierta o cinta para evitar cortocircuitos. • Tenga presente que la unidad puede dañarse si se conecta incorrectamente o los cables se cortocircuitan. Azul Rojo Negro 12ES FUSE 10A Blanco Blanco/negro a rayas Gris Gris/negro a rayas Verde Verde/negro - Sony XAV-AX8500 | Operating Instructions - Page 65
*1 No suministrado *2 Impedancia del altavoz: 4 Ω a 8 Ω × 4 *3 Cable con clavija RCA (no suministrado) *4 Amplificador de potencia (no suministrado) *5 Altavoz potenciador de graves (no suministrado) *6 Según el tipo de automóvil, utilice un adaptador para un control remoto del volante (no - Sony XAV-AX8500 | Operating Instructions - Page 66
Conexión de la cámara Se requiere la instalación de las cámaras (no suministradas) antes de su uso. Conecte el cable de alimentación de la cámara (cable) a la terminal de potencia de accesorios. Cuando conecte el módulo iDataLink Maestro (no suministrado) y utilice la función de Guías activas de cá - Sony XAV-AX8500 | Operating Instructions - Page 67
adecuadamente cada cable con los cables correspondientes. Una conexión incorrecta puede dañar la unidad. URL: https://www.sony.com/am/support • Se recomienda consultar con el vendedor o un técnico experimentado para obtener ayuda. • Cuando conecte el módulo iDataLink Maestro (no suministrado), no - Sony XAV-AX8500 | Operating Instructions - Page 68
Usar un dispositivo USB y/o un dispositivo HDMI Se requiere la instalación del cable extensor de USB Type-C y/o de un cable HDMI (HDMI Type-D o Micro-HDMI) (no suministrado) antes de montar la unidad en el tablero. 1 Conecte el cable extensor de USB Type-C al puerto USB y/o un cable HDMI (no - Sony XAV-AX8500 | Operating Instructions - Page 69
Configuración de la pantalla Las posiciones de montaje de la pantalla pueden ajustarse. 2 Deslice el soporte del conector para determinar la posición de profundidad adecuada. Profundidad ajustable: inferior a 20 mm (), en tres pasos, en 10 mm de cabeceo (). ɸ 321 Profundidad (inferior a 20 mm - Sony XAV-AX8500 | Operating Instructions - Page 70
2 Ajuste la posición de montaje del tornillo ubicado en el lugar en que la línea () de la tapa de giro está más cercana a la tierra y orientada en sentido horizontal. ɸ Nota Coloque los tornillos instalados previamente en las posiciones correctas. Si los tornillos se instalan en posiciones - Sony XAV-AX8500 | Operating Instructions - Page 71
3 En la posición deseada, apriete los cuatro tornillos firmemente para fijar el soporte del conector. 2 Deslice el soporte del conector hacia la izquierda o derecha para determinar la posición adecuada. Ancho ajustable: dentro de los 25 mm (), en 5 pasos, en 12,5 mm de cabeceo (). ɸ ɹɹ ɸ ɹɹ - Sony XAV-AX8500 | Operating Instructions - Page 72
4 Gire la unidad, apriete el tornillo firmemente para fijar el soporte del conector. Conexión de la pantalla a la unidad Procure no pellizcarse los dedos ni arañar el panel central de medidores de su automóvil cuando conecte la pantalla a la unidad. 1 Conecte la pantalla a la unidad. Nota Asegú - Sony XAV-AX8500 | Operating Instructions - Page 73
3 Deslice el cubrejuntas hacia fuera para proteger la base de montaje de la pantalla y luego apriete el tornillo de fijación para asegurar la cubierta. Cubrejuntas Ajustar el ángulo de giro e inclinación de la pantalla Una vez instalada la pantalla, tome la pantalla por las partes - Sony XAV-AX8500 | Operating Instructions - Page 74
Acerca de la licencia CONTRATO DE LICENCIA DE USUARIO FINAL IMPORTANTE: LEA ATENTAMENTE EL PRESENTE CONTRATO DE LICENCIA DE USUARIO FINAL (END USER LICENSE AGREEMENT-"EULA") ANTES DE UTILIZAR EL SOFTWARE. AL UTILIZARLO, ESTARÁ ACEPTANDO LOS TÉRMINOS Y CONDICIONES DEL EULA. SINO ACEPTA LOS TÉRMINOS Y - Sony XAV-AX8500 | Operating Instructions - Page 75
formato de código fuente. Cuando dicha divulgación sea obligatoria, deberá visitar la página oss.sony.net/Products/Linux o cualquier otra página web que SONY determine para consultar la lista de COMPONENTES DE CÓDIGO ABIERTO incluidos en el SOFTWARE en cada momento, así como los términos y - Sony XAV-AX8500 | Operating Instructions - Page 76
exclusivamente y que Usted será el responsable de su uso. El SOFTWARE se proporciona en su CONDICIÓN ACTUAL ("AS IS"), sin garantías, obligaciones o condiciones de ningún tipo. SONY Y TODOS Y CADA UNO DE LOS TERCEROS PROVEEDORES (a los efectos de esta Cláusula, SONY y los TERCEROS PROVEEDORES se - Sony XAV-AX8500 | Operating Instructions - Page 77
equidad o extraordinarios que considere necesarias o convenientes en tales circunstancias. Asimismo, SONY podrá adoptar las medidas legales y técnicas que se precisen para evitar cualquier contravención de este EULA y/o velar por su cumplimiento incluyendo, sin limitación alguna, el cese inmediato - Sony XAV-AX8500 | Operating Instructions - Page 78
- Sony XAV-AX8500 | Operating Instructions - Page 79
- Sony XAV-AX8500 | Operating Instructions - Page 80
If you have any questions/problems regarding this product, try the following: 1 Read Troubleshooting in Help Guide (online manual). 2 Please contact (U.S.A. only); Call 1-800-222-7669 URL https://www.SONY.com ©2023 Sony Corporation Printed in Thailand https://www.sony.net/
-
 1
1 -
 2
2 -
 3
3 -
 4
4 -
 5
5 -
 6
6 -
 7
7 -
8
-
9
-
10
-
11
-
12
-
13
-
14
-
15
-
16
-
17
-
18
-
19
-
20
-
21
-
22
-
23
-
24
-
25
-
26
-
27
-
28
-
29
-
30
-
31
-
32
-
33
-
34
-
35
-
36
-
37
-
38
-
39
-
40
-
41
-
42
-
43
-
44
-
45
-
46
-
47
-
48
-
49
-
50
-
51
-
52
-
53
-
54
-
55
-
56
-
57
-
58
-
59
-
60
-
61
-
62
-
63
-
64
-
65
-
66
-
67
-
68
-
69
-
70
-
71
-
72
-
73
-
74
-
75
-
76
-
77
-
78
-
79
-
80
 |
 |

XAV-AX8500
5-050-132-
11
(1)
XAV-AX8500(UC)
AV RECEIVER
Owner’s Record
The model and serial numbers are located on the bottom of the
unit.
Record the serial number in the space provided below.
Refer to these numbers whenever you call upon your Sony dealer
regarding this product.
Model No. XAV-AX8500
Serial No.
Operating Instructions
EN
Mode d’emploi
FR
Manual de instrucciones
ES
To cancel the demonstration (Demo Mode) display, see
page 6.
Pour annuler l’affichage de démonstration (Mode démo),
reportez-vous à la page 6.
Para cancelar la pantalla de demostración (Modo de prueba),
consulte la página 6.