TEAC TA-TS30UN Owners Manual - Page 5
Notes about record styluses, Balancing the tone arm and adjusting, the stylus pressure
 |
View all TEAC TA-TS30UN manuals
Add to My Manuals
Save this manual to your list of manuals |
Page 5 highlights
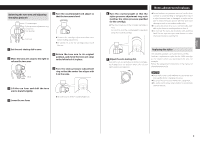
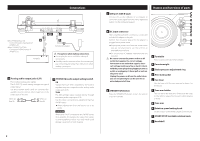
ENGLISH TING NG NG NG NG NG Balancing the tone arm and adjusting the stylus pressure 5 Turn the counterweight and adjust so that the tone arm is level. Counterweight Stylus pressure adjustment ring Center line TI-SKATI Anti-skating TI-SKATI AN 0 3 AN 0 3 Cue lever 1 Set the anti-skating dial to zero. 2 Move the tone arm clasp to the right to release the tone arm. ooRemove the cartridge stylus protection cover before making adjustments. ooBe careful not to let the cartridge stylus touch the unit. 6 Return the tone arm to its original position, and move the tone arm clasp to the left to lock it in place. AN 0 3 TI-SKATI Clasp 7 Turn the stylus pressure adjustment ring so that the center line aligns with 0 on the scale. 3 Lift the cue lever and shift the tone arm to the left slightly. 4 Lower the cue lever. AN 0 3 TI-SKATI ooBe careful not to let the counterweight turn. 8 Turn the counterweight so that the stylus pressure adjustment ring scale matches the stylus pressure specified for the cartridge. ooThe stylus pressure of the included cartridge is 2.0 g. So, turn it to 2 on the counterweight scale when using the included cartridge. Notes about record styluses ooRecord styluses are precision parts, so handle them carefully to avoid bending or damaging their tips. If a stylus becomes bent or damaged, it might not be able to follow the audio groove precisely and could damage records or cause other malfunction. ooIf a stylus becomes dirty, use a commercially available stylus cleaner or similar product to clean it. ooDo not rub the stylus tip forcefully with anything hard. Do not wipe the stylus with thinner or other chemicals. Doing so could harm it. AN 0 3 TI-SKATI 9 Adjust the anti-skating dial. Start with it set at 2 and adjust it during record playback (page 8) to the position where the left and right volumes are balanced. Replacing the stylus The included cartridge is an Audio-Technica AT95E. Purchase a replacement stylus for the AT95E cartridge at the retailer where you purchased this unit, for example. Follow the replacement instructions in the manual of the replacement stylus. A 3 NTI-SKA 0 CAUTION ooSince loud noises could suddenly occur, put the unit into standby before changing the stylus. ooBe careful not to hurt your hand or the equipment. ooBe careful not to allow small children to accidentally swallow styluses. 5
-
 1
1 -
 2
2 -
 3
3 -
 4
4 -
 5
5 -
 6
6 -
 7
7 -
 8
8 -
 9
9 -
 10
10 -
 11
11 -
12
-
13
-
14
-
15
-
16
-
17
-
18
-
19
-
20
-
21
-
22
-
23
-
24
-
25
-
26
-
27
-
28
-
29
-
30
-
31
-
32
-
33
-
34
-
35
-
36
-
37
-
38
-
39
-
40
-
41
-
42
-
43
-
44
-
45
-
46
-
47
-
48
-
49
-
50
-
51
-
52
-
53
-
54
-
55
-
56
-
57
-
58
-
59
-
60
 |
 |
