TP-Link TD-W8961ND User Guide - Page 32
Current Pool Summary
 |
View all TP-Link TD-W8961ND manuals
Add to My Manuals
Save this manual to your list of manuals |
Page 32 highlights
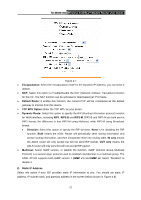
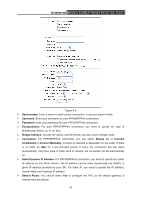
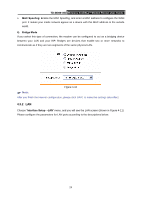
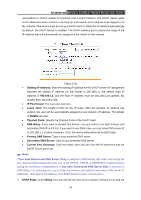
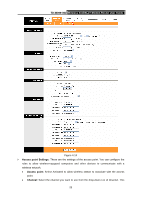
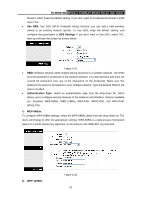
TD-W8961ND Wireless N ADSL2+ Modem Router User Guide connected to it. DHCP stands for Dynamic Host Control Protocol. The DHCP Server gives out IP addresses when a device is booting up and request an IP address to be logged on to the network. That device must be set as a DHCP client to obtain the IP address automatically. By default, the DHCP Server is enabled. The DHCP address pool contains the range of the IP address that will automatically be assigned to the clients on the network. Figure 4-12 • Starting IP Address: Enter the starting IP address for the DHCP server's IP assignment. Because the default IP address for the Router is 192.168.1.1, the default Start IP Address is 192.168.1.2, and the Start IP Address must be 192.168.1.2or greater, but smaller than 192.168.1.254. • IP Pool Count: The max user pool size. • Lease Time: The length of time for the IP lease. After the dynamic IP address has expired, the user will be automatically assigned a new dynamic IP address. The default is 259200 seconds. • Physical Ports: Specify the Physical Ports of the DHCP client. • DNS Relay: If you want to disable this feature, you just need to set both Primary and secondary DNS IP to 0.0.0.0. If you want to use DNS relay, you can setup DNS server IP to 192.168.1.1 on their Computer. If not, the device will perform as no DNS relay. • Primary DNS Server: Type in your preferred DNS server. • Secondary DNS Server: Type in your preferred DNS server. • Current Pool Summary: Click the button, then you can view the IP addresses that the DHCP Server gives out. ) Note: If Use Auto Discovered DNS Server Only is selected in DNS Relay, this router will accept the first received DNS assignment from one of the PPPoA, PPPoE or MER/DHCP enabled PVC(s) during the connection establishment. If Use User Discovered DNS Server Only is selected in DNS Relay, it is necessary for you to enter the primary and optional secondary DNS server IP addresses. After type in the address, click SAVE button to save it and invoke it. ¾ DHCP Relay: Select Relay, then you will see the next screen (shown in Figure 4-13), and the 26
-
 1
1 -
2
-
3
-
4
-
5
-
6
-
7
-
8
-
9
-
10
-
11
-
12
-
13
-
14
-
15
-
16
-
17
-
18
-
19
-
20
-
21
-
22
-
23
-
24
-
25
-
26
-
 27
27 -
 28
28 -
 29
29 -
 30
30 -
 31
31 -
 32
32 -
 33
33 -
 34
34 -
 35
35 -
 36
36 -
 37
37 -
38
-
39
-
40
-
41
-
42
-
43
-
44
-
45
-
46
-
47
-
48
-
49
-
50
-
51
-
52
-
53
-
54
-
55
-
56
-
57
-
58
-
59
-
60
-
61
-
62
-
63
-
64
-
65
-
66
-
67
-
68
-
69
-
70
-
71
 |
 |