TP-Link TL-WR1043ND User Guide - Page 55
TL-WR1043N/TL-WR1043ND, Capacity, Permissions, Shared, Start, Eject Disk, Rescan, User Accounts - driver
 |
UPC - 845973051389
View all TP-Link TL-WR1043ND manuals
Add to My Manuals
Save this manual to your list of manuals |
Page 55 highlights
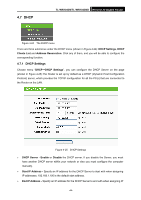
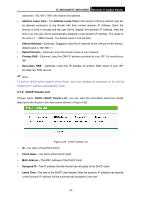
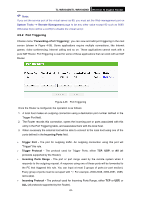
TL-WR1043N/TL-WR1043ND Wireless N Gigabit Router ¾ Capacity - The storage capacity of the USB driver. ¾ Used - The used space of the USB driver. ¾ Free - The available space of the USB driver. ¾ Use% - The percentage of the used space. ¾ Permissions - Read-Only or Read/Write access to the volume designated as the share. ¾ Shared - Indicates the shared or non-shared status of the volume. Click the Start button to start the Network Sharing service. Click the Stop button to stop the Network Sharing service. Click the Eject Disk button to safely remove the USB storage device that is connected to USB port. This takes the drive offline. A message will appear on your web browser when it is safe to detach the USB disk. Click the Rescan button to start a new scan. Follow the instructions below to set up your Router as a file server: 1. Plug an external USB hard disk drive or USB flash drive into this Router. 2. Click the Rescan button to find the USB drive that has been attached to the Router. 3. To specify a volume that the Network Sharing users can access, click the Edit link in the Properties column and configure the share settings in figure 4-31. 4. Set the Network Sharing user's username and password on User Accounts page. 5. Click the Start button to start the Network Sharing service. 6. Now the Network Sharing users inside your local network can access files on the USB drive from Internet Explorer at its Share Name followed by the Router's LAN IP address, for example: \\192.168.1.1\MyShare. ) Note: Figure 4-31 Sharing Settings 1. The Router cannot automatically locate new USB drive. You have to click the Rescan button manually to display a list of volumes and information about them. 2. The new settings will not take effect until you restart the service. -48-
-
 1
1 -
2
-
3
-
4
-
5
-
6
-
7
-
8
-
9
-
10
-
11
-
12
-
13
-
14
-
15
-
16
-
17
-
18
-
19
-
20
-
21
-
22
-
23
-
24
-
25
-
26
-
27
-
28
-
29
-
30
-
31
-
32
-
33
-
34
-
35
-
36
-
37
-
38
-
39
-
40
-
41
-
42
-
43
-
44
-
45
-
46
-
47
-
48
-
49
-
 50
50 -
 51
51 -
 52
52 -
 53
53 -
 54
54 -
 55
55 -
 56
56 -
 57
57 -
 58
58 -
 59
59 -
 60
60 -
61
-
62
-
63
-
64
-
65
-
66
-
67
-
68
-
69
-
70
-
71
-
72
-
73
-
74
-
75
-
76
-
77
-
78
-
79
-
80
-
81
-
82
-
83
-
84
-
85
-
86
-
87
-
88
-
89
-
90
-
91
-
92
-
93
-
94
-
95
-
96
-
97
-
98
-
99
-
100
-
101
-
102
-
103
-
104
-
105
-
106
-
107
-
108
-
109
 |
 |