Toshiba 2455 S305 Satellite 2455-S305/S306 User's Guide (PDF) - Page 69
Connecting an optional Slim SelectBay module
 |
View all Toshiba 2455 S305 manuals
Add to My Manuals
Save this manual to your list of manuals |
Page 69 highlights
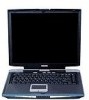
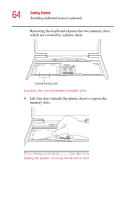
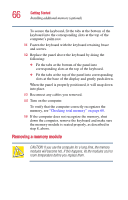
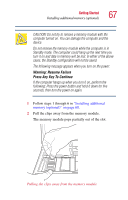
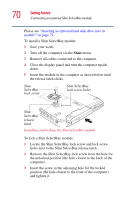
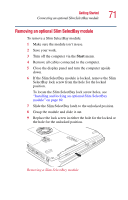
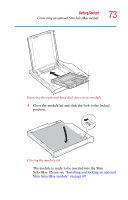
Getting Started Connecting an optional Slim SelectBay module 69 3 Click System. 4 The General tab view automatically appears and shows the recognized memory. 5 If the computer does not recognize the memory configuration, turn off the computer, remove the keyboard and make sure the memory module is seated properly, as described in "Installing additional memory (optional)" on page 60. Connecting an optional Slim SelectBay module Your computer has a Slim SelectBay, in which you can connect optional modules with a variety of functions: ❖ An optional DVD-ROM or multi-function drive ❖ An optional hard disk drive Hot swapping an optional Slim SelectBay module One of the great things about optional Slim SelectBay modules is that you can replace one module with another while the computer is on. This is called "hot swapping." Stop the module by clicking the Safely Remove Hardware icon on the System tray. After the module is stopped, it is safe to remove. NOTE: To hot swap optional Slim SelectBay modules, make sure the Slim SelectBay is not locked with the lock screw. Installing and locking an optional Slim SelectBay module To install a module with an optional hard disk drive, you must first add the optional hard disk drive to the module.
-
 1
1 -
2
-
3
-
4
-
5
-
6
-
7
-
8
-
9
-
10
-
11
-
12
-
13
-
14
-
15
-
16
-
17
-
18
-
19
-
20
-
21
-
22
-
23
-
24
-
25
-
26
-
27
-
28
-
29
-
30
-
31
-
32
-
33
-
34
-
35
-
36
-
37
-
38
-
39
-
40
-
41
-
42
-
43
-
44
-
45
-
46
-
47
-
48
-
49
-
50
-
51
-
52
-
53
-
54
-
55
-
56
-
57
-
58
-
59
-
60
-
61
-
62
-
63
-
 64
64 -
 65
65 -
 66
66 -
 67
67 -
 68
68 -
 69
69 -
 70
70 -
 71
71 -
 72
72 -
 73
73 -
 74
74 -
75
-
76
-
77
-
78
-
79
-
80
-
81
-
82
-
83
-
84
-
85
-
86
-
87
-
88
-
89
-
90
-
91
-
92
-
93
-
94
-
95
-
96
-
97
-
98
-
99
-
100
-
101
-
102
-
103
-
104
-
105
-
106
-
107
-
108
-
109
-
110
-
111
-
112
-
113
-
114
-
115
-
116
-
117
-
118
-
119
-
120
-
121
-
122
-
123
-
124
-
125
-
126
-
127
-
128
-
129
-
130
-
131
-
132
-
133
-
134
-
135
-
136
-
137
-
138
-
139
-
140
-
141
-
142
-
143
-
144
-
145
-
146
-
147
-
148
-
149
-
150
-
151
-
152
-
153
-
154
-
155
-
156
-
157
-
158
-
159
-
160
-
161
-
162
-
163
-
164
-
165
-
166
-
167
-
168
-
169
-
170
-
171
-
172
-
173
-
174
-
175
-
176
-
177
-
178
-
179
-
180
-
181
-
182
-
183
-
184
-
185
-
186
-
187
-
188
-
189
-
190
-
191
-
192
-
193
-
194
-
195
-
196
-
197
-
198
-
199
-
200
-
201
-
202
-
203
-
204
-
205
-
206
-
207
-
208
-
209
-
210
-
211
-
212
-
213
-
214
-
215
-
216
-
217
-
218
-
219
-
220
-
221
-
222
-
223
-
224
-
225
-
226
-
227
-
228
-
229
-
230
-
231
-
232
-
233
-
234
-
235
-
236
-
237
-
238
-
239
-
240
-
241
-
242
-
243
-
244
-
245
-
246
-
247
-
248
-
249
-
250
-
251
-
252
-
253
-
254
-
255
-
256
-
257
-
258
-
259
-
260
-
261
-
262
-
263
-
264
-
265
-
266
-
267
-
268
-
269
-
270
-
271
-
272
-
273
-
274
-
275
-
276
-
277
-
278
-
279
-
280
-
281
-
282
-
283
-
284
-
285
-
286
-
287
-
288
-
289
-
290
-
291
-
292
-
293
-
294
-
295
 |
 |