Toshiba 32WL66 Owners Manual - Page 20
Picture controls
 |
View all Toshiba 32WL66 manuals
Add to My Manuals
Save this manual to your list of manuals |
Page 20 highlights
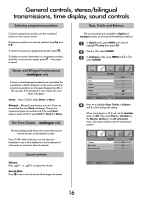
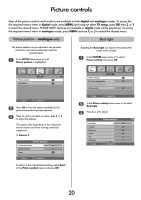
Picture controls Most of the picture controls and functions are available in both digital and analogue modes. To access the the required menus when in digital mode: press MENU and using Q select TV setup, press OK then S or R to select the desired menu. PLEASE NOTE: features not available in digital mode will be greyed out. To access the required menus when in analogue mode: press MENU and use S or R to select the desired menu. Picture position - analogue only Back light The picture position may be adjusted to suit personal preference and can be particularly useful for external inputs. 1 In the SET UP menu press Q until Picture position is highlighted. Adjusting the Back light can improve the clarity of the screen when viewing. 1 In the PICTURE menu press Q to select Picture settings, then press OK. Picture position Quick Setup SET UP 2/2 OK OK MENU Back EXIT Watch TV 2 Press OK to view the options available for the picture format that has been selected. 3 Press P and Q to select an option, then S or R to adjust the settings. The options alter depending on the widescreen format chosen and when viewing connected equipment. In Cinema 2: Picture position Horizontal position 0 Vertical position 0 Reset OK MENU Back EXIT Watch TV To return to the original factory settings select Reset in the Picture position menu and press OK. PICTURE Picture settings OK 3D Colour management Off Base colour adjustment Cinema mode Off MENU Back EXIT Watch TV 2 In the Picture settings menu press Q to select Back light. 3 Press S or R to adjust. Back light Contrast Brightness Colour Tint Sharpness MENU Back Picture settings 1/2 100 100 50 50 0 0 EXIT Watch TV 20
-
 1
1 -
2
-
3
-
4
-
5
-
6
-
7
-
8
-
9
-
10
-
11
-
12
-
13
-
14
-
 15
15 -
 16
16 -
 17
17 -
 18
18 -
 19
19 -
 20
20 -
 21
21 -
 22
22 -
 23
23 -
 24
24 -
 25
25 -
26
-
27
-
28
-
29
-
30
-
31
-
32
-
33
-
34
-
35
-
36
-
37
-
38
-
39
-
40
 |
 |