Toshiba 39L22U User's Guide for Model 39L22U - Page 28
To view the HDMI, device video, HDMI 1, INPUT, To connect a DVI device, you will need
 |
View all Toshiba 39L22U manuals
Add to My Manuals
Save this manual to your list of manuals |
Page 28 highlights
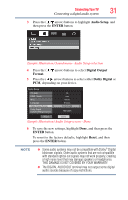
28 Connecting Your TV Connecting an HDMI® or DVI device to the HDMI® input To view the HDMI® device video: Select HDMI 1 or HDMI 2 video input source on the TV. (Press the INPUT button on the remote control. For more information, see "Selecting the video input source" on page 54.) To connect a DVI device, you will need: ❖ HDMI® to DVI adapter cable For proper operation, the length of an HDMI® to DVI adapter cable should not exceed 9.8 ft (3m). The recommended length is 6.6 ft (2m). ❖ 3.5mm Stereo to RCA Y-cable An HDMI® to DVI adapter cable transfers video only. Separate analog audio cables are required (see illustration). For more information, see "Setting the HDMI® audio mode" on page 50. VIDEO AUDIO L R IN IN DVI / HDCP OUT OUT L R (Sample Illustration) Connecting a DVI device NOTE To ensure that the HDMI® or DVI device is reset properly: ❖ When turning on your electronic components, turn on the TV first, and then the HDMI® or DVI device. ❖ When turning off your electronic components, turn off the HDMI® or DVI device first, and then the TV. NOTE EIA/CEA-861-D compliance covers the transmission of uncompressed digital video with high-bandwidth digital content protection, which is being standardized for reception of high-definition video signals. Because this is an evolving technology, it is possible that some devices may not operate properly with the TV.
-
 1
1 -
2
-
3
-
4
-
5
-
6
-
7
-
8
-
9
-
10
-
11
-
12
-
13
-
14
-
15
-
16
-
17
-
18
-
19
-
20
-
21
-
22
-
 23
23 -
 24
24 -
 25
25 -
 26
26 -
 27
27 -
 28
28 -
 29
29 -
 30
30 -
 31
31 -
 32
32 -
 33
33 -
34
-
35
-
36
-
37
-
38
-
39
-
40
-
41
-
42
-
43
-
44
-
45
-
46
-
47
-
48
-
49
-
50
-
51
-
52
-
53
-
54
-
55
-
56
-
57
-
58
-
59
-
60
-
61
-
62
-
63
-
64
-
65
-
66
-
67
-
68
-
69
-
70
-
71
-
72
-
73
-
74
-
75
-
76
-
77
-
78
-
79
-
80
-
81
-
82
-
83
-
84
-
85
-
86
-
87
-
88
-
89
-
90
-
91
-
92
-
93
-
94
-
95
-
96
-
97
-
98
-
99
-
100
-
101
-
102
-
103
-
104
-
105
-
106
-
107
-
108
-
109
-
110
-
111
-
112
-
113
-
114
-
115
-
116
-
117
-
118
-
119
-
120
-
121
-
122
-
123
-
124
-
125
-
126
-
127
-
128
-
129
-
130
-
131
 |
 |
