Toshiba 65H83 User Manual - Page 48
Selecting/Labeling Video Input Sources, VIDEO 3, ColorStream HD1, DVI, or ANT 2
 |
View all Toshiba 65H83 manuals
Add to My Manuals
Save this manual to your list of manuals |
Page 48 highlights
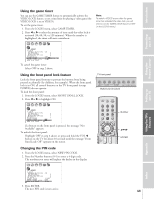
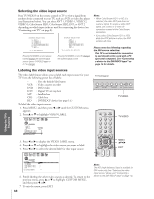
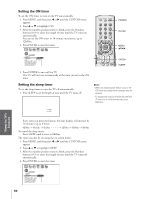
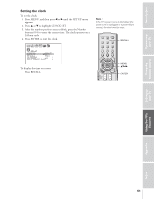
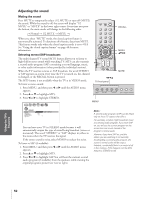
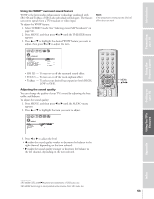
Introduction Connecting your TV Selecting the video input source Press TV/VIDEO on the remote control or TV to view a signal from another device connected to your TV, such as a VCR or video disc player (see illustrations below). You can select ANT 1, VIDEO 1, VIDEO 2, VIDEO 3, ColorStream HD1, ColorStream HD2, DVI, or ANT 2 depending on which input jacks are used for connecting the devices (see "Connecting your TV" on page 8). SOURCE SELECT I ON 0 : ANT 1 1 : V I DEO 1 2 : V I DEO 2 3 : V I DEO 3 4 : Co l o r S t r e am HD1 5 : Co l o r S t r e am HD2 6 : DVI 7 : ANT 2 0- 7 : TO SELECT Pressing TV/VIDEO on the remote control displays the current signal source (press TV/VIDEO again or 0-7 to change) SOURCE SELECT I ON ANT 1 V I DEO 1 V I DEO 2 V I DEO 3 Co l o r S t r e am HD1 Co l o r S t r e am HD2 DVI ANT 2 TV / V I DEO : TO SELECT Pressing TV/VIDEO on the TV changes the current signal source Note: • When ColorStream HD 1 or HD 2 is selected, the video OUT jack does not output a signal. To receive a video OUT signal, use a video or S-video IN connection instead of the ColorStream connection. • If you select ColorStream HD1 or HD2 while the POP picture is active, the POP window will close. Please note the following regarding the DVI source selection: This TV is not intended for connection to and should not be used with a PC (personal computer). See "Connecting a device to the DVI/HDCP input" on page 14 for details. Using the Remote Control Setting up your TV Labeling the video input sources The video label feature allows you to label each input source for your TV from the following preset list of labels: - VCR DVD DTV SAT CBL HD : Uses the default label name : Video cassette recorder : DVD video : Digital TV set-top box : Satellite box : Cable box : DVI/HDCP device (see page 14.) To label the video input sources: 1. Press MENU, and then press x or • until the CUSTOM menu appears. 2. Press y or z to highlight VIDEO LABEL. CUSTOM T I MER ON SLEEP CC C2 FAVOR I TE CH1 FAVOR I TE CH2 CH L A B E L I NG V I DEO L A B E L BACKGROUND 00h00m 0h00m OFF TV front panel MENU VOLUME CHANNEL EXIT TV/VIDEO TouchFocus TV/VIDEO TV/VIDEO RECALL POWER INFO 123 456 78 +10 100 0 MENU FAV 9 CHRTN ENT GUID TV/VIDEO Using the TV's Features FAVOTRIOTPE E PIC SIZE ENTEERNT Appendix 3. Press x or • to display the VIDEO LABEL menu. 4. Press y or z to highlight the video source you want to label. 5. Press x or • to select the desired label for that input source. 1 2 3 4 5 6 7 8 9 10 11 12 13 14 15 16 17 18 19 20 21 22 23 24 25 26 27 28 29 30 31 32 33 34 35 1 1 2 2 3 3 4 4 5 5 6 6 7 CUSTOM 7 8 9 V I DEO LABEL 10 V I DEO1 11 V I DEO2 12 V I DEO3 13 Color Stream HD1 14 Color Stream HD2 15 DVI 8 9 -VCR / DVD / DTV / SAT / CBL 10 - 11 - 12 - 13 - 14 - 15 16 16 17 CUSTOM MENU 17 18 18 1 2 3 4 5 6 7 8 9 10 11 12 13 14 15 16 17 18 19 20 21 22 23 24 25 26 27 28 29 30 31 32 33 34 35 6. Finish labeling the other video sources as desired. To return to the previous menu, press y or z to highlight CUSTOM MENU, and then press x or •. 7. To exit the menu, press EXIT. 48 MENU DVDMENU MENU yzx • ER FAV CLE TV CBL/SAT CH VCR DVD VOL POP DIRECT CH MUTE SLEEP EXIT AR EXIT TV/VCR PAUSE STOP PLAY Note: FREEZE SOURCE SPLIT REW FF SKIP / SEARCH The HD CHSCAN (hSWiAgP h-dePOfPiCnHition) label is available for REC LIGHT DVI mode only (see "Selecting the video input source" above, and "Connecting a device to the DVI/HDCP input" on page 14). Index
-
 1
1 -
2
-
3
-
4
-
5
-
6
-
7
-
8
-
9
-
10
-
11
-
12
-
13
-
14
-
15
-
16
-
17
-
18
-
19
-
20
-
21
-
22
-
23
-
24
-
25
-
26
-
27
-
28
-
29
-
30
-
31
-
32
-
33
-
34
-
35
-
36
-
37
-
38
-
39
-
40
-
41
-
42
-
 43
43 -
 44
44 -
 45
45 -
 46
46 -
 47
47 -
 48
48 -
 49
49 -
 50
50 -
 51
51 -
 52
52 -
 53
53 -
54
-
55
-
56
-
57
-
58
-
59
-
60
-
61
-
62
-
63
 |
 |
