Toshiba BDX3000 Owners Manual - Page 26
Using an SD Card
 |
View all Toshiba BDX3000 manuals
Add to My Manuals
Save this manual to your list of manuals |
Page 26 highlights
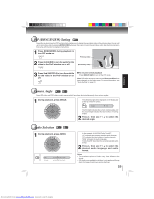
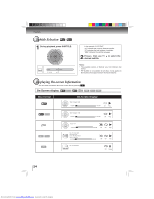
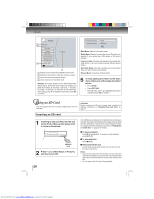
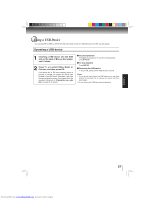
Playback Pictures 1 Optical Disc 2 30 item(s) Main Menu Settings Media Menu Start Slide Show Browse Music Now Playing 3 File: 13/30 Thumbnail 4 1 : displays source (Optical Disc/USB/SD) device name. 2 : defines the total number of files that a device contains. 3 : shows the currently playing file number. 4 : shows all pictures in thumbnail mode. Settings: This option enables you to define Slide Show Effects (None, Horizontal Scroll, Fade and Shutter) and Slide Show Delay (5 Seconds, 2 Seconds, 1 Seconds, No Delay, 10 Seconds, 15 Seconds and 30 Seconds). After setting, press to highlight Ok and then press OK to confirm. Slide Show Effects Slide Show Delay None No Delay Ok Main Menu: Returns to the main menu. Media Menu: Returns to select the source. This item only appears if your optical disc, USB device or SD card is inserted. Previous Folder: This item only appears if your optical disc, USB device or SD card contains several different picture folders. Start Slide Show: This option enables you to view picture (files) one after another automatically. Browse Music: Goes back to Music folder. 5 To stop playing and return to the main menu, follow one of the steps described below: • Press STOP. • Press RETURN. • Press , then use / to highlight Main Menu and then press OK to confirm. Using an SD Card This unit supports the use of a Secure Digital (SD) card (not included). CAUTION: Before inserting the SD card, please read carefully the relevant information on "Playable Discs and Files" on page 17. Inserting an SD card 1 Inserting an SD card fully into the slot on the front of Blu-ray disc player until it clicks as illustrated. SD/SDHC Card 2 Press / to select Music or Pictures, and then press OK. 26 If no USB device or optical disc containing music or pictures is inserted, the system will directly load the data on the inserted SD card. Otherwise, it will enter the source selection screen. If so, please follow the operation instructions in "Playing files on a data disc" on page 25 for details. To pause playback Press during playback. To resume normal playback, press PLAY. To stop playback Press STOP. Removing the SD card In stop mode, gently push the SD card into the slot and then pull it out slowly. Notes: • If you cannot easily insert the memory card, you may have inserted it incorrectly.Try to turnover the card and then insert again. Do not force the memory card into the memory card slot. • Do not remove the SD card during playback. Downloaded from www.Manualslib.com manuals search engine
-
 1
1 -
2
-
3
-
4
-
5
-
6
-
7
-
8
-
9
-
10
-
11
-
12
-
13
-
14
-
15
-
16
-
17
-
18
-
19
-
20
-
 21
21 -
 22
22 -
 23
23 -
 24
24 -
 25
25 -
 26
26 -
 27
27 -
 28
28 -
 29
29 -
 30
30 -
 31
31 -
32
-
33
-
34
-
35
-
36
-
37
-
38
-
39
-
40
-
41
-
42
-
43
-
44
-
45
-
46
-
47
-
48
-
49
-
50
-
51
-
52
-
53
-
54
-
55
-
56
-
57
-
58
-
59
-
60
-
61
-
62
-
63
-
64
 |
 |
