Toshiba SD-V290 Owners Manual - Page 40
Reference, Troubleshooting, Symptom, Cause, Correction - dvd problem
 |
View all Toshiba SD-V290 manuals
Add to My Manuals
Save this manual to your list of manuals |
Page 40 highlights
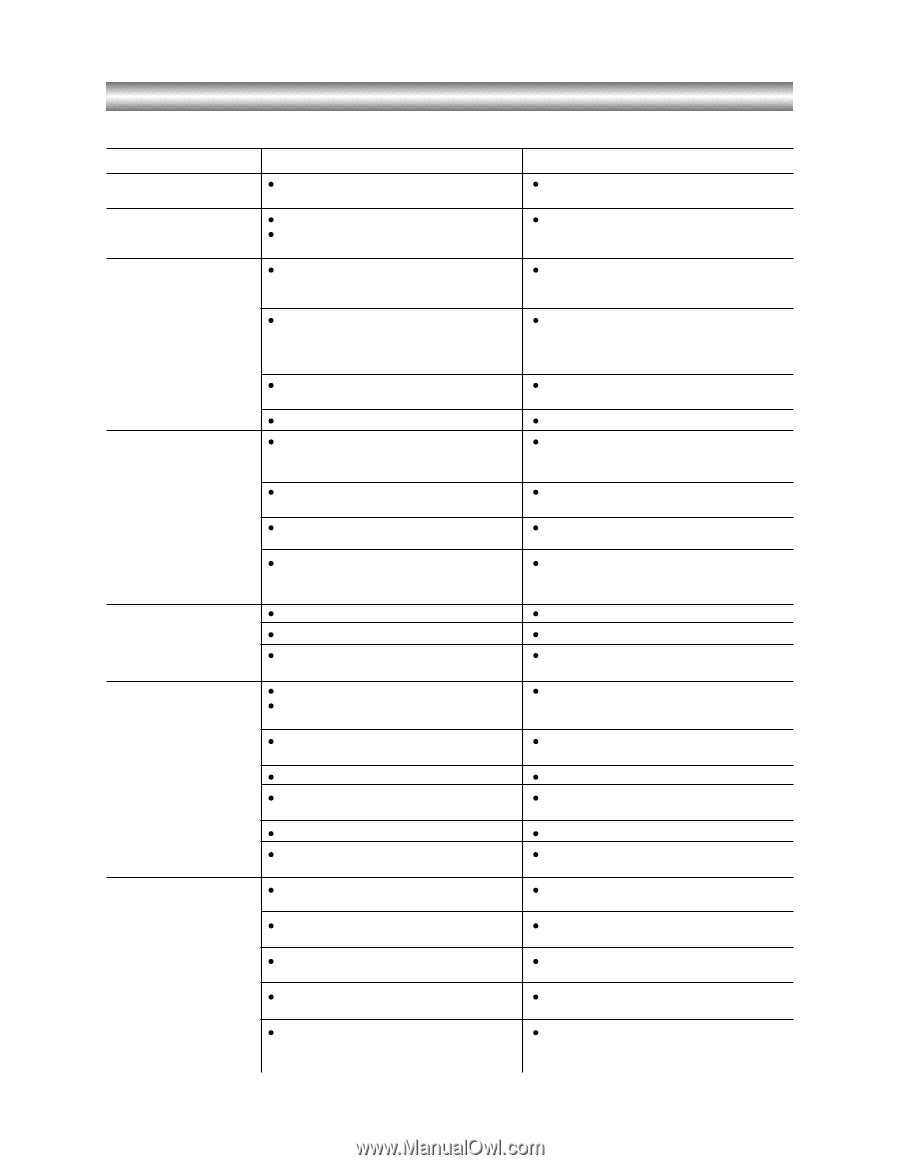
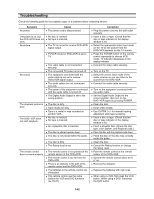
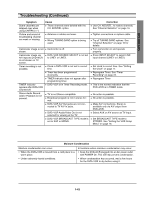
Troubleshooting Check the following guide for the possible cause of a problem before contacting service. Symptom No power. Cause z The power cord is disconnected. The power is on, but z No disc is inserted. the DVD+VCR does not z No tape is inserted. work. No picture. z The TV is not set to receive DVD+VCR signal output. z TV/VCR mode for DVD+VCR is set to TV. No sound. z The video cable is not connected securely. z The connected TV power is turned off. z The equipment connected with the audio cable is not set to receive DVD+VCR signal output. z The audio cables are not connected securely. z The power of the equipment connected with the audio cable is turned off. z The Digital Audio Output is set to the wrong position. The playback picture is poor. The DVD+VCR does not start playback. z The disc is dirty. z Tape heads are dirty. z Tape is a rental or was recorded on another VCR. z No disc is inserted. z No tape is inserted. z An unplayable disc is inserted. z The disc is placed upside down. z The disc is not placed within the guide. z The disc is dirty. z The Rating level is set. The remote control does not work properly. z The remote control is not pointed at the remote sensor of the DVD+VCR. z The remote control is too far from the DVD+VCR. z There is an obstacle in the path of the remote control and the DVD+VCR. z The batteries in the remote control are exhausted. z This remote control use the same buttons for VCR and DVD functions (ex. PLAY). Correction z Plug the power cord into the wall outlet securely. z Insert a disc or tape. (Check that the disc or tape indicator in the display window is lit.) z Select the appropriate video input mode on the TV so the picture from the DVD+VCR appears on the TV screen. z Press the TV/VCR button on the remote control repeatedly to choose VCR mode. TV indicator disappears in the display window. z Connect the video cable securely. z Turn on the TV. z Select the correct input mode of the audio receiver so you can listen to the sound from the DVD+VCR. z Connect the audio cable securely. z Turn on the equipment connected with the audio cable. z Set the Digital Audio Output to the correct position, then turn on the DVD+VCR again by pressing POWER. z Clean the disc. z Clean video heads. z Use CH/TRK (+/-) for manual tracking adjustment while tape is playing. z Insert a disc or tape. (Check that the disc or tape indicator in the display window is lit.) z Insert a playable disc. (Check the disc type, color system, and Regional code.) z Place the disc with the playback side down. z Place the disc on the disc tray correctly inside the guide. z Clean the disc. z Cancel the Rating function or change the rating level. z Point the remote control at the remote sensor of the DVD+VCR. z Operate the remote control within 23 ft (7 m). z Remove the obstacle. z Replace the batteries with new ones. z When using a VCR, first press the VCR button. When using a DVD, first press the DVD button. 1-42
-
 1
1 -
2
-
3
-
4
-
5
-
6
-
7
-
8
-
9
-
10
-
11
-
12
-
13
-
14
-
15
-
16
-
17
-
18
-
19
-
20
-
21
-
22
-
23
-
24
-
25
-
26
-
27
-
28
-
29
-
30
-
31
-
32
-
33
-
34
-
 35
35 -
 36
36 -
 37
37 -
 38
38 -
 39
39 -
 40
40 -
 41
41 -
 42
42 -
 43
43 -
 44
44 -
 45
45 -
46
 |
 |