Troy-Bilt CSV 060 Operation Manual - Page 7
Assembly & Set-Up - bag
 |
View all Troy-Bilt CSV 060 manuals
Add to My Manuals
Save this manual to your list of manuals |
Page 7 highlights
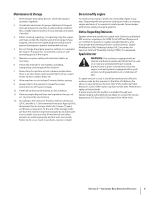
Assembly & Set-Up 3 Contents of Carton • One Chipper/Shredder Vacuum • One Upper and Lower Handle • One Bag • One Operator's Manual • One Hose Assembly • One Bottle of Oil • One Engine Operator's Manual • One Safety Glasses • One Hose Extension Assembly 2. Unfold the upper handle until it aligns with lower handle. Make sure the rope guide is on the right side of upper NOTE: This unit is shipped without gasoline or oil in the engine. handle. See Fig. 3-2A. Fill up gasoline and oil as instructed in the accompanying engine manual BEFORE operating your chipper shredder vacuum. Handle 1. Remove the hairpin clips from the handle brackets and the carriage screws and wing nuts from the lower handle. a. Place the bottom holes in lower handle over the pins on the handle brackets with notch in handle pointing downwards and secure with hairpin clips. B See Fig. 3-1. A B A Figure 3-2 3. Secure the two handles by tightening the star knobs (carriage bolts must be seated properly into the handle). See Fig. 3-2B. Figure 3-1 b. Insert carriage screws through upper hole in lower handle from the inside and secure with wing nuts. See Fig. 3-1. 7
-
 1
1 -
 2
2 -
 3
3 -
 4
4 -
 5
5 -
 6
6 -
 7
7 -
 8
8 -
 9
9 -
 10
10 -
 11
11 -
 12
12 -
13
-
14
-
15
-
16
-
17
-
18
-
19
-
20
-
21
-
22
-
23
-
24
-
25
-
26
-
27
-
28
-
29
-
30
-
31
-
32
-
33
-
34
-
35
-
36
-
37
-
38
-
39
-
40
 |
 |
