ViewSonic VA1912W Service Manual - Page 20
Adjustment Procedure - reset
 |
UPC - 766907167313
View all ViewSonic VA1912W manuals
Add to My Manuals
Save this manual to your list of manuals |
Page 20 highlights
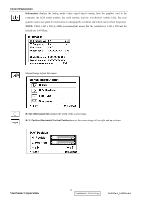
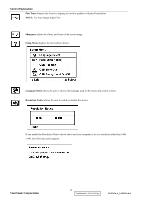
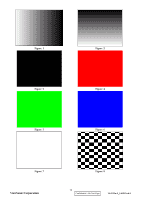
5. Adjustment Procedure A. Function Test and Alignment Procedure 1. All Modes Reset You should do "All Model Reset" (Refer to Chap 3. Hot Keys for Function Controls) first. This action will allow you to erase all end-user's settings and restore the factory defaults. 2. Auto Image Adjust The Auto Adjust is aimed to offer a best screen quality by built-in ASIC. For optimum screen quality, the user has to adjust each function manually. A.Turn the computer and LCD monitor on. B. Press the 'Auto' button on monitor keypad to Auto Adjust. C. The LCD monitor will start the Auto Adjust process automatically and run for 10 consecutive seconds, during which time you will notice the image change. 3. Firmware Test Patten: Burn in Model (Refer to Chap3. Hot Keys for Function Control) -Make sure the F/W is the latest version. 4. DCC Test Patten: EDID program -Make sure it can pass test program. 5. Window Shut Down Test Signal: 1280*1024@60Hz Test Pattern: Checkered Pattern Every One Pixel (50%Green & 50%Blue) Inspection Item: Flicker, Mura 6. Window BG Test Signal: 1280*1024@60Hz Test Pattern: Window standard pattern Inspection Item: Line Defect, Function Defect & Mura 7. 25 Gray Test Signal: 1280*1024@60Hz Test Pattern: Full Screen 25% White (Gray) Inspection Item: Particle, Line Defect & Mura 8. 50 Gray Test Signal: 1280*1024@60Hz Test Pattern: Full Screen 50% White (Gray) Inspection Item: Bright Dot, Particle, Line Defect & Mura 9. White Box Test Signal: 1280*1024@60Hz Test Pattern: Window standard pattern Inspection Item: Particle, Line Defect, Power, Image Remain & Mura ViewSonic Corporation 17 Confidential - Do Not Copy VA1912w-2_VA1912wb-2
-
 1
1 -
2
-
3
-
4
-
5
-
6
-
7
-
8
-
9
-
10
-
11
-
12
-
13
-
14
-
 15
15 -
 16
16 -
 17
17 -
 18
18 -
 19
19 -
 20
20 -
 21
21 -
 22
22 -
 23
23 -
 24
24 -
 25
25 -
26
-
27
-
28
-
29
-
30
-
31
-
32
-
33
-
34
-
35
-
36
-
37
-
38
-
39
-
40
-
41
-
42
-
43
-
44
-
45
-
46
-
47
-
48
-
49
-
50
-
51
-
52
-
53
-
54
-
55
-
56
-
57
-
58
-
59
-
60
-
61
-
62
-
63
-
64
-
65
-
66
 |
 |
