Weider 3000 Instruction Manual - Page 7
Attach the Seat Frame 6 to the Front Leg 7
 |
View all Weider 3000 manuals
Add to My Manuals
Save this manual to your list of manuals |
Page 7 highlights
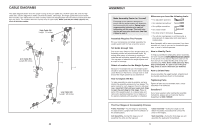
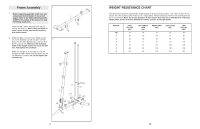
ARM CONVERSION To use the Arms (9, 10) as butterfly arms, insert the Arm Pins (40) into the holes in the Upright (3) and the Pivot Frame (5) as shown. To use the Arms (9, 10) as press arms, insert the Arm Pins (40) into the holes in the Pivot Frame (5) and Arms. USING THE CURL PAD To use the Curl Pad (14), remove the 50mm Round Inner Cap (30) from the Front Leg (7). Insert the Curl Post (13) into the Front Leg and secure it in place with the Curl Knob (61). Remove the Curl Pad (14) and replace the 50mm Round Inner Cap (30) into the Front Leg (7) when performing an exercise that does not require the Curl Pad. Store the Curl Pad away from the weight system. LOCKING THE WEIGHT STACK Lock the weight stack by inserting the Lock Pin (89) through a Weight Guide (21) and securing the Lock (88) onto the Lock Pin. 3 40 Holes 5 14 13 30 61 7 21 88 89 18 3. Attach the Front Leg (7) to the Base (1) with the 3 two indicated M8 x 63mm Carriage Bolts (78) and two M8 Nylon Locknuts (58). Do not tighten the Locknut yet. Attach the Leg Bumper (60) to the Front Leg (7) with an M4 x 20mm Self-tapping Screw (69) and an M4 Washer (33). Make sure the end of the Bumper is pointing up. Up 33 60 69 58 7 58 1 78 4. Attach the Seat Frame (6) to the Upright (3) with two M8 x 65mm Bolts (68), two M8 Washers (59), and two M8 Nylon Locknuts (58). Do not tighten the Locknuts yet. Attach the Seat Frame (6) to the Front Leg (7) in the same manner. 4 68 68 6 59 58 59 68 68 3 7 59 58 58 59 5. Slide the two Weight Bumpers (27) onto the 5 Weight Guides (21). Orient the six Weights (22) with the pin holes on the bottom as shown. Slide the Weights onto the Weight Guides. Insert the Weight Tube Cap (23) into the Weight Tube (24). Insert the Weight Tube into the six Weights (22). Make sure the pin on the Weight Tube is oriented as shown. Lubricate the indicated holes in the Top Weight (25) with the included grease packet. Slide the Top Weight onto the Weight Guides (21). 21 25 Pin Hole 21 Grease Pin 24 23 22 27 7
-
 1
1 -
 2
2 -
 3
3 -
 4
4 -
 5
5 -
 6
6 -
 7
7 -
 8
8 -
 9
9 -
 10
10 -
 11
11 -
 12
12 -
13
-
14
 |
 |
