Weider Pro 550 Bench Uk Manual - Page 11
Attach the Curl Pad 20 to the Curl Post 13
 |
View all Weider Pro 550 Bench manuals
Add to My Manuals
Save this manual to your list of manuals |
Page 11 highlights
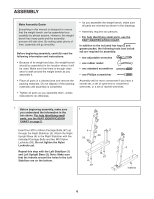
15. Insert an M10 x 20mm Bolt (65) through the Weight Carriage (29). Slide the Weight Carriage 15 onto the Lat Tower (14). Next, attach the Cable (73) to the Bolt with an M10 Nylon Locknut (58). 16. Insert a Weight Rest (39) into one of the holes in the Left Upright (31) and engage the locking 16 bar around the Left Upright. Repeat this step with the other Weight Rest (not shown) and the Right Upright (not shown). 14 73 58 65 29 39 31 Locking Bar 17. Attach the Curl Pad (20) to the Curl Post (13) with two M6 x 16mm Screws (41). 17 18. Make sure that all parts are properly tightened before you use the weight bench. The use of all remaining parts will be explained in ADJUSTMENTS, starting on the next page. 20 13 41 11
-
 1
1 -
2
-
3
-
4
-
5
-
 6
6 -
 7
7 -
 8
8 -
 9
9 -
 10
10 -
 11
11 -
 12
12 -
 13
13 -
 14
14 -
 15
15 -
 16
16 -
17
-
18
-
19
-
20
 |
 |

11
17
17. Attach the Curl Pad (20) to the Curl Post (13)
with two M6 x 16mm Screws (41).
18.
Make sure that all parts are properly tight-
ened before you use the weight bench. The
use of all remaining parts will be explained
in ADJUSTMENTS, starting on the next
page.
20
13
41
15
16
73
14
65
39
31
29
58
16. Insert a Weight Rest (39) into one of the holes
in the Left Upright (31) and engage the locking
bar around the Left Upright.
Repeat this step with the other Weight Rest
(not shown) and the Right Upright (not
shown).
15. Insert an M10 x 20mm Bolt (65) through the
Weight Carriage (29). Slide the Weight Carriage
onto the Lat Tower (14). Next, attach the Cable
(73) to the Bolt with an M10 Nylon Locknut
(58).
Locking
Bar