Weider Pro 9725 English Manual - Page 12
completely
 |
View all Weider Pro 9725 manuals
Add to My Manuals
Save this manual to your list of manuals |
Page 12 highlights
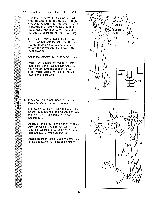
25. Attach the end of the Short Cable (58) to the Long "U"-Bracket (57) with a 1/4" Nylon Lock- 25 nut (2) and a 1/4" Flat Washer (10). Do not completely tighten the Nylon Locknut. It should be threaded onto the end of the Cable so only a couple of threads are showing above the nut, as shown in the inset drawing. 26. Attach the 3 1/2" Low Pulley (88) and the 5/8" LIJ x uitt3' Spacer (73) io the inciicaieci noie in the Press Frame (17) with a 3/8" x 3 3/4" Bolt (71), a 3/8" Flat Washer (9), and a 3/8" Nylon Locknut (21). Do not tighten the 3/8" Nylon Locknut (21) yet. Be sure that the 3/8" x 3 3/4" Bolt (71), the 3/8" Flat Washer (9), the 5/8" x 9/16" Spacer (73), the 3 1/2" Low Pulley (88), and the 3/8" Nylon Locknut (21) are oriented as shown. 58 10 2 57 261 I I I I I I 58 57 1 0 2 I I U 17 21 73 88 12
-
 1
1 -
2
-
3
-
4
-
5
-
6
-
 7
7 -
 8
8 -
 9
9 -
 10
10 -
 11
11 -
 12
12 -
 13
13 -
 14
14 -
 15
15 -
 16
16 -
 17
17 -
18
-
19
-
20
-
21
-
22
-
23
-
24
-
25
-
26
-
27
-
28
-
29
-
30
-
31
 |
 |
