Whirlpool WGD92HEF Instruction Sheet - Page 3
Lint Duct, Screws, Moisture, Strip, Connector, Screws, Front, Bulkhead, Bulkhead, Hooks One On, Each
 |
View all Whirlpool WGD92HEF manuals
Add to My Manuals
Save this manual to your list of manuals |
Page 3 highlights
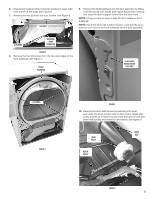
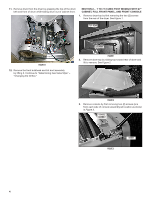
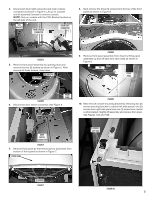
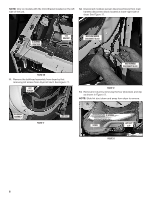
6. Disconnect moisture strip connector located in lower right front corner of the dryer. See Figure 6. 7. Remove the two (2) lower lint duct screws. See Figure 6. LINT DUCT 9. Remove the front bulkhead and lint duct assembly by lifting it off the two (2) front hooks (see Figure 8) and then lowering it to clear the drum support rollers from the drum front. NOTE: Lift up on front of drum to help lift off of rollers on front bulkhead. NOTE: Since the drum belt is still in tension, it will pull the drum down as you remove the front bulkhead and lint duct assembly. (2) SCREWS MOISTURE STRIP CONNECTOR FIGURE 6 8. Remove the four (4) screws from the two side edges of the front bulkhead. See Figure 7. FRONT BULKHEAD (2) BULKHEAD HOOKS (ONE ON EACH SIDE) (4) SCREWS FIGURE 7 FIGURE 8 10. Remove the drum belt tension by reaching into dryer just under the drum to back side of drive motor. Grasp idler pulley and lift up to relieve tension from belt and remove belt from motor pulley and lower the idler slowly. See Figure 9. DRUM BELT IDLER PULLEY MOTOR PULLEY FIGURE 9 3
-
 1
1 -
 2
2 -
 3
3 -
 4
4 -
 5
5 -
 6
6 -
 7
7 -
 8
8 -
 9
9 -
10
-
11
-
12
-
13
-
14
-
15
-
16
-
17
-
18
-
19
-
20
-
21
-
22
-
23
-
24
-
25
-
26
-
27
-
28
 |
 |
