Whirlpool WRFF5333P Owners Manual - Page 15
Production, Maker, Freezer, Ice Maker in the Refrigerator on some models
 |
View all Whirlpool WRFF5333P manuals
Add to My Manuals
Save this manual to your list of manuals |
Page 15 highlights
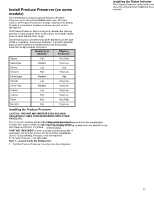
Ice Production Rate Allow 24 hours to produce the first batch of ice. Discard the first three batches of ice produced. Allow 3 days to completely fill the ice storage bin. The ice maker should produce approximately 3 lbs (1.4 kg) (8 to 12 batches) of ice in a 24-hour period. To increase ice production, lower the freezer and refrigerator temperature, or see "Control Panel Descriptions" in the Quick Start Guide for details. Wait 24 hours between adjustments. Ice Maker in the Freezer Turn the Ice Maker On/Off: Turn the Ice Maker On/Off for Icemaker without a switch: To turn on the ice maker, simply lower the wire shutoff arm. To manually turn the ice maker off, lift the wire shutoff arm to the off (arm up) position and listen for the click. Your ice maker has an automatic shutoff. As ice is made, the ice cubes will fill the ice storage bin and the ice cubes will raise the wire shutoff arm to the off (arm up) position. Do not force the wire shutoff arm up or down. For icemakers with a switch: For icemakers with a switch, use the switch to turn ON or Off the icemaker. Ice Maker in the Refrigerator (on some models) Style 1-Left-Hand Refrigerator Door The ice maker is located on the left-hand side of the refrigerator door. Ice cubes are ejected into the ice storage bin, located on the left-hand refrigerator door. Turn the Ice Maker On/Off: 1. Push up on the latch on the left-hand side of the ice compartment to open the door. A. Ice compartment door latch 2. Turn on the ice maker by moving the switch to the (left) on position. � To manually turn off the ice maker, move the control to the off (right) position. � Your ice maker has an automatic shutoff. The sensor will automatically stop ice production if the storage bin is full, if the door is open or the storage bin is removed. The control will remain in the on (left) position. Without switch With switch NOTE: Turn off the ice maker before removing the ice storage bin to serve ice or to clean the bin. This will keep the ice cubes from dropping out of the ice maker and into the freezer compartment. After replacing the ice storage bin, turn on the ice maker. Wash the ice storage bin with mild soap and warm water. Slide the ice storage bin under the ice maker and push it toward the back as far as it will go. Auto Ice Storage Bin (on some models): Your ice storage bin has a lever which allows the storage bin to slide out with the drawer when it is pulled open or to stay in place. � Move the lever to the right to attach the ice storage bin to the freezer drawer. � Move the lever to the left to release the ice storage bin from the freezer drawer. A. Ice storage bin lever A. Ice storage bin release latch 3. Close the ice compartment door. Remove and Replace the Ice Storage Bin: � Remove the ice storage bin by inserting your fingers into the hole at the base of the bin and squeezing the latch to release the bin from the compartment. Lift the storage bin up and pull it straight out. � Replace the storage bin inside the ice compartment and push down to make sure it is firmly in place. Style 2-Upper Left-Hand Side of the Refrigerator Compartment The ice maker and storage bin are located in the upper left-hand side of the refrigerator compartment. Some models have an on/off switch located on the ice maker. To turn on the ice maker, press the switch to the On position. To manually turn off the ice maker, press the switch to the Off position. To manually turn off the ice maker, see the Quick Start Guide for more information. Remove and Replace the Ice Storage Bin: 1. Hold the base of the storage bin and press the release button on the lower right. 2. Pull out the storage bin until resistance is felt. Lift up the front of the ice bin and remove. 3. Press the switch to Off (on some models). 15
-
 1
1 -
2
-
3
-
4
-
5
-
6
-
7
-
8
-
9
-
 10
10 -
 11
11 -
 12
12 -
 13
13 -
 14
14 -
 15
15 -
 16
16 -
 17
17 -
 18
18 -
 19
19 -
 20
20 -
21
-
22
-
23
-
24
-
25
-
26
-
27
-
28
-
29
-
30
-
31
-
32
-
33
-
34
-
35
-
36
-
37
-
38
-
39
-
40
-
41
-
42
-
43
-
44
-
45
-
46
-
47
-
48
-
49
-
50
-
51
-
52
-
53
-
54
-
55
-
56
-
57
-
58
-
59
-
60
-
61
-
62
-
63
-
64
 |
 |
