Whirlpool WRT138FFD Installation Instructions - Page 10
Top/bottom freezer models continued
 |
View all Whirlpool WRT138FFD manuals
Add to My Manuals
Save this manual to your list of manuals |
Page 10 highlights
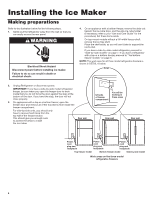
Top/bottom freezer models (continued) Refer to the side diagrams for the following steps. 1. (continued) On 14 to 18 Cubic Foot Top Freezer and Bottom Freezer Models Locate the fill tube and the round foam gasket from the ice maker kit (the gasket may already be installed on the fill tube). If not already done, slide the gasket over the end of the fill tube. Insert the fill tube through the hole in the rear of the refrigerator with the spout facing down, and secure it with two 1⁄2" hex-head sheet-metal screws. 1⁄2" hex-head sheet-metal screws Refer to the side diagrams for the following steps. You will be working inside the freezer compartment. 1. Slide the plastic fill tube extension (See components table on page 5) over the end of the fill tube as far as it will go (see DETAIL A). NOTE: The plastic fill tube extension is not required for models with open-top fill tube. Fill tube Spout Foam gasket Installing the fill tube/gasket (14 to 18 cubic foot and Bottom Freezer models) DETAIL A 2. Flat wiring cover: Install the wiring cover over the fill tube with the wiring harness through the slot. Hook the tab in the side of the wiring cover into the slot in the back cover of the freezer, and secure the cover with the screw you removed earlier (see DETAIL B). Fill tube Wiring harness fill tube extension (See components table on page 5) Installing the fill tube extension Mounting hole DETAIL B Edge of cover Hex screw Tab Route harness through slot and fill tube through hole Route harness through slot and fill tube through hole 10
-
 1
1 -
2
-
3
-
4
-
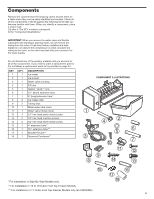 5
5 -
 6
6 -
 7
7 -
 8
8 -
 9
9 -
 10
10 -
 11
11 -
 12
12 -
 13
13 -
 14
14 -
 15
15 -
16
-
17
-
18
-
19
-
20
-
21
-
22
-
23
-
24
-
25
-
26
-
27
-
28
-
29
-
30
-
31
-
32
-
33
-
34
-
35
-
36
-
37
-
38
-
39
-
40
-
41
-
42
-
43
-
44
-
45
-
46
-
47
-
48
-
49
-
50
-
51
-
52
-
53
-
54
-
55
-
56
 |
 |
