Whirlpool WRT138FFD Installation Instructions - Page 6
Installing the Ice Maker
 |
View all Whirlpool WRT138FFD manuals
Add to My Manuals
Save this manual to your list of manuals |
Page 6 highlights
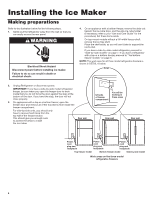
Installing the Ice Maker Making preparations Refer to the illustration below for the following steps. 1. Gently pull the refrigerator away from the wall so that you can easily access the rear panel. WARNING Electrical Shock Hazard Disconnect power before installing ice maker. Failure to do so can result in death or electrical shock. 4. On an appliance with a bottom freezer, remove the slide-out basket, the ice cube trays, and the wire ice cube holder (if necessary, refer to your "Use and Care Guide" for the procedure). Set these items aside. On top-mount models without a full-width freezer shelf, remove the ice tray shelf. Place the shelf aside, as you will use it later to support the ice bucket. If you have a side-by-side model refrigerator, proceed to "Side-by-side models" on page 7. If you have a refrigerator with a top or a bottom freezer, proceed to "Top/bottom freezer models" on page 9. NOTE: The work area for all three model refrigerator-freezers is shown in DETAIL A below. Detail 2. Unplug Refrigerator or disconnect power. IMPORTANT: If you have a side-by-side model refrigeratorfreezer, be sure when you open the freezer door to work inside that you do not force the door against the stop at the bottom of the door. If you bend the stop, the door will not close properly. 3. On appliances with a top or a bottom freezer, open the freezer door and remove all of the food items from inside the freezer compartment. For side-by-side units, you should only have to remove food items from the top half of the freezer section. This should give you enough room to access the areas to install the ice maker. Rear wall left side of freezer compartment You will be working in these areas Rear wall Rear wall Power cord plug and receptacle Power cord plug and receptacle Power cord plug and receptacle Top freezer model Bottom freezer model Side-by-side model Work areas on the three model refrigerator-freezers 6
-
 1
1 -
 2
2 -
 3
3 -
 4
4 -
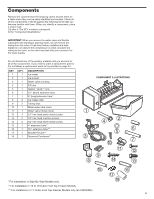 5
5 -
 6
6 -
 7
7 -
 8
8 -
 9
9 -
 10
10 -
 11
11 -
 12
12 -
13
-
14
-
15
-
16
-
17
-
18
-
19
-
20
-
21
-
22
-
23
-
24
-
25
-
26
-
27
-
28
-
29
-
30
-
31
-
32
-
33
-
34
-
35
-
36
-
37
-
38
-
39
-
40
-
41
-
42
-
43
-
44
-
45
-
46
-
47
-
48
-
49
-
50
-
51
-
52
-
53
-
54
-
55
-
56
 |
 |
