Xerox 2006NPC DocuColor 2006 Problem Solving - Page 2
Printer jam clearance areas, Area 2: Paper Feed Area from Paper Tray 1 or the Duplex Tray, when
 |
UPC - 042215475440
View all Xerox 2006NPC manuals
Add to My Manuals
Save this manual to your list of manuals |
Page 2 highlights
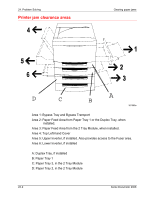
24. Problem Solving Printer jam clearance areas Clearing paper jams D C A B 301069a Area 1: Bypass Tray and Bypass Transport Area 2: Paper Feed Area from Paper Tray 1 or the Duplex Tray, when installed. Area 3: Paper Feed Area from the 2 Tray Module, when installed. Area 4: Top Left-hand Cover Area 5: Upper Inverter, if installed. Also provides access to the Fuser area. Area 6: Lower Inverter, if installed A: Duplex Tray, if installed B: Paper Tray 1 C: Paper Tray 3, in the 2 Tray Module D: Paper Tray 2, in the 2 Tray Module 24-2 Xerox DocuColor 2006

24. Problem Solving
Clearing paper jams
24-2
Xerox DocuColor 2006
Printer jam clearance areas
D
C
B
A
301069a
Area 1: Bypass Tray and Bypass Transport
Area 2: Paper Feed Area from Paper Tray 1 or the Duplex Tray, when
installed.
Area 3: Paper Feed Area from the 2 Tray Module, when installed.
Area 4: Top Left-hand Cover
Area 5: Upper Inverter, if installed. Also provides access to the Fuser area.
Area 6: Lower Inverter, if installed
A: Duplex Tray, if installed
B: Paper Tray 1
C: Paper Tray 3, in the 2 Tray Module
D: Paper Tray 2, in the 2 Tray Module

