Xerox 7300DX Specialty Printing
Xerox 7300DX - Phaser Color Laser Printer Manual
 |
UPC - 042215476973
View all Xerox 7300DX manuals
Add to My Manuals
Save this manual to your list of manuals |
Xerox 7300DX manual content summary:
- Xerox 7300DX | Specialty Printing - Page 1
by duplexing specialty media may not be covered under your printer warranty. For best results with automatic 2-sided printing, do not use heavy toner coverage on the even-numbered pages of your print job. When you print any job, you can use the printer driver to select the orientation of the images - Xerox 7300DX | Specialty Printing - Page 2
%! PHASER 7300 7300-85 7300-86 2. In the printer driver: I Select the tray containing the paper. I Select the orientation. I Select 2-sided printing. Refer to the table on page 14 for instructions and the wording used in the printer drivers. 3. Send the job to the printer. Phaser® 7300 Color - Xerox 7300DX | Specialty Printing - Page 3
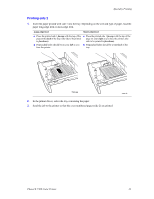
heavy toner coverage on side 1 of a manual 2-sided print. Increase the top margin on side 1 to at least 12 mm (0.48 in.). I Print quality may be degraded on the second side of manual 2-sided prints for weights ranging from 105-203 g/m2 (>28-75 lb. bond, 58-112 lb. index). Phaser® 7300 Color Printer - Xerox 7300DX | Specialty Printing - Page 4
the printer. I Prepunched holes should be towards the front of the printer. 20)5-4 %! 20)5-4 %! 7300-38 2. In the printer driver, select the tray containing the paper. 3. Send the job to the printer so that the odd-numbered pages (side 1) are printed. 7300-39 Phaser® 7300 Color Printer 15 - Xerox 7300DX | Specialty Printing - Page 5
side to be printed is facedown). I Prepunched holes should be at the back of the tray. 20)5-4 %! 7300-44 2. In the printer driver, select the tray containing the paper. 3. Send the job to the printer so that the even-numbered pages (side 2) are printed. 7300-45 Phaser® 7300 Color Printer 16 - Xerox 7300DX | Specialty Printing - Page 6
the printer first. I Prepunched holes should be towards the front of the printer. 7300-71 2. In the printer driver, select the Multi-Purpose Tray as the paper source. 3. Send the job to the printer so that the odd-numbered pages (side 1) are printed. 7300-72 Phaser® 7300 Color Printer 17 - Xerox 7300DX | Specialty Printing - Page 7
toward the back of the printer. PHASER 2135 PHASER 2135 PHASER 7300 PHASER 7300 7300-46 7300-47 2. In the printer driver, select the Multi-Purpose Tray as the paper source. 3. Send the job to the printer so that the even-numbered pages (side 2) are printed. Phaser® 7300 Color Printer 18 - Xerox 7300DX | Specialty Printing - Page 8
covered under the warranty, service agreement, or Total Satisfaction Guarantee. Note Xerox and Xerox Phaser transparency films developed for other Xerox printers and copiers are not meant to be used with this printer. Using non-Phaser 35-Series transparencies may damage the fuser and might not be - Xerox 7300DX | Specialty Printing - Page 9
Specialty Printing Printing transparencies from Tray 1 1. Insert the transparencies long-edge feed into the tray. For more information, refer to the Trays section of the Trays and Paper Guide on the Interactive Documentation CD-ROM. PHASER 7300 7300-35 2. Do not load transparencies above the - Xerox 7300DX | Specialty Printing - Page 10
press the OK key to save your selection. c. Scroll to the correct paper size and press the OK key to save your selection. 3. In the printer driver, either select Multi-Purpose Tray as the paper source or select Transparencies as the paper type. Phaser® 7300 Color Printer 21 - Xerox 7300DX | Specialty Printing - Page 11
envelope enter the printer first. I Maximum capacity is 10 sheets C4 envelopes I Place the side to be printed faceup with the envelope flap closed and tucked in. I Have the top of the envelope enter the printer last. I Maximum capacity is 10 sheets C4 7300-74 Phaser® 7300 Color Printer 7300-94 22 - Xerox 7300DX | Specialty Printing - Page 12
OK 6200-45 3. Open the Left Side Output Tray. 4. In the printer driver, either select Multi-Purpose Tray as the paper source or select Envelopes as the paper type. 5. Make a test print from your application to confirm that the orientation of your envelope is correct. Phaser® 7300 Color Printer 23 - Xerox 7300DX | Specialty Printing - Page 13
cards, greeting cards, CD/DVD inserts, and CD/ DVD labels 1. If printing on labels and your application has a setting for labels, use it as a template. Templates for greeting cards, etc. are available at the Color Connection web site at: www.colorconnection.xerox.com Phaser® 7300 Color Printer 24 - Xerox 7300DX | Specialty Printing - Page 14
feed into the Multi-Purpose Tray. Place the side to be printed faceup with the top of the sheet entering the printer first. For more information, refer to the Trays section of the Trays and Paper Guide on the Interactive Documentation CD-ROM. 7300-75 3. When the front panel prompts you to confirm or
-
 1
1 -
 2
2 -
 3
3 -
 4
4 -
 5
5 -
 6
6 -
 7
7 -
8
-
9
-
10
-
11
-
12
-
13
-
14
 |
 |
Phaserfi 7300 Color Printer
Copyright ' 2002 Xerox Corporation. All Rights Reserved.
12
Specialty Printing
This section covers:
■
Automatic 2-sided printing ° see page 12.
■
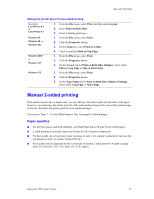
Manual 2-sided printing ° see page 14.
■
Transparencies ° see page 19.
■
Envelopes ° see page 22.
■
Labels, Business Cards, Greeting Cards, CD/DVD Inserts, and CD/DVD Labels °
see page 24.
For a list of the acceptable papers, transparencies, envelopes, and labels that can be used in each tray,
refer to the
Supported Papers
section of the
Trays and Paper Guide
on the
Interactive Documentation
CD-ROM
.
Caution
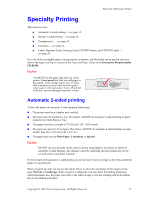
Automatic 2-sided printing
To have the printer do automatic 2-sided printing (duplexing):
■
The printer must have a duplex unit installed.
■
The paper must be loaded in a tray. The printer will NOT do automatic 2-sided printing on paper
loaded in the Multi-Purpose Tray.
■
The paper must have a weight of 75-105 g/m
2
(20 - 28 lb. bond).
■
The paper size must be A5 or larger. The printer will NOT do automatic 2-sided printing on paper
smaller than 148 x 210 mm (5.83 x 8.27 in.).
■
The paper type must be
Plain Paper
,
Letterhead
, or
Special
.
Caution
DO NOT use any specialty media (such as glossy coated paper), envelopes, or labels for
automatic 2-sided printing. Any damage caused by duplexing specialty media may not be
covered under your printer warranty.
For best results with automatic 2-sided printing, do not use heavy toner coverage on the even-numbered
pages of your print job.
When you print any job, you can use the printer driver to select the orientation of the images on the
page:
Portrait
or
Landscape
. When you print 2-sided jobs, you also select the binding preference,
which determines how the pages turn; refer to the table on page 14 for the wording used in the printer
drivers for binding preference.
You MUST set the paper type and size in the
printer±s
front panel
any time you add paper to
the printer.
If you change paper sizes or types,
take a moment to ensure that the front panel
values agree with your paper choice.
If you fail
to do this, you can damage the printer±s fuser.
OK
6200-45