Xerox 7300DX Specialty Printing - Page 2
Interactive Documentation CD-ROM - tabloid color printer
 |
UPC - 042215476973
View all Xerox 7300DX manuals
Add to My Manuals
Save this manual to your list of manuals |
Page 2 highlights
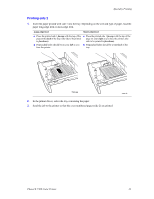
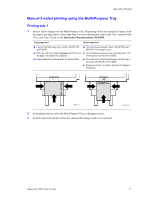
Portrait Bind on Side Edge Flip on Long Edge Portrait Bind on Top Edge Flip on Short Edge Landscape Bind on Side Edge Flip on Short Edge Specialty Printing Landscape Bind on Top Edge Flip on Long Edge To do automatic 2-sided printing: 1. Insert a stack of paper into the tray. Depending on the size and type of paper, load the paper long-edge feed or short-edge feed. For more information, refer to the Trays section of the Trays and Paper Guide on the Interactive Documentation CD-ROM. Long-edge feed Short-edge feed I Use for the following sizes: Letter, A4, and B5 JIS. I Place the side to be printed with the odd-number pages faceup with the top of the page at the back of the tray. I Prepunched holes should be on your left as you face the printer. I Use for the following sizes: Legal, Tabloid (11 x 17 in.), Tabloid Extra (12 x 18 in.), Executive, US Folio, A3, SRA3, A5, A6, and B4 JIS. I Place the side to be printed with the odd-number pages faceup with the top of the page on your right as you face the printer. I Prepunched holes should be towards the back of the printer. 20)5-4 %! PHASER 7300 7300-85 7300-86 2. In the printer driver: I Select the tray containing the paper. I Select the orientation. I Select 2-sided printing. Refer to the table on page 14 for instructions and the wording used in the printer drivers. 3. Send the job to the printer. Phaser® 7300 Color Printer 13
-
 1
1 -
 2
2 -
 3
3 -
 4
4 -
 5
5 -
 6
6 -
 7
7 -
 8
8 -
9
-
10
-
11
-
12
-
13
-
14
 |
 |
