Yamaha 820 Owner's Manual - Page 56
CLP-860/840/820: Keyboard Stand Assembly
 |
View all Yamaha 820 manuals
Add to My Manuals
Save this manual to your list of manuals |
Page 56 highlights
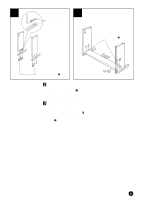
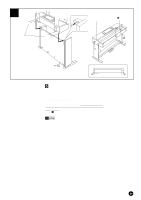
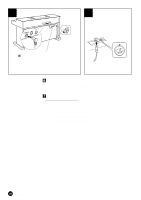
1 A D B D C E E Bundled pedal cord inside 5 x 40 mm long gold screws x6 1 6 x 20 mm round-head screws x4 2 4 x 12 mm round-head screws x2 3 4 x 20 mm tapping screws x4 4 q Cord holders x 2 q AC power cord 6 x 16 mm flat-head screws x4 5 CLP-860/840/820: Keyboard Stand Assembly The CLP-860/840/820 all require the same assembly procedures. Illustrations use the CLP-860 for reference. • Be careful not to confuse parts, and be sure to install all parts in the correct direction. Please assemble in accordance with the sequence given below. • Assembly should be carried out by at least two persons. • Be sure to use the correct screw size, as indicated above. Use of incorrect screws can cause damage. • Be sure to tighten up all screws upon completing assembly of each unit. • To disassemble, reverse the assembly sequence given below. Have a Phillips-head (+) screwdriver ready. Z Open the box and remove all the parts. On opening the box you should find the parts shown in the illustration. Check to make sure that all the required parts are provided. 56 CLP-880/860/840/820/820S
-
 1
1 -
2
-
3
-
4
-
5
-
6
-
7
-
8
-
9
-
10
-
11
-
12
-
13
-
14
-
15
-
16
-
17
-
18
-
19
-
20
-
21
-
22
-
23
-
24
-
25
-
26
-
27
-
28
-
29
-
30
-
31
-
32
-
33
-
34
-
35
-
36
-
37
-
38
-
39
-
40
-
41
-
42
-
43
-
44
-
45
-
46
-
47
-
48
-
49
-
50
-
 51
51 -
 52
52 -
 53
53 -
 54
54 -
 55
55 -
 56
56 -
 57
57 -
 58
58 -
 59
59 -
 60
60 -
 61
61 -
62
-
63
-
64
-
65
-
66
-
67
-
68
-
69
-
70
-
71
-
72
 |
 |
