Yamaha AV-S70 Owner's Manual - Page 10
Using the Height Adjustment Brackets, To further stabilize and prevent, falling
 |
View all Yamaha AV-S70 manuals
Add to My Manuals
Save this manual to your list of manuals |
Page 10 highlights
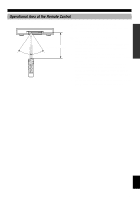
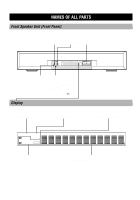
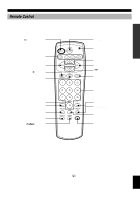
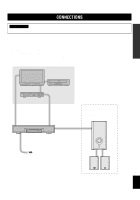
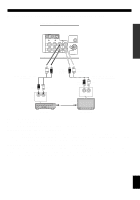
INSTALLATION Using the Height Adjustment Brackets 1 Loosen the screws securing the adjustment bracket. s To further stabilize and prevent falling Wire attachment hole Loosen the screws. 2 Lower the bracket so that the front speaker unit is level and securely tighten the screws. Secure the front speaker unit to the wall by attaching sufficiently strong wire to the wire attachment hole on the adjustment bracket. This prevents falling in two ways when this method is used together with velcro strip. This can prevent damage caused by the front speaker falling. Note • Please provide wire separately. CAUTION Never place anything on top of the front speaker unit. Lower the bracket and adjust. Securely tighten the screws. Place the front speaker unit so that it is level. 8
-
 1
1 -
2
-
3
-
4
-
 5
5 -
 6
6 -
 7
7 -
 8
8 -
 9
9 -
 10
10 -
 11
11 -
 12
12 -
 13
13 -
 14
14 -
 15
15 -
16
-
17
-
18
-
19
-
20
-
21
-
22
-
23
-
24
-
25
-
26
-
27
-
28
-
29
-
30
-
31
-
32
-
33
-
34
-
35
-
36
-
37
-
38
-
39
-
40
 |
 |
