Yamaha HTR-5440 Owner's Manual
Yamaha HTR-5440 Manual
 |
View all Yamaha HTR-5440 manuals
Add to My Manuals
Save this manual to your list of manuals |
Yamaha HTR-5440 manual content summary:
- Yamaha HTR-5440 | Owner's Manual - Page 1
U C A HTR-5450 HTR-5440 Natural Sound AV Receiver Ampli-tuner audio-vidéo OWNER'S MANUAL MODE D'EMPLOI - Yamaha HTR-5440 | Owner's Manual - Page 2
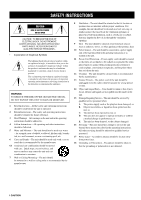
as radiators, stoves, or other appliances that produce heat. 10 Power Sources - The unit should be connected to a power supply only of the type described in the operating instructions or as marked on the unit. 11 Power-Cord Protection - Power-supply cords should be routed so that they are not likely - Yamaha HTR-5440 | Owner's Manual - Page 3
INSTRUCTIONS EXAMPLE OF ANTENNA GROUNDING MAST GROUND CLAMP ELECTRIC SERVICE EQUIPMENT NEC - NATIONAL ELECTRICAL CODE ANTENNA LEAD IN WIRE ANTENNA DISCHARGE UNIT (NEC SECTION 810-20) GROUNDING CONDUCTORS (NEC SECTION 810-21) GROUND CLAMPS POWER SERVICE GROUNDING ELECTRODE SYSTEM (NEC ART 250. PART - Yamaha HTR-5440 | Owner's Manual - Page 4
unit must be set for your local main voltage BEFORE plugging into the AC main supply. Voltages are 110/120/220/240 V AC, 50/60 Hz. This unit is not disconnected from the AC power source as long as it is connected to the wall outlet, even if this unit itself is turned off. This - Yamaha HTR-5440 | Owner's Manual - Page 5
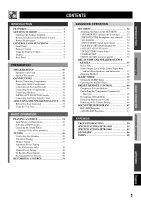
the Components Connected to This Unit 40 Description of Each Mode 41 Setting the Manufacturer Code 45 Returning to the Factory Setting 46 SOUND FIELD PROGRAM 47 Hi-Fi DSP Programs 47 CINEMA DSP Programs 47 APPENDIX TROUBLESHOOTING 50 SPECIFICATIONS (HTR-5450 54 SPECIFICATIONS (HTR-5440 55 - Yamaha HTR-5440 | Owner's Manual - Page 6
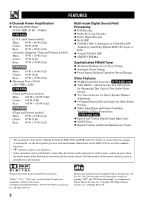
Input and Output Capability (Including S Video Connections HTR-5450 only ) N Optical and Coaxial Digital Signal Input Jacks N SLEEP Timer N Remote Control with Preset Manufacturer Codes • This document is the Owner's Manual for both the HTR-5450 and HTR-5440. For details on various functions unique - Yamaha HTR-5440 | Owner's Manual - Page 7
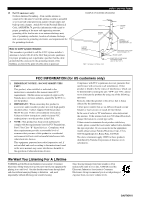
Connection guide PREPARATION BASIC OPERATION ADVANCED OPERATION APPENDIX Battery Installation in the Remote Control 2 1 3 1 Turn the remote control , the codes preset for the remote control will return to the factory settings. Notes • Use only AAA, R03 or UM-4 batteries for replacement. • Be - Yamaha HTR-5440 | Owner's Manual - Page 8
the standby mode. Before turning the power on, set the volume at the minimum level. Standby mode In this mode, this unit consumes a very small quantity of power to receive infrared-signals from the remote control. 2 Remote control sensor This receives signals from the remote control. 3 Display This - Yamaha HTR-5440 | Owner's Manual - Page 9
. Turn the control to adjust the balance of the output volume from the right and left main speakers to compensate for sound imbalance caused by the speaker location or listening room conditions. 0 SPEAKERS A/B Set A or B (or both A and B) to the ON position for the main speaker system (connected to - Yamaha HTR-5440 | Owner's Manual - Page 10
Manufacturer Code".) When the component selector button has been pressed, the remote control is set to that component operation mode. 3 POWER Each time you press this button, the unit switches between the power on and standby mode. 4 TEST Press this button to output the test tone for each speaker - Yamaha HTR-5440 | Owner's Manual - Page 11
speakers (center and rear). r PRG+, PRG- Press these buttons to select a DSP program. Once you press SET MENU, these buttons are used for selecting the SET MENU item. t SET MENU Press this button to select the items in the SET MENU. CONTROLS AND FUNCTIONS Using the Remote Control Remote control - Yamaha HTR-5440 | Owner's Manual - Page 12
strength is being received. 7 x indicator " x " lights up when the built-in digital sound field processor is on. 8 v indicator This lights up when this unit is reproducing PCM (pulse code modulation) digital audio signals. 9 Headphones indicator This lights up when headphones are connected. 0 Multi - Yamaha HTR-5440 | Owner's Manual - Page 13
MIN. /SPEAKER CENTER : 8 MIN. /SPEAKER REAR : 8 MIN. /SPEAKER MAIN A OR B: 4 MIN. /SPEAKER A + B: 8 MIN. /SPEAKER CENTER : 6 MIN. /SPEAKER REAR : 6 MIN. /SPEAKER AC OUTLETS SWITCHED 100W MAX. TOTAL 9 HTR-5440 As this terminal is used for an examination in the factory, do not connect any - Yamaha HTR-5440 | Owner's Manual - Page 14
PREPARATION SPEAKER SETUP Speakers to Be Used This unit is designed to provide the best sound-field quality with a 5-speaker system, using main speakers, rear speakers and a center speaker. If you use different brands of speakers (with different tonal qualities) in your system, the tone of a - Yamaha HTR-5440 | Owner's Manual - Page 15
connection methods and have different terminal names. Refer to the instructions for each component to be connected to this unit. When you connect other YAMAHA audio channel L L Red analog audio signals for the right channel R R coaxial digital signals C C After completing all connections - Yamaha HTR-5440 | Owner's Manual - Page 16
the main and surround channels. Notes • When you select 6CH INPUT as the input source, this unit automatically turns off the digital sound field processor, and you cannot listen to DSP programs. • When you select 6CH INPUT as the input source, changing items of "1 SPEAKER SET" in the SET MENU is not - Yamaha HTR-5440 | Owner's Manual - Page 17
PREPARATION CONNECTIONS OUTPUT CD player MAIN OUTPUT SUBWOOFER OUTPUT External decoder COAXIAL OUTPUT LR C LR LR SURROUND OUTPUT CENTER OUTPUT (HTR-5450/U.S.A. model) DIGITAL INPUT CD AM ANT GND TUNER FM ANT COAXIAL OPTICAL D-TV/CBL DVD 6CH INPUT MAIN SURROUND CENTER - Yamaha HTR-5440 | Owner's Manual - Page 18
connect the right channel (R), left channel (L), input (IN) and output (OUT) properly. I Video signal jacks Be sure to connect the input (IN) and output (OUT) properly. I S VIDEO jacks HTR to connect any video input source such as a game console or camcorder to this unit. HTR-5450 HTR-5440 S - Yamaha HTR-5440 | Owner's Manual - Page 19
S indicates S-video cables HTR-5450 only When using an LD player Connect the LD player output to connections and operations, refer to the operation instructions for the LD player. Note that this unit's remote control can be used to operate the LD player by setting the corresponding manufacturer code - Yamaha HTR-5440 | Owner's Manual - Page 20
channel (L), "+" (red) and "-" (black) properly. If the connections are faulty, no sound will be heard from the speakers, and if the polarity of the speaker connections is incorrect, the sound will be unnatural and lack bass. CAUTION • Use speakers with the specified impedance shown on the rear - Yamaha HTR-5440 | Owner's Manual - Page 21
Right Left Rear speakers I Subwoofer connection When using a subwoofer with built-in amplifier, including the YAMAHA Active Servo Processing Subwoofer System, connect the input jack of the subwoofer system to this jack. Low bass signals distributed from the main, center and/or rear channels are - Yamaha HTR-5440 | Owner's Manual - Page 22
each speaker must be 8 Ω or higher. I VOLTAGE SELECTOR (China and General models only) The VOLTAGE SELECTOR on the rear panel of this unit must be set for your local main voltage BEFORE plugging into the AC main supply. Voltages are 110/120/220/240 V AC, 50/60 Hz. Connecting the Power Supply Cords - Yamaha HTR-5440 | Owner's Manual - Page 23
SILENT VIDEO AUX 43 1 Set the volume at the minimum level. (HTR-5450) VOLUME 2 Turn the power on. STANDBY /ON 3 Press SPEAKERS A or B to select the main speakers to be used. If you use two main speaker systems, press both A and B. SPEAKERS A B ON OFF 4 Set BASS, TREBLE and BALANCE to - Yamaha HTR-5440 | Owner's Manual - Page 24
the adjustments, you can only adjust the overall volume level of your audio system by using VOLUME (or VOLUME (u/d)). • If there is insufficient sound output from the center and rear speakers, you may decrease the main speaker output level by setting "MAIN LVL" in the SET MENU to "-10 dB". 20 - Yamaha HTR-5440 | Owner's Manual - Page 25
Front panel Remote control 1 Set the volume at the VOLUME minimum level. 2 Turn the power on. STANDBY /ON Front panel or Front panel 3 Press SPEAKERS A or B to select the main speakers to be used. If you use two main speaker systems, press both A and B. Remote control SPEAKERS A B ON OFF - Yamaha HTR-5440 | Owner's Manual - Page 26
you want to control. Refer to "PRESET REMOTE CONTROL". 6 Adjust the volume to the desired output level. VOLUME or Front panel Remote control If desired, adjust BASS, TREBLE, BALANCE, etc. These controls are only effective for the sound from the main speakers. • BASS controls the low-frequency - Yamaha HTR-5440 | Owner's Manual - Page 27
remote control, press AMP(TUNER) on the component selector. This unit comes with various input jacks. If your component is connected to more than one type of input jack, you can set switches to the appropriate setting and reproduces 5.1 channel source. • The sound output may be interrupted for - Yamaha HTR-5440 | Owner's Manual - Page 28
PRO LOGIC/ENHANCED, no sound will be heard from the main speakers and the rear speakers. Sound can only be heard from the center speaker. However, if "CENTER SP" in the SET MENU is set to NON, the center channel sound is output from the main speakers. • When a source connected to the 6CH INPUT jack - Yamaha HTR-5440 | Owner's Manual - Page 29
feature delivers powerful surround reproduction just as if listening through the speakers. You can listen to SILENT CINEMA by connecting your headphones to the PHONES jack while the effect speakers are on. PLAYING A SOURCE Canceling the Sound Effect (turning off the effect speakers) Press EFFECT - Yamaha HTR-5440 | Owner's Manual - Page 30
an outdoor AM antenna is connected to this unit. A properly installed outdoor antenna provides clearer reception than an indoor one. If you experience poor reception quality, an outdoor antenna may improve the quality. Consult the nearest authorized YAMAHA dealer or service center about the outdoor - Yamaha HTR-5440 | Owner's Manual - Page 31
is effective when station signals are strong and there is no interference. STANDBY /ON D I G I TA L SURROUND BASS TREBLE BALANCE -+ -+ L R SPEAKERS A B ON OFF (HTR-5450) D I G I TA L VOLUME PROGRAM EFFECT PRESET/TUNING PHONES S VIDEO VIDEO L AUDIO R OPTICAL A/B/C/D/E PRESET - Yamaha HTR-5440 | Owner's Manual - Page 32
Notes • A new setting can be stored in place of the former one. • The reception mode is stored along with the station frequency. • You can manually replace a preset station with another FM or AM station by simply using the manual preset tuning method. • Even if the number of received stations is not - Yamaha HTR-5440 | Owner's Manual - Page 33
Refer to "Automatic/Manual Tuning" for the tuning . Notes • A new setting can be stored in place remote control. Press AMP(TUNER) on the component selector and press TUNER on the input selector. STANDBY /ON D I G I TA L SURROUND BASS TREBLE BALANCE -+ -+ L R SPEAKERS A B ON OFF (HTR - Yamaha HTR-5440 | Owner's Manual - Page 34
stations with each other. Example: Exchange preset station "E1" with "A5" STANDBY /ON D I G I TA L SURROUND BASS TREBLE BALANCE -+ -+ L R SPEAKERS A B ON OFF (HTR-5450) D I G I TA L VOLUME PROGRAM EFFECT PRESET/TUNING PHONES S VIDEO VIDEO L AUDIO R OPTICAL A/B/C/D/E PRESET - Yamaha HTR-5440 | Owner's Manual - Page 35
For DVDs and CDs encoded with DTS Only 2-channel analog audio signals may be recorded. Set the DVD player (or CD player) as described in the player's operation instructions so that the audio signals are output from the player's analog outputs. or Front panel Remote control APPENDIX English 31 - Yamaha HTR-5440 | Owner's Manual - Page 36
order as when pressing PRG-. 4 Press - or + once to enter the setup mode of the selected item. The last setting you adjusted appears on the display. Adjusting the Items on the SET MENU Adjustment should be made with the remote control. Depending on the item, press PRG- (or PRG+) to select a sub - Yamaha HTR-5440 | Owner's Manual - Page 37
the AC outlet, or the power supply is temporarily cut due to power failure. However, if the power is cut for more than one week, the settings of the SET MENU you adjusted will return to the factory settings. If so, adjust the items again. 1 SPEAKER SET (speaker mode settings) Use this feature to - Yamaha HTR-5440 | Owner's Manual - Page 38
signals (90 Hz and below) from those channels are added to the LFE and output to the subwoofer. I MAIN LVL (main level mode) Change this setting if you cannot match the output level of the center and rear speakers with the main speakers because of the unusually high-efficiency performance of - Yamaha HTR-5440 | Owner's Manual - Page 39
-frequency special effect sound which is only added to certain scenes. Control value (dB): -20 to 0 Initial setting: 0 dB dB Notes • Adjust the LFE level according to the capacity of your subwoofer. • Normally, around -6 dB to -8 dB is most suitable for listening at home. HTR-5440 I D-RANGE (dynamic - Yamaha HTR-5440 | Owner's Manual - Page 40
delay of the center channel sound. This feature works when this unit decodes a Dolby Digital or DTS signal. Ideally, the center speaker should be the same distance from the listening position as the left and right main speakers. However, in most home situations, the center speaker is placed in line - Yamaha HTR-5440 | Owner's Manual - Page 41
if it has already been adjusted in "ADJUSTING THE SPEAKER BALANCE" procedure. Notes • If "CENTER SP" in the SET MENU is set to the NON position, the sound output level of the center speaker cannot be adjusted. This is because the center channel sound is automatically output from the right and left - Yamaha HTR-5440 | Owner's Manual - Page 42
the power is cut for more than one week, the latest values for the delay time and the center/rear/ subwoofer output levels that were set will automatically return to the preset values. If so, adjust the delay time and output levels again. DELAY CENTER R SUR. L SUR. SWFR Delay time Center speaker - Yamaha HTR-5440 | Owner's Manual - Page 43
timer can only be set with the remote control. Notes • First press AMP(TUNER), TAPE/MD, CD or DVD/LD on the component selector to set the SLEEP timer for this unit. • The SLEEP timer is effective for the components connected to the AC OUTLET(S) on the rear panel of this unit. Setting the SLEEP Timer - Yamaha HTR-5440 | Owner's Manual - Page 44
the factory, the YAMAHA manufacturer codes listed on page 49 are set for each dial position. If unable to operate your YAMAHA A/V component, please try using another YAMAHA code. Controlling the Components Connected to This Unit I Example: To control YAMAHA CD player 5 7 2 3 4 6 3 Turn on - Yamaha HTR-5440 | Owner's Manual - Page 45
Mode I TAPE/MD MODE Note • TV VOLUME functions if you have set the code for your TV. PRESET REMOTE CONTROL INTRODUCTION PREPARATION BASIC OPERATION ADVANCED OPERATION POWER This button turns this unit on if you have set the code for a YAMAHA tape deck, MD recorder or CD recorder. This button - Yamaha HTR-5440 | Owner's Manual - Page 46
set the code for your TV. Press CD. POWER This button turns this unit on if you have set the code for a YAMAHA CD player. This button turns on the CD player that has a remote control with a power button if you have set the code * for operating a YAMAHA CD player under factory setting. a SKIP+ This - Yamaha HTR-5440 | Owner's Manual - Page 47
if you have set the code for your TV. PRESET REMOTE CONTROL Press DVD/LD. POWER This button turns this unit on if you have set the code for a YAMAHA DVD or LD player. This button turns on the DVD or LD player that has a remote control with a power button if you have set the code. VOLUME MUTE SLEEP - Yamaha HTR-5440 | Owner's Manual - Page 48
PRESET REMOTE CONTROL I VCR MODE Note • TV VOLUME, TV INPUT and TV SLEEP function if you have set the code for your TV. I CBL/SAT MODE Note • TV VOLUME, TV INPUT and TV SLEEP function if you have set the code for your TV. VCR POWER VCR CHANNEL -/+ VOLUME MUTE TV SLEEP VCR REC Press this button - Yamaha HTR-5440 | Owner's Manual - Page 49
3 and re-enter the code. 5 Press POWER (or any other button) on the remote control to check if you have set the code correctly. If your component cannot be controlled with the remote control, try setting another code for the same manufacturer. Notes • You can set only one code for one mode. • In - Yamaha HTR-5440 | Owner's Manual - Page 50
REMOTE CONTROL Returning to the Factory Setting I To return to the factory-set codes in all modes 1 Press one of the component selector buttons other than AMP(TUNER). 2 Press both VOLUME buttons (u/d) at the same time for about four seconds. The indicator flashes twice. I To return to the factory - Yamaha HTR-5440 | Owner's Manual - Page 51
sounds best to you. Hi-Fi DSP Programs I For audio sources: Nos. 1 to 4 No. Program (group) 1 CONCERT HALL Sub-program - 2 JAZZ CLUB - 3 ROCK CONCERT - 4 ENTERTAINMENT DISCO 5CH STEREO Features A large round concert hall with a rich surround the sound is output from all speakers regardless - Yamaha HTR-5440 | Owner's Manual - Page 52
program, the digital sound field processor is not turned on. ENHANCED PRO LOGIC/ ENHANCED Analog, PCM, Dolby Digital in 2-channel DOLBY DIGITAL/ Dolby Digital ENHANCED (5.1-channel) DTS DIGITAL DTS SUR./ ENHANCED This program ideally simulates the multi-surround speaker systems of the 35 - Yamaha HTR-5440 | Owner's Manual - Page 53
the main speakers to recreate the realistic sound of a Dolby Stereo theater. 70 mm SPECTACLE 70 mm SCI-FI 70 mm ADVENTURE Surround DSP sound field 70 mm GENERAL The built-in Dolby Digital or DTS decoder brings the professional-quality sound designed for movie theaters into your home. With the - Yamaha HTR-5440 | Owner's Manual - Page 54
is not listed below or if the instruction below does not help, set this unit in the standby mode, disconnect the power cord and contact the nearest authorized YAMAHA dealer or service center. I General Problem The unit fails to turn on when STANDBY/ON (or POWER) is pressed, or enters in the - Yamaha HTR-5440 | Owner's Manual - Page 55
TROUBLESHOOTING Problem Cause Remedy No sound from the effect speakers. No sound from the center speaker. No sound from the rear speakers. No sound from the subwoofer. Poor bass reproduction. A "humming" sound can be heard. The sound effect is off. Press EFFECT to turn it on. A Dolby Surround - Yamaha HTR-5440 | Owner's Manual - Page 56
unit. Cause The component connected to the REC OUT jacks of this unit is turned off. Remedy Turn on the power to the component. It is not possible to record the effect and surround sounds by a recording component. An analog source is being input during digital recording. HTR-5450 only A source - Yamaha HTR-5440 | Owner's Manual - Page 57
unit. Replace all batteries with new ones. The component to be controlled has not been selected. The remote control cannot control system components. Press one of the component selector buttons, corresponding to the component to be controlled. The manufacturer code has not been set up properly - Yamaha HTR-5440 | Owner's Manual - Page 58
50 W maximum 1 (SWITCHED) [Australia model Total 100 W maximum • Dimension (W x H x D 435 x 151 x 390 mm • Weight 10.0 kg • Accessories Remote Control Batteries AM loop antenna Indoor FM antenna Quick Reference Card Connection Guide * Specifications are subject to change without notice. 54 - Yamaha HTR-5440 | Owner's Manual - Page 59
maximum 1 (SWITCHED) [Australia model Total 100 W maximum • Dimension (W x H x D 435 x 151 x 390 mm • Weight 9.5 kg • Accessories Remote Control Batteries AM loop antenna Indoor FM antenna Quick Reference Card Connection Guide * Specifications are subject to change without notice. APPENDIX - Yamaha HTR-5440 | Owner's Manual - Page 60
(Digital Theater Systems) Digital Surround DTS digital surround was developed to replace the analog soundtracks of movies with a six-channel digital sound track, and is now rapidly gaining popularity in movie theaters around the world. Digital Theater Systems Inc. has developed a home theater system - Yamaha HTR-5440 | Owner's Manual - Page 61
audio. The PCM system uses a technique for sampling the size of the analog signal per very small unit of time. Standing for "pulse code modulation", the the sound level can be reproduced. I I/O ASSIGN (SET MENU) Although component is normally connected according to jack names shown on the rear panel - Yamaha HTR-5440 | Owner's Manual - Page 62
preset tuning 28 Manual preset tuning 29 R Rear panel 9 Recording 31 Remote control Basic operation 6 Batteries 3 Operation range 7 Setup codes 45 S Sampling frequency (HTR-5450 only 22, 57 SET MENU 32 SILENT CINEMA 25, 56 Sleep timer 39 SP DLY TIME (SET MENU 36 Speaker Output levels - Yamaha HTR-5440 | Owner's Manual - Page 63
LIST OF MANUFACTURER'S CODES LISTES DES CODES FABRICANT TV A-Mark 1161 A Tandy 0941 Abex 1151 Admira 1141 Adventura 1131 Aiko 1121 Akai 0331, 1101, 1111 Alba 0431 Alleron 1091 Ambassador 1081 Amstrad - Yamaha HTR-5440 | Owner's Manual - Page 64
, 1771 Watson 1001 Xogego 1611, 1621, 1661, 1741, 1761 Yamaha 0361, 1031, 1111 Yoko 1001 Zenith 0011, 0041, 0891, Pulsar 0386 RCA Digital Satellite System 0396, 0406 Realistic 0136 Regency 0506 Toshiba 0386 Tudi 0046 Unika Universal Videoway Viewstar Zenith 0136 0136, 0156 - Yamaha HTR-5440 | Owner's Manual - Page 65
Proscan 0108 0368 0388 0168, 0348 0288 0248 0268 0128, 0248 0048 0188, 0248 0208, 0228 0308 RCA Samsung Sharp Sony Technics Thomson Toshiba Yamaha Zenith 0308 0148 0068 0028 0048 0328 0088, 0248 0008, 0048, 0188, 0248 0248 LD PLAYER Aiwa Denon Disco Vision Funai Hitachi (E) Kenwood Magnavox - Yamaha HTR-5440 | Owner's Manual - Page 66
ELECTRONIQUE FRANCE S.A. RUE AMBROISE CROIZAT BP70 CROISSY-BEAUBOURG 77312 MARNE-LA-VALLEE CEDEX02, FRANCE YAMAHA ELECTRONICS (UK) LTD. YAMAHA HOUSE, 200 RICKMANSWORTH ROAD WATFORD, HERTS WD1 7JS, ENGLAND YAMAHA SCANDINAVIA A.B. J A WETTERGRENS GATA 1, BOX 30053, 400 43 VÄSTRA FRÖLUNDA, SWEDEN - Yamaha HTR-5440 | Owner's Manual - Page 67
OUT VCR 1 SUB WOOFER OUTPUT R+ A MAIN B SPEAKERS - - +L CENTER REAR R (SURROUND) L + - * *RX-V520/RX-V520RDS HTR-5450/HTR-5450RDS only VIDEO IN S VIDEO IN S V * Video Monitor Subwoofer system Center speaker R L Rear speakers (U.S.A. model) L Analog signal S S Video signal - Yamaha HTR-5440 | Owner's Manual - Page 68
buttons 6CH INPUT EFFECT PRESET-/+ TV VOLUME VOLUME MUTE SLEEP TV INPUT PRG+, PRG- SET MENU REC/PAUSE PLAY DIR A (TAPE) SKIP- (MD) REWIND (TAPE) SEARCH (MD) Input selector buttons 6CH INPUT EFFECT POWER TV VOLUME VOLUME MUTE DISPLAY (MD) DECK A/B (TAPE) SLEEP PAUSE (MD) DIR B (TAPE) SKIP - Yamaha HTR-5440 | Owner's Manual - Page 69
SELECT MENU LEFT VCR FAST FORWARD VCR STOP RECALL CHANNEL TV POWER +100 CHANNEL ENTER TV CHANNEL-/+ VOLUME TV VOLUME TV MUTE DISPLAY TV INPUT MENU UP MENU RIGHT TV SLEEP VCR REC*1 VCR PLAY MENU MENU DOWN VCR REWIND CHANNEL EFFECT CHANNEL ENTER TV VOLUME DISPLAY TV INPUT VCR PAUSE VCR
-
 1
1 -
 2
2 -
 3
3 -
 4
4 -
 5
5 -
 6
6 -
 7
7 -
8
-
9
-
10
-
11
-
12
-
13
-
14
-
15
-
16
-
17
-
18
-
19
-
20
-
21
-
22
-
23
-
24
-
25
-
26
-
27
-
28
-
29
-
30
-
31
-
32
-
33
-
34
-
35
-
36
-
37
-
38
-
39
-
40
-
41
-
42
-
43
-
44
-
45
-
46
-
47
-
48
-
49
-
50
-
51
-
52
-
53
-
54
-
55
-
56
-
57
-
58
-
59
-
60
-
61
-
62
-
63
-
64
-
65
-
66
-
67
-
68
-
69
 |
 |

OWNER’S MANUAL
MODE D’EMPLOI
HTR-5450
HTR-5440
Natural Sound AV Receiver
Ampli-tuner audio-vidéo
U C A