Yamaha PSR-225 Owner's Manual - Page 69
Recording a Space, Playing the Accompaniment During EZ Chord Recording - keyboard manual
 |
View all Yamaha PSR-225 manuals
Add to My Manuals
Save this manual to your list of manuals |
Page 69 highlights
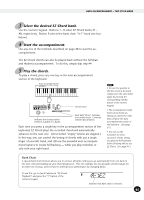
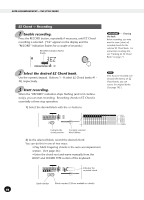
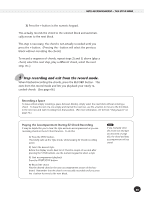
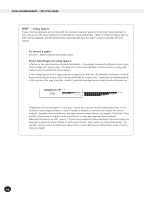
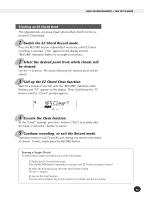
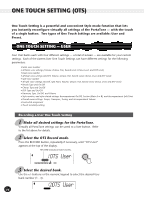
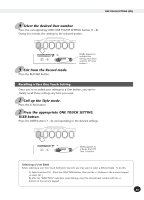
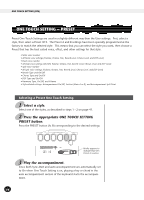
AUTO ACCOMPANIMENT - THE STYLE MODE 3) Press the + button in the numeric keypad. This actually records the chord to the selected block and automatically moves to the next block. This step is necessary; the chord is not actually recorded until you press the + button. (Pressing the - button will select the previous block without recording the chord.) To record a sequence of chords, repeat steps 2) and 3) above (play a chord, select the next step, play a different chord, select the next step, etc.). 4 Stop recording and exit from the record mode. When finished recording the chords, press the RECORD button. This exits from the record mode and lets you playback your newly recorded chords. (See page 66.) Recording a Space To leave a block empty (creating a space between blocks), simply select the next block without entering a chord. To leave the rest of a row empty and start at the next row, use the + button to move to the first block in the next row and start recording from that position. (For more infomation, see the hint "Using Spaces" on page 70.) Playing the Accompaniment During EZ Chord Recording It may be helpful for you to hear the style and auto accompaniment as you are recording chords in the EZ Chord function. To do this: 1) Press the STYLE button. This briefly calls up the Style mode, while keeping EZ Chord recording active. 2) Select the desired style. Before the display reverts back to EZ Chord (a couple of seconds after pressing the STYLE button), use the numeric keypad to select a style. 3) Start accompaniment playback. Press the START/STOP button. 4) Record the chord. Play the desired chord in the auto accompaniment section of the keyboard. Remember that the chord is not actually recorded until you press the + button to move to the next block. If you manually enter the chord root and type (as described on page 68), the chord and bass accompaniment will not sound. 69
-
 1
1 -
2
-
3
-
4
-
5
-
6
-
7
-
8
-
9
-
10
-
11
-
12
-
13
-
14
-
15
-
16
-
17
-
18
-
19
-
20
-
21
-
22
-
23
-
24
-
25
-
26
-
27
-
28
-
29
-
30
-
31
-
32
-
33
-
34
-
35
-
36
-
37
-
38
-
39
-
40
-
41
-
42
-
43
-
44
-
45
-
46
-
47
-
48
-
49
-
50
-
51
-
52
-
53
-
54
-
55
-
56
-
57
-
58
-
59
-
60
-
61
-
62
-
63
-
 64
64 -
 65
65 -
 66
66 -
 67
67 -
 68
68 -
 69
69 -
 70
70 -
 71
71 -
 72
72 -
 73
73 -
 74
74 -
75
-
76
-
77
-
78
-
79
-
80
-
81
-
82
-
83
-
84
-
85
-
86
-
87
-
88
-
89
-
90
-
91
-
92
-
93
-
94
-
95
-
96
-
97
-
98
-
99
-
100
-
101
-
102
-
103
-
104
-
105
-
106
-
107
-
108
-
109
-
110
-
111
-
112
-
113
-
114
-
115
-
116
-
117
-
118
-
119
-
120
 |
 |