Yamaha QL5 Reference Manual - Page 159
Setup, About the SETUP screen
 |
View all Yamaha QL5 manuals
Add to My Manuals
Save this manual to your list of manuals |
Page 159 highlights
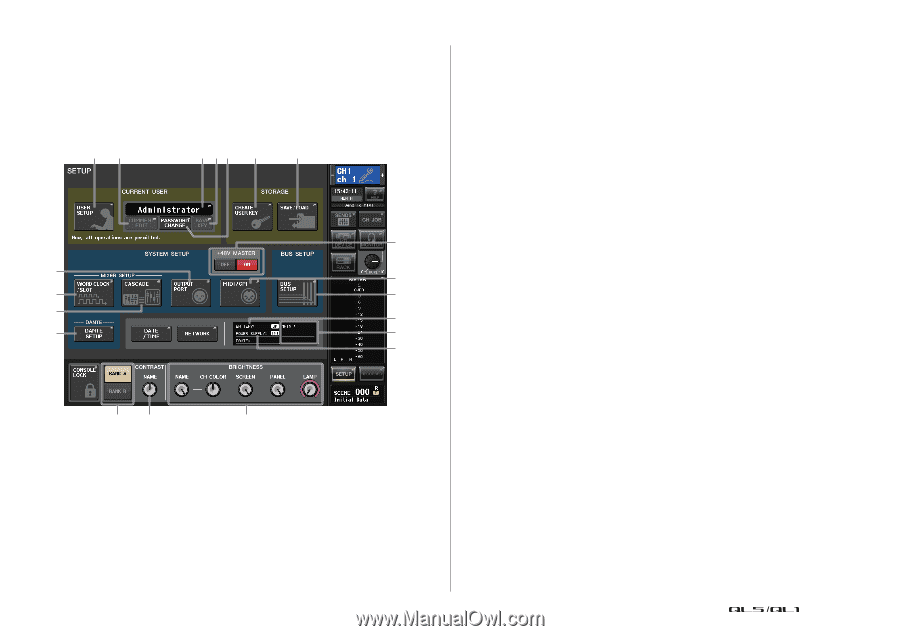
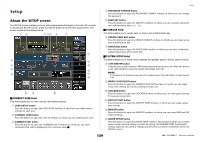
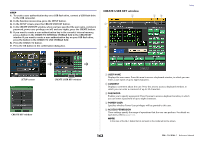
Setup About the SETUP screen The SETUP screen enables you to set various parameters that apply to the entire QL console. To access the SETUP screen, press the SETUP button in the Function Access Area. The screen contains the following items. 13 2 54 6 7 8 A B 9 D 0 E C G F HI J CURRENT USER field This field enables you to make various user-related settings. 1 USER SETUP button Press this button to open the USER SETUP window, in which you can make various settings for each user. 2 CURRENT USER button Press this button to open the LOG IN window, in which you can switch log-in users. 3 COMMENT EDIT button Press this button to open the COMMENT EDIT window, in which you can enter comments that will be displayed in the comment area (). Setup 4 PASSWORD CHANGE button Press this button to open the PASSWORD CHANGE window, in which you can change the password. 5 SAVE KEY button Press this button to open the SAVE KEY window, in which you can overwrite (save) the user authentication key (page 165). STORAGE field This field enables you to create, save, or load a user authentication key. 6 CREATE USER KEY button Press this button to open the CREATE USER KEY window, in which you can create a new user authentication key. 7 SAVE/LOAD button Press this button to open the SAVE/LOAD window, in which you can save or load user authentication keys and console files. SYSTEM SETUP field This field enables you to make various settings that globally apply to the QL series console. 8 +48V MASTER button Switches the console's master +48V master phantom power on or off. When this button is off, +48V phantom power for all the head amps turns off. NOTE If this button is off, phantom power will not be supplied even if the +48V button of each channel is on. 9 WORD CLOCK/SLOT button Press this button to open the WORD CLOCK/SLOT window, in which you can make word clock settings and various settings for each slot. 0 CASCADE button Press this button to open the CASCADE window, in which you can make patch settings for cascade connections. A OUTPUT PORT button Press this button to open the OUTPUT PORT window, in which you can make output port settings. B MIDI/GPI button Press this button to open the MIDI/GPI window, in which you can make MIDI and GPIrelated settings. C DANTE SETUP button Press this button to open the DANTE SETUP window. This window enables you to make various audio network settings (console ID setting; SECONDARY PORT functionality setting; audio bit rate; latency setting; and selections for devices controlled via the I/O DEVICE screen). 159 Reference Manual
-
 1
1 -
2
-
3
-
4
-
5
-
6
-
7
-
8
-
9
-
10
-
11
-
12
-
13
-
14
-
15
-
16
-
17
-
18
-
19
-
20
-
21
-
22
-
23
-
24
-
25
-
26
-
27
-
28
-
29
-
30
-
31
-
32
-
33
-
34
-
35
-
36
-
37
-
38
-
39
-
40
-
41
-
42
-
43
-
44
-
45
-
46
-
47
-
48
-
49
-
50
-
51
-
52
-
53
-
54
-
55
-
56
-
57
-
58
-
59
-
60
-
61
-
62
-
63
-
64
-
65
-
66
-
67
-
68
-
69
-
70
-
71
-
72
-
73
-
74
-
75
-
76
-
77
-
78
-
79
-
80
-
81
-
82
-
83
-
84
-
85
-
86
-
87
-
88
-
89
-
90
-
91
-
92
-
93
-
94
-
95
-
96
-
97
-
98
-
99
-
100
-
101
-
102
-
103
-
104
-
105
-
106
-
107
-
108
-
109
-
110
-
111
-
112
-
113
-
114
-
115
-
116
-
117
-
118
-
119
-
120
-
121
-
122
-
123
-
124
-
125
-
126
-
127
-
128
-
129
-
130
-
131
-
132
-
133
-
134
-
135
-
136
-
137
-
138
-
139
-
140
-
141
-
142
-
143
-
144
-
145
-
146
-
147
-
148
-
149
-
150
-
151
-
152
-
153
-
 154
154 -
 155
155 -
 156
156 -
 157
157 -
 158
158 -
 159
159 -
 160
160 -
 161
161 -
 162
162 -
 163
163 -
 164
164 -
165
-
166
-
167
-
168
-
169
-
170
-
171
-
172
-
173
-
174
-
175
-
176
-
177
-
178
-
179
-
180
-
181
-
182
-
183
-
184
-
185
-
186
-
187
-
188
-
189
-
190
-
191
-
192
-
193
-
194
-
195
-
196
-
197
-
198
-
199
-
200
-
201
-
202
-
203
-
204
-
205
-
206
-
207
-
208
-
209
-
210
-
211
-
212
-
213
-
214
-
215
-
216
-
217
-
218
-
219
-
220
-
221
-
222
-
223
-
224
-
225
-
226
-
227
-
228
-
229
-
230
-
231
-
232
-
233
-
234
-
235
-
236
-
237
-
238
-
239
-
240
-
241
-
242
-
243
-
244
-
245
-
246
-
247
-
248
-
249
-
250
-
251
-
252
-
253
-
254
-
255
-
256
-
257
-
258
-
259
-
260
-
261
-
262
-
263
-
264
 |
 |