Yamaha QL5 Reference Manual - Page 167
Preferences, USER SETUP window PREFERENCE
 |
View all Yamaha QL5 manuals
Add to My Manuals
Save this manual to your list of manuals |
Page 167 highlights
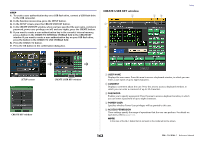
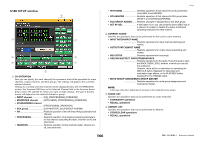
5 FILE LOAD Specifies the settings that will be applied when a file is loaded from a USB flash drive. The user authentication key contains settings such as the user level, preferences, and the USER DEFINED key settings (USER SETUP settings). Other data is saved in an "ALL" file. The "ALL" file also includes the USER SETUP settings of the Administrator and the Guest. • USER SETUP (Preference and USER DEFINED keys settings) • SYSTEM SETUP/MONITOR SETUP • CURRENT SCENE • SCENE LIST • LIBRARY LIST 6 MONITOR SETUP Specifies the monitor setup operations that can be performed. • OSCILLATOR • TALKBACK 7 SYSTEM SETUP Specifies the system setup operations that can be performed. • MIXER SETUP • OUTPUT PORT • MIDI/GPI 8 SET ALL/CLEAR ALL button Permits/clears all items. Preferences Follow the steps below to make various settings for the QL console operating environment, such as how windows appear, and whether [SEL] key on/off operations will be linked. These settings are changed for the user who is logged-in, but if you are logged-in as the Administrator, you will also be able to change the Guest settings. STEP 1. In the Function Access Area, press the SETUP button. 2. In the SETUP screen, press the USER SETUP button. 3. In the USER SETUP window, press the PREFERENCE tab. 4. Use the buttons on screen to make Preference settings. 5. When you have finished making settings, close the window and press the SETUP button in the Function Access Area. NOTE If you are logged-in as the Administrator, you can also turn on the FOR GUEST button to access the PREFERENCE for Guest page and make preference settings for the Guest account. Setup USER SETUP window (PREFERENCE page) 1 2 5 3 4 1 STORE/RECALL field Enables you to turn on or off options related to scene store/recall operations. • STORE CONFIRMATION • RECALL CONFIRMATION If these ON buttons are lit, a confirmation message will appear when you perform a Store or Recall operation respectively. 2 PATCH field Enables you to turn on or off options related to patch operations. • PATCH CONFIRMATION If this ON button is lit, a confirmation message will appear when you edit an input patch or output patch. • STEAL PATCH CONFIRMATION If this ON button is lit, a confirmation message will appear when you edit an input or output patch item that is already patched to a port. 3 LOCALE SETUP field In the SAVE/LOAD screen or RECORDER screen, select JA if you want Japanese to be displayed. (This does not select the Help language.) 4 ERROR MESSAGE field Specifies whether error messages will be displayed. 167 Reference Manual
-
 1
1 -
2
-
3
-
4
-
5
-
6
-
7
-
8
-
9
-
10
-
11
-
12
-
13
-
14
-
15
-
16
-
17
-
18
-
19
-
20
-
21
-
22
-
23
-
24
-
25
-
26
-
27
-
28
-
29
-
30
-
31
-
32
-
33
-
34
-
35
-
36
-
37
-
38
-
39
-
40
-
41
-
42
-
43
-
44
-
45
-
46
-
47
-
48
-
49
-
50
-
51
-
52
-
53
-
54
-
55
-
56
-
57
-
58
-
59
-
60
-
61
-
62
-
63
-
64
-
65
-
66
-
67
-
68
-
69
-
70
-
71
-
72
-
73
-
74
-
75
-
76
-
77
-
78
-
79
-
80
-
81
-
82
-
83
-
84
-
85
-
86
-
87
-
88
-
89
-
90
-
91
-
92
-
93
-
94
-
95
-
96
-
97
-
98
-
99
-
100
-
101
-
102
-
103
-
104
-
105
-
106
-
107
-
108
-
109
-
110
-
111
-
112
-
113
-
114
-
115
-
116
-
117
-
118
-
119
-
120
-
121
-
122
-
123
-
124
-
125
-
126
-
127
-
128
-
129
-
130
-
131
-
132
-
133
-
134
-
135
-
136
-
137
-
138
-
139
-
140
-
141
-
142
-
143
-
144
-
145
-
146
-
147
-
148
-
149
-
150
-
151
-
152
-
153
-
154
-
155
-
156
-
157
-
158
-
159
-
160
-
161
-
 162
162 -
 163
163 -
 164
164 -
 165
165 -
 166
166 -
 167
167 -
 168
168 -
 169
169 -
 170
170 -
 171
171 -
 172
172 -
173
-
174
-
175
-
176
-
177
-
178
-
179
-
180
-
181
-
182
-
183
-
184
-
185
-
186
-
187
-
188
-
189
-
190
-
191
-
192
-
193
-
194
-
195
-
196
-
197
-
198
-
199
-
200
-
201
-
202
-
203
-
204
-
205
-
206
-
207
-
208
-
209
-
210
-
211
-
212
-
213
-
214
-
215
-
216
-
217
-
218
-
219
-
220
-
221
-
222
-
223
-
224
-
225
-
226
-
227
-
228
-
229
-
230
-
231
-
232
-
233
-
234
-
235
-
236
-
237
-
238
-
239
-
240
-
241
-
242
-
243
-
244
-
245
-
246
-
247
-
248
-
249
-
250
-
251
-
252
-
253
-
254
-
255
-
256
-
257
-
258
-
259
-
260
-
261
-
262
-
263
-
264
 |
 |
