Yamaha QL5 Reference Manual - Page 51
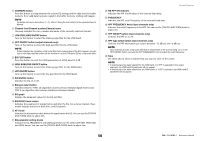
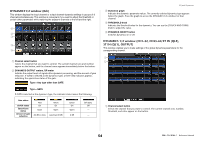
HPF/EQ window 8ch, CH33-64/ST IN QL5, ST IN QL1, OUTPUT, Channel select button, EQ graph
 |
View all Yamaha QL5 manuals
Add to My Manuals
Save this manual to your list of manuals |
Page 51 highlights
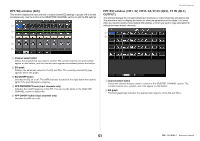
HPF/EQ window (8ch) This window displays the input channel or output channel EQ settings in groups of 8 channels simultaneously. Use the knobs in the SELECTED CHANNEL section to edit the EQ settings. 1 2 3 4 5 EQ and Dynamics HPF/EQ window (CH1-32, CH33-64/ST IN (QL5), ST IN (QL1), OUTPUT) This window displays the corresponding input channels (or output channels) simultaneously. This window is only for display, and does not allow the parameters to be edited. It is useful when you need to quickly check multiple EQ settings, or when you want to copy and paste EQ settings between distant channels. 1 2 1 Channel select button Selects the channel that you want to control. The current channel icon and number appear on the button, and the channel name appears immediately below the button. 2 EQ graph Displays the parameter values for the EQ and filter. The currently-selected EQ type appears below the graph. 3 EQ ON/OFF button Switches the EQ on or off. The OVER indicator (located to the right above the button) lights if the post-EQ signal is clipping. 4 HPF FREQUENCY knob (input channels only) Indicates the cutoff frequency of the HPF. You can use the knobs in the SELECTED CHANNEL section to adjust this. 5 HPF ON/OFF button (input channels only) Switches the HPF on or off. 1 Channel select button Selects the channel that you want to control in the SELECTED CHANNEL section. The current channel icon, number, and color appear on the button. 2 EQ graph This field graphically indicates the approximate response of the EQ and filters. 51 Reference Manual
-
 1
1 -
2
-
3
-
4
-
5
-
6
-
7
-
8
-
9
-
10
-
11
-
12
-
13
-
14
-
15
-
16
-
17
-
18
-
19
-
20
-
21
-
22
-
23
-
24
-
25
-
26
-
27
-
28
-
29
-
30
-
31
-
32
-
33
-
34
-
35
-
36
-
37
-
38
-
39
-
40
-
41
-
42
-
43
-
44
-
45
-
 46
46 -
 47
47 -
 48
48 -
 49
49 -
 50
50 -
 51
51 -
 52
52 -
 53
53 -
 54
54 -
 55
55 -
 56
56 -
57
-
58
-
59
-
60
-
61
-
62
-
63
-
64
-
65
-
66
-
67
-
68
-
69
-
70
-
71
-
72
-
73
-
74
-
75
-
76
-
77
-
78
-
79
-
80
-
81
-
82
-
83
-
84
-
85
-
86
-
87
-
88
-
89
-
90
-
91
-
92
-
93
-
94
-
95
-
96
-
97
-
98
-
99
-
100
-
101
-
102
-
103
-
104
-
105
-
106
-
107
-
108
-
109
-
110
-
111
-
112
-
113
-
114
-
115
-
116
-
117
-
118
-
119
-
120
-
121
-
122
-
123
-
124
-
125
-
126
-
127
-
128
-
129
-
130
-
131
-
132
-
133
-
134
-
135
-
136
-
137
-
138
-
139
-
140
-
141
-
142
-
143
-
144
-
145
-
146
-
147
-
148
-
149
-
150
-
151
-
152
-
153
-
154
-
155
-
156
-
157
-
158
-
159
-
160
-
161
-
162
-
163
-
164
-
165
-
166
-
167
-
168
-
169
-
170
-
171
-
172
-
173
-
174
-
175
-
176
-
177
-
178
-
179
-
180
-
181
-
182
-
183
-
184
-
185
-
186
-
187
-
188
-
189
-
190
-
191
-
192
-
193
-
194
-
195
-
196
-
197
-
198
-
199
-
200
-
201
-
202
-
203
-
204
-
205
-
206
-
207
-
208
-
209
-
210
-
211
-
212
-
213
-
214
-
215
-
216
-
217
-
218
-
219
-
220
-
221
-
222
-
223
-
224
-
225
-
226
-
227
-
228
-
229
-
230
-
231
-
232
-
233
-
234
-
235
-
236
-
237
-
238
-
239
-
240
-
241
-
242
-
243
-
244
-
245
-
246
-
247
-
248
-
249
-
250
-
251
-
252
-
253
-
254
-
255
-
256
-
257
-
258
-
259
-
260
-
261
-
262
-
263
-
264
 |
 |
