Yamaha YPT220MS Owner's Manual - Page 30
Timing
 |
UPC - 086792311234
View all Yamaha YPT220MS manuals
Add to My Manuals
Save this manual to your list of manuals |
Page 30 highlights
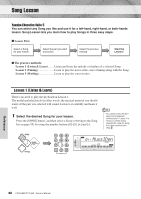
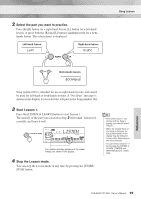
Song Lesson Lesson 2 (Timing) In this lesson, try playing the notes with the correct timing. Simply concentrate on playing each note in time with the rhythmic accompaniment. The correct notes sound even if you play wrong notes as long as you play in time with the rhythm. 1 Select a Song for your lesson. 2 Select the part you want to prac- tice. NOTE • The Split Point is fixed and it cannot be changed. For the left-hand lesson, it is fixed at 59 or B2; for the left-hand chord lesson, it is fixed at 54 or F#2. NOTE • You cannot select the part during Song playback before Lesson 2 starts. If a Song is currently being played back, stop the Song first, then continue from Step 2. 3 Start Lesson 2. Press the [TIMING] button to start Lesson 2. r2 TIMING 004 Play the notes shown in the display. In Lesson 2, simply play each note in time with the music. Songs 070-102 are intended specifically for chord playing lessons. When practicing the left parts of these Songs, play the notes in the Auto Accompaniment range. 4 Stop the Lesson mode. You can stop the Lesson mode at any time by pressing the [START/STOP] button. NOTE • Even after Lesson 2 has started and the Song is playing, you can still select the part. • Regardless of how strongly you play the keys, the level of the sound does not change. As a result, your performance may not sound exactly like the model or example, depending on the selected song. Grade When the lesson Song has played all the way through in Lesson mode 2 or 3, your performance will be evaluated in four levels: OK, Good, Very Good, or Excellent. OK Good Very0Good! Excellent! 30 PSR-E223/YPT-220 Owner's Manual Reference
-
 1
1 -
2
-
3
-
4
-
5
-
6
-
7
-
8
-
9
-
10
-
11
-
12
-
13
-
14
-
15
-
16
-
17
-
18
-
19
-
20
-
21
-
22
-
23
-
24
-
 25
25 -
 26
26 -
 27
27 -
 28
28 -
 29
29 -
 30
30 -
 31
31 -
 32
32 -
 33
33 -
 34
34 -
 35
35 -
36
-
37
-
38
-
39
-
40
-
41
-
42
-
43
-
44
-
45
-
46
-
47
-
48
-
49
-
50
-
51
-
52
-
53
-
54
-
55
-
56
-
57
-
58
-
59
-
60
-
61
-
62
-
63
-
64
 |
 |