Yamaha YSP 3000 Owner's Manual - Page 10
Supplied accessories, U.S.A. and Canada models - how to use subwoofer
 |
UPC - 027108928616
View all Yamaha YSP 3000 manuals
Add to My Manuals
Save this manual to your list of manuals |
Page 10 highlights
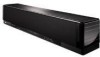
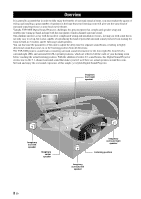
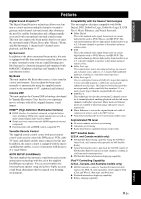
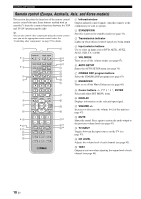
Supplied accessories Supplied accessories Check that you have received all of the following parts. Remote control (×1) STANDBY/ON POWER POWER AV TV DOCK DVD AUX1 AUX2 AUX3 TV INPUT1 MACRO STB TV PRESET/TUNE SEARCH MEMORY FM/XM CAT AUTO VOL MODE SETUP INPUTMODE SLEEP 5BEAM 1 ST+3BEAM 2 3BEAM 3 STEREO 4 MY BEAM 5 MY SUR. 6 MUSIC 7 MOVIE 8 SPORTS 9 OFF SUR. DECODE 0 +10 ENHANCER ENTRY MENU CAT/ A-E DISPLAY ENTER TV/AV YSP RETURN VOLUME CH TV VOL Fasteners (×4) Cable clamp (×1) IntelliBeam microphone (×1) Optical cable (×1) Digital audio pin cable (×1) (Orange) Audio pin cable (×1) MUTE TV INPUT TV MUTE CODE SET CH LEVEL TEST Cardboard microphone stand (×1) (White/Red) (U.S.A. and Canada models) Batteries (×2) (AA, R6, UM-3) Demonstration DVD (×1) Indoor FM antenna (×1) OSD* video pin cable (×1) (Yellow) *OSD: On-Screen Display REFERENCE GUIDE (iPod/XM Radio) (×1) UA YSP-3000 Digital Sound ProjectorTM Reference Guide for iPod/XM Radio Overview This is the Reference Guide for Yamaha YSP-3000 Digital Sound Projector. This guide explains the connections and operations of iPod and XM Satellite Radio (U.S.A. and Canada models only). Operations in this guide use keys on the supplied remote control unless otherwise specified. For general information including the controls and functions of this unit, refer to the owner's manual. y The illustrations used in this Reference Guide are for U.S.A. and Canada models only. iPodTM "iPod" is a trademark of Apple Inc., registered in the U.S. and other countries. The XM name and related logos are registered trademarks of XM Satellite Radio Inc. Neural Surround™ name and related logos are trademarks owned by Neural Audio Corporation. Contents Using iPod™...2 Connection...2 Controlling iPod™ ...2 XM Satellite Radio tuning (U.S.A. and Canada models only 5 Connecting XM Mini-Tuner Home Dock 5 Activating XM Satellite Radio ...6 Basic XM Satellite Radio operations ...6 Presetting the XM Satellite Radio channels 9 Displaying the XM Satellite Radio information 10 Troubleshooting ...11 (U.S.A., Canada, and Australia models only) QUICK REFERENCE GUIDE YSP-3000 QUICK REFERENCE GUIDE Items used for connections and operations in this guide s Audio pin cable (x1) s OSD* video pin cable (x1) s Optical cable (x1) s Digital audio pin cable (x1) s IntelliBeam microphone (x1) s Cardboard microphone stand (x1) s Demonstration DVD (x1) *OSD: On-Screen Display This quick reference guide explains steps to connect a TV and a DVD player to this unit and achieve the surround sound effects in a quick, easy manner. For detailed operation, refer to the Owner's Manual. 1 Installing this unit Decide where to install this unit. Install this unit where there are no objects such as furniture obstructing the path of sound beams. Otherwise, the desired surround sound effects may not be achieved. You may install this unit in parallel with the wall or in the corner. Install this unit in the exact center of the wall when it is measured from the left and right corners. Install this unit in the corner at a 40˚ to 50˚ angle from the adjacent walls. An object, such as furniture Front left channel Center channel Front right channel Surround left channel Surround right channel An object, such as furniture 40˚ to 50˚ Front left channel Center channel Front right channel Surround left channel Surround right channel Install this unit using a rack, etc. Depending on your installation environment, connections with external components (see "2 Connecting external components to this unit") can be done before installing this unit. We recommend that you temporarily place and arrange all components in order to decide which procedure must come first. In case you install this unit on top of a rack, etc., use the supplied fasteners to prevent an accidental fall of this unit. For further information on installation, see page 16 in the Owner's Manual. The following is an example of installing this unit in a rack. To prevent this unit or the floor from being scratched, we recommend putting a piece of cloth on the floor in step 2. 1 Place this unit in front of 2 Place this unit upside 3 Install this unit in the 4 Installation is completed. the rack. down and connect this unit to rack. your TV and DVD player. y Hint • To enjoy better surround effects, place this unit on the upper shelf to keep it away from the floor. • You can also use the optional metal wall bracket (sold separately) to mount this unit on the wall. For details, refer to the instructions supplied with the metal wall bracket. Note Be careful not to leave scratches on this unit or the rack. Printed in Malaysia WK75520 [En] 2 Connecting external components to this unit Connecting external components such as a TV or DVD player to this unit. Connect your TV or DVD player to this unit using appropriate cables as shown below. After all connections are complete, plug the power supply cable into the AC wall outlet. For further information on connecting other components, see pages 19 to 29 in the Owner's Manual. Connection example 1 This connection example shows a way to connect external components such as a TV or DVD player to this unit by using the supplied cable. You can enjoy the multi-channel audio from the DVD player and the analog/digital audio from the TV. Use the video pin cable supplied with your DVD player to make a video connection between your DVD player and TV. TV DVD player ANALOG AUDIO VIDEO OUTPUT INPUT L 1 R 2 Video connection OPTICAL AUDIO OUTPUT COAXIAL AUDIO OUTPUT 1. Pull out the cap 2. Check the direction Optical cable Pull out the cap before connecting the optical cable, and then check the direction to insert the cable. 1 2 3 4 AUDIO INPUT OUT VIDEO DIGITAL INPUT AUX 2 DVD COAXIAL AUX 1 TV/STB SUBWOOFER AUX 1 TV/STB Audio connection * The rear panel illustration shows jacks and their names to help you find them easily. They are not exactly the same as the ones on the actual rear panel of this unit. YSP-3000 Subwoofer Do not plug the power supply cable into an AC wall outlet until all connections are complete. To the AC wall outlet Connect cables in the following order. Supplied 1 Audio pin cable (Outputs TV analog audio sounds from this unit) 2 OSD video pin cable (Displays the YSP-3000 menu screen on the TV) 3 Optical cable (Outputs TV digital audio sounds from this unit) 4 Digital audio pin cable (Outputs DVD digital audio sounds from this unit) y Hint Check whether the digital audio output of your TV and DVD player is turned on. If you have connected external components, follow the steps on the backside to start the Continued AUTO SETUP procedure. on the back Connection example 2 This connection example shows a way to make the most of the capability of this unit. You can enjoy DVD audio and video with higher quality via the HDMI cable. In case your TV does not have a built-in digital satellite tuner, cable TV tuner, or digital airwave tuner, connect a digital satellite tuner, cable TV tuner, or digital airwave tuner via the HDMI cable. For details, see "Connections using HDMI cables" on page 21 in the Owner's manual. TV DVD player Digital satellite tuner/Cable TV tuner/ Digital airwave tuner VIDEO INPUT 1 2 HDMI INPUT HDMI OUTPUT 1 2 (Sold separately) 3 (Sold separately) HDMI connection AUX 1 DVD IN OUT HDMI AUDIO INPUT OUT VIDEO DIGITAL INPUT AUX 2 DVD COAXIAL YSP-3000 AUX 1 TV/STB SUBWOOFER AUX 1 TV/STB Subwoofer Audio connection * The rear panel illustration shows jacks and their names to help you find them easily. They are not exactly the same as the ones on the actual rear panel of this unit. Do not plug the power supply cable into an AC wall outlet until all connections are complete. To the AC wall outlet Connect cables in the following order. Supplied 1 OSD video pin cable (Displays the YSP-3000 menu screen on the TV) Sold separately 2 HDMI cable (Displays the DVD digital video on the TV) 3 HDMI cable (Inputs DVD digital audio/video signals to this unit) y Hint • If you connect this unit to an HDMI control-compatible TV (except some models) via HDMI, you can use the remote control supplied with your TV to turn on or off the power, select the audio output component, and adjust the volume level of this unit. • Check whether the digital audio output of your TV and DVD player is turned on. If you have connected external components, follow the steps on the backside to start the Continued AUTO SETUP procedure. on the back C2007 All rights reserved. * The number of provided languages varies depending on the sales area. 6 En
-
 1
1 -
2
-
3
-
4
-
 5
5 -
 6
6 -
 7
7 -
 8
8 -
 9
9 -
 10
10 -
 11
11 -
 12
12 -
 13
13 -
 14
14 -
 15
15 -
16
-
17
-
18
-
19
-
20
-
21
-
22
-
23
-
24
-
25
-
26
-
27
-
28
-
29
-
30
-
31
-
32
-
33
-
34
-
35
-
36
-
37
-
38
-
39
-
40
-
41
-
42
-
43
-
44
-
45
-
46
-
47
-
48
-
49
-
50
-
51
-
52
-
53
-
54
-
55
-
56
-
57
-
58
-
59
-
60
-
61
-
62
-
63
-
64
-
65
-
66
-
67
-
68
-
69
-
70
-
71
-
72
-
73
-
74
-
75
-
76
-
77
-
78
-
79
-
80
-
81
-
82
-
83
-
84
-
85
-
86
-
87
-
88
-
89
-
90
-
91
-
92
-
93
-
94
-
95
-
96
-
97
-
98
-
99
-
100
-
101
-
102
-
103
-
104
-
105
-
106
-
107
-
108
-
109
-
110
-
111
-
112
-
113
-
114
-
115
-
116
-
117
-
118
-
119
-
120
-
121
-
122
-
123
-
124
-
125
-
126
-
127
-
128
-
129
 |
 |
