2013 Chevrolet Express 1500 Cargo Owner Manual - Page 109
2013 Chevrolet Express 1500 Cargo Manual

Page 109 highlights
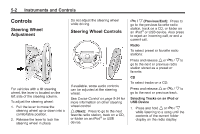
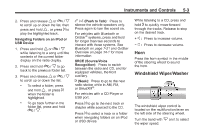
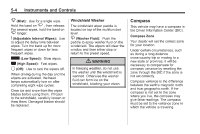
Instruments and Controls Another way to increase the time or date, is to press ¨ SEEK or \ FWD (forward). 3. To decrease, press © SEEK or s REV. Turn the f knob, on the upper right side of the radio, to adjust the selected setting. Changing the Time and Date Default Settings To change the time or date default settings: 1. Press H and then the softkey under the forward arrow that is currently displayed on the radio screen until the time 12H (hour) and 24H (hour), and the date MM/DD (month and day) and DD/MM (day and month) are displayed. 2. Press the softkey under the desired option. 3. Press H again to apply the selected default, or let the screen time out. 5-7 Power Outlets The accessory power outlets can be used to plug in electrical equipment, such as a cell phone or an MP3 player. The vehicle may have two accessory power outlets on the instrument panel. Remove the cover to access and replace when not in use. Certain power accessory plugs may not be compatible to the accessory power outlet and could overload vehicle or adapter fuses. If a problem is experienced, see your dealer. Notice: Leaving electrical equipment plugged in for an extended period of time while the vehicle is off will drain the battery. Always unplug electrical equipment when not in use and do not plug in equipment that exceeds the maximum 20 ampere rating. When adding electrical equipment, be sure to follow the proper installation instructions included with the equipment. See Add-On Electrical Equipment on page 9‑57. Notice: Hanging heavy equipment from the power outlet can cause damage not covered by the vehicle warranty. The power outlets are designed for accessory power plugs only, such as cell phone charge cords. { WARNING Power is always supplied to the outlets. Do not leave electrical equipment plugged in when the vehicle is not in use because the vehicle could catch fire and cause injury or death. Cigarette Lighter To use the cigarette lighter, if the vehicle has one, push it in all the way, and let go. When it is ready for use, it will pop back out by itself.
-
 1
1 -
2
-
3
-
4
-
5
-
6
-
7
-
8
-
9
-
10
-
11
-
12
-
13
-
14
-
15
-
16
-
17
-
18
-
19
-
20
-
21
-
22
-
23
-
24
-
25
-
26
-
27
-
28
-
29
-
30
-
31
-
32
-
33
-
34
-
35
-
36
-
37
-
38
-
39
-
40
-
41
-
42
-
43
-
44
-
45
-
46
-
47
-
48
-
49
-
50
-
51
-
52
-
53
-
54
-
55
-
56
-
57
-
58
-
59
-
60
-
61
-
62
-
63
-
64
-
65
-
66
-
67
-
68
-
69
-
70
-
71
-
72
-
73
-
74
-
75
-
76
-
77
-
78
-
79
-
80
-
81
-
82
-
83
-
84
-
85
-
86
-
87
-
88
-
89
-
90
-
91
-
92
-
93
-
94
-
95
-
96
-
97
-
98
-
99
-
100
-
101
-
102
-
103
-
 104
104 -
 105
105 -
 106
106 -
 107
107 -
 108
108 -
 109
109 -
 110
110 -
 111
111 -
 112
112 -
 113
113 -
 114
114 -
115
-
116
-
117
-
118
-
119
-
120
-
121
-
122
-
123
-
124
-
125
-
126
-
127
-
128
-
129
-
130
-
131
-
132
-
133
-
134
-
135
-
136
-
137
-
138
-
139
-
140
-
141
-
142
-
143
-
144
-
145
-
146
-
147
-
148
-
149
-
150
-
151
-
152
-
153
-
154
-
155
-
156
-
157
-
158
-
159
-
160
-
161
-
162
-
163
-
164
-
165
-
166
-
167
-
168
-
169
-
170
-
171
-
172
-
173
-
174
-
175
-
176
-
177
-
178
-
179
-
180
-
181
-
182
-
183
-
184
-
185
-
186
-
187
-
188
-
189
-
190
-
191
-
192
-
193
-
194
-
195
-
196
-
197
-
198
-
199
-
200
-
201
-
202
-
203
-
204
-
205
-
206
-
207
-
208
-
209
-
210
-
211
-
212
-
213
-
214
-
215
-
216
-
217
-
218
-
219
-
220
-
221
-
222
-
223
-
224
-
225
-
226
-
227
-
228
-
229
-
230
-
231
-
232
-
233
-
234
-
235
-
236
-
237
-
238
-
239
-
240
-
241
-
242
-
243
-
244
-
245
-
246
-
247
-
248
-
249
-
250
-
251
-
252
-
253
-
254
-
255
-
256
-
257
-
258
-
259
-
260
-
261
-
262
-
263
-
264
-
265
-
266
-
267
-
268
-
269
-
270
-
271
-
272
-
273
-
274
-
275
-
276
-
277
-
278
-
279
-
280
-
281
-
282
-
283
-
284
-
285
-
286
-
287
-
288
-
289
-
290
-
291
-
292
-
293
-
294
-
295
-
296
-
297
-
298
-
299
-
300
-
301
-
302
-
303
-
304
-
305
-
306
-
307
-
308
-
309
-
310
-
311
-
312
-
313
-
314
-
315
-
316
-
317
-
318
-
319
-
320
-
321
-
322
-
323
-
324
-
325
-
326
-
327
-
328
-
329
-
330
-
331
-
332
-
333
-
334
-
335
-
336
-
337
-
338
-
339
-
340
-
341
-
342
-
343
-
344
-
345
-
346
-
347
-
348
-
349
-
350
-
351
-
352
-
353
-
354
-
355
-
356
-
357
-
358
-
359
-
360
-
361
-
362
-
363
-
364
-
365
-
366
-
367
-
368
-
369
-
370
-
371
-
372
-
373
-
374
-
375
-
376
-
377
-
378
-
379
-
380
-
381
-
382
-
383
-
384
-
385
-
386
-
387
-
388
-
389
-
390
-
391
-
392
-
393
-
394
-
395
-
396
-
397
-
398
-
399
-
400
-
401
-
402
 |
 |