2004 Honda Civic Owner's Manual - Page 158
2004 Honda Civic Manual
Page 158 highlights
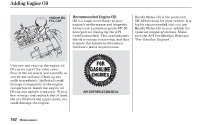
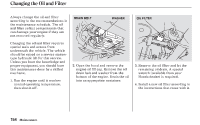
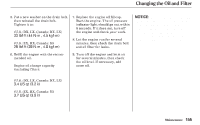
Changing the Oil and Filter 5. Put a new washer on the drain bolt, then reinstall the drain bolt. Tighten it to: (U.S.: DX, LX, Canada: DX, LX) 33 lbf·ft (44 N·m , 4.5 kgf·m) (U.S.: EX, HX, Canada: Si) 29 lbf·ft (39 N·m , 4.0 kgf·m) 6. Refill the engine with the recommended oil. Engine oil change capacity (including filter): (U.S.: DX, LX, Canada: DX, LX) 3.4 US qt (3.2 ) (U.S.: EX, HX, Canada: Si) 3.7 US qt (3.5 ) 7. Replace the engine oil fill cap. Start the engine. The oil pressure indicator light should go out within 5 seconds. If it does not, turn off the engine and check your work. 8. Let the engine run for several minutes, then check the drain bolt and oil filter for leaks. 9. Turn off the engine and let it sit for several minutes, then check the oil level. If necessary, add more oil. NOTICE: Improper disposal of engine oil can be harmf ul to the environment. If you change your own oil, please dispose of the used oil properly. Put it in a sealed container and take it to a recycling center. Do not discard it in a trash bin or dump it on the ground. Maintenance 155
-
 1
1 -
2
-
3
-
4
-
5
-
6
-
7
-
8
-
9
-
10
-
11
-
12
-
13
-
14
-
15
-
16
-
17
-
18
-
19
-
20
-
21
-
22
-
23
-
24
-
25
-
26
-
27
-
28
-
29
-
30
-
31
-
32
-
33
-
34
-
35
-
36
-
37
-
38
-
39
-
40
-
41
-
42
-
43
-
44
-
45
-
46
-
47
-
48
-
49
-
50
-
51
-
52
-
53
-
54
-
55
-
56
-
57
-
58
-
59
-
60
-
61
-
62
-
63
-
64
-
65
-
66
-
67
-
68
-
69
-
70
-
71
-
72
-
73
-
74
-
75
-
76
-
77
-
78
-
79
-
80
-
81
-
82
-
83
-
84
-
85
-
86
-
87
-
88
-
89
-
90
-
91
-
92
-
93
-
94
-
95
-
96
-
97
-
98
-
99
-
100
-
101
-
102
-
103
-
104
-
105
-
106
-
107
-
108
-
109
-
110
-
111
-
112
-
113
-
114
-
115
-
116
-
117
-
118
-
119
-
120
-
121
-
122
-
123
-
124
-
125
-
126
-
127
-
128
-
129
-
130
-
131
-
132
-
133
-
134
-
135
-
136
-
137
-
138
-
139
-
140
-
141
-
142
-
143
-
144
-
145
-
146
-
147
-
148
-
149
-
150
-
151
-
152
-
 153
153 -
 154
154 -
 155
155 -
 156
156 -
 157
157 -
 158
158 -
 159
159 -
 160
160 -
 161
161 -
 162
162 -
 163
163 -
164
-
165
-
166
-
167
-
168
-
169
-
170
-
171
-
172
-
173
-
174
-
175
-
176
-
177
-
178
-
179
-
180
-
181
-
182
-
183
-
184
-
185
-
186
-
187
-
188
-
189
-
190
-
191
-
192
-
193
-
194
-
195
-
196
-
197
-
198
-
199
-
200
-
201
-
202
-
203
-
204
-
205
-
206
-
207
-
208
-
209
-
210
-
211
-
212
-
213
-
214
-
215
-
216
-
217
-
218
-
219
-
220
-
221
-
222
-
223
-
224
-
225
-
226
-
227
-
228
-
229
-
230
-
231
-
232
-
233
 |
 |