2005 Volvo S40 Owner's Manual - Page 82
2005 Volvo S40 Manual
Page 82 highlights
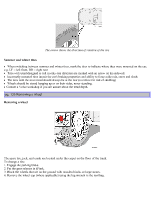
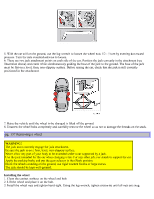
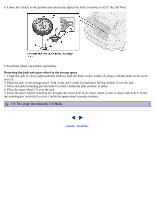
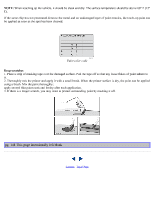
5. With the car still on the ground, use the lug wrench to loosen the wheel nuts 1/2 - 1 turn by exerting downward pressure. Turn the nuts counterclockwise to loosen. 6. There are two jack attachment points on each side of the car. Position the jack correctly in the attachment (see illustration above) and crank while simultaneously guiding the base of the jack to the ground. The base of the jack must be flat on a level, firm, non-slippery surface. Before raising the car, check that the jack is still correctly positioned in the attachment. 7. Raise the vehicle until the wheel to be changed is lifted off the ground. 8. Unscrew the wheel bolts completely and carefully remove the wheel so as not to damage the threads on the studs. pg. 137 Removing a wheel WARNING! The jack must correctly engage the jack attachment. Be sure the jack is on a firm, level, non-slippery surface. Never allow any part of your body to be extended under a car supported by a jack. Use the jack intended for the car when changing a tire. For any other job, use stands to support the car. Apply the parking brake and put the gear selector in the (P)ark position. Block the wheels standing on the ground, use rigid wooden blocks or large stones. The jack should be kept well-greased. Installing the wheel 1. Clean the contact surfaces on the wheel and hub. 2. Lift the wheel and place it on the hub. 3. Install the wheel nuts and tighten hand-tight. Using the lug wrench, tighten crosswise until all nuts are snug.
-
 1
1 -
2
-
3
-
4
-
5
-
6
-
7
-
8
-
9
-
10
-
11
-
12
-
13
-
14
-
15
-
16
-
17
-
18
-
19
-
20
-
21
-
22
-
23
-
24
-
25
-
26
-
27
-
28
-
29
-
30
-
31
-
32
-
33
-
34
-
35
-
36
-
37
-
38
-
39
-
40
-
41
-
42
-
43
-
44
-
45
-
46
-
47
-
48
-
49
-
50
-
51
-
52
-
53
-
54
-
55
-
56
-
57
-
58
-
59
-
60
-
61
-
62
-
63
-
64
-
65
-
66
-
67
-
68
-
69
-
70
-
71
-
72
-
73
-
74
-
75
-
76
-
 77
77 -
 78
78 -
 79
79 -
 80
80 -
 81
81 -
 82
82 -
 83
83 -
 84
84 -
 85
85 -
 86
86 -
 87
87 -
88
-
89
-
90
-
91
-
92
-
93
-
94
-
95
-
96
-
97
-
98
-
99
-
100
-
101
-
102
-
103
-
104
-
105
-
106
-
107
-
108
-
109
-
110
-
111
-
112
-
113
-
114
-
115
-
116
-
117
-
118
-
119
-
120
-
121
-
122
-
123
-
124
-
125
-
126
-
127
 |
 |
