2007 Volvo C70 Owner's Manual - Page 157
2007 Volvo C70 Manual

Page 157 highlights
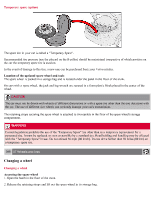
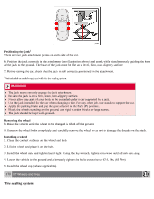
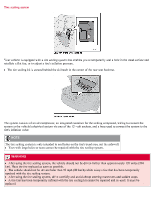
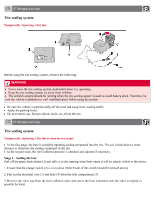
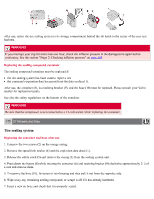
4. Connect the electrical wire to the nearest 12-volt socket in the vehicle. 5. Release the safety catch (6) and turn the orange colored section of the sealing kit (7), which holds the sealing compound container, 90 degrees until it clicks into the vertical position. 6. Start the vehicle's engine. 7. Start the tire sealing system's compressor by pressing the switch (2) to position I. NOTE The air pressure gauge (9) will temporarily show an increase in pressure to approximately 88 psi (6 bar) while the sealing compound is being pumped into the tire. The pressure should return to a normal level after approximately one minute. WARNING Contact with the sealing compound may cause skin irritation. If contact occurs, wash the affected area immediately. Never stand next to the tire being inflated when the compressor is in operation. If cracks, bubbles, etc. form on the tire, switch off the compressor immediately. If there is visible damage to the sidewall or the rim, the tire cannot be repaired. The vehicle should not be driven if this occurs. Contact a towing service or Volvo On Call Roadside Assistance if applicable. 8. Within seven minutes, inflate the tire to between 22 - 50 psi (1.8 - 3.5 bar). Switch off the compressor briefly to get a clear reading from the pressure gauge (9). 9. Disconnect the electrical wire from the 12-volt socket. NOTE If the pressure remains below 22 psi (1.8 bar) after approximately seven minutes, turn off the compressor. In this case, the hole is too large to be sealed and the vehicle should not be driven. 10. Unscrew the hose from the tire's inflation valve and reinstall the valve cap. 11. Fold down the orange section of the tire sealing system to its original (horizontal) position and press the safety catch into place. 12. Safely stow the tire sealing system kit in a convenient place as it will soon be used again to check the tire's inflation pressure. 13. Immediately drive the vehicle for approximately 2 miles (3 km) to distribute the sealing compound in the tire. 173 07 Wheels and tires Tire sealing system Stage 2 - Checking inflation pressure 1. Park the car in a safe place.
-
 1
1 -
2
-
3
-
4
-
5
-
6
-
7
-
8
-
9
-
10
-
11
-
12
-
13
-
14
-
15
-
16
-
17
-
18
-
19
-
20
-
21
-
22
-
23
-
24
-
25
-
26
-
27
-
28
-
29
-
30
-
31
-
32
-
33
-
34
-
35
-
36
-
37
-
38
-
39
-
40
-
41
-
42
-
43
-
44
-
45
-
46
-
47
-
48
-
49
-
50
-
51
-
52
-
53
-
54
-
55
-
56
-
57
-
58
-
59
-
60
-
61
-
62
-
63
-
64
-
65
-
66
-
67
-
68
-
69
-
70
-
71
-
72
-
73
-
74
-
75
-
76
-
77
-
78
-
79
-
80
-
81
-
82
-
83
-
84
-
85
-
86
-
87
-
88
-
89
-
90
-
91
-
92
-
93
-
94
-
95
-
96
-
97
-
98
-
99
-
100
-
101
-
102
-
103
-
104
-
105
-
106
-
107
-
108
-
109
-
110
-
111
-
112
-
113
-
114
-
115
-
116
-
117
-
118
-
119
-
120
-
121
-
122
-
123
-
124
-
125
-
126
-
127
-
128
-
129
-
130
-
131
-
132
-
133
-
134
-
135
-
136
-
137
-
138
-
139
-
140
-
141
-
142
-
143
-
144
-
145
-
146
-
147
-
148
-
149
-
150
-
151
-
 152
152 -
 153
153 -
 154
154 -
 155
155 -
 156
156 -
 157
157 -
 158
158 -
 159
159 -
 160
160 -
 161
161 -
 162
162 -
163
-
164
-
165
-
166
-
167
-
168
-
169
-
170
-
171
-
172
-
173
-
174
-
175
-
176
-
177
-
178
-
179
-
180
-
181
-
182
-
183
-
184
-
185
-
186
-
187
-
188
-
189
-
190
-
191
-
192
-
193
-
194
-
195
-
196
-
197
-
198
-
199
-
200
-
201
-
202
-
203
-
204
-
205
-
206
-
207
-
208
-
209
-
210
-
211
-
212
-
213
-
214
-
215
-
216
-
217
 |
 |