2007 Volvo C70 Owner's Manual - Page 158
2007 Volvo C70 Manual
Page 158 highlights
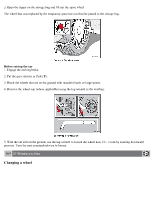
2. Ensure that the orange switch (2) is in position 0 (the 0 side of the switch should be pressed down). 3. Remove the valve cap from the tire's inflation valve and screw the hose connector onto the valve as tightly as possible by hand. WARNING If heavy vibrations, unsteady steering behavior, or noises should occur while driving, reduce speed and park the car in a safe place. Recheck the tire for bumps, cracks, or other visible damage, and recheck its inflation pressure. If the pressure is below 16 psi (1.3 bar), do not continue driving. Have the vehicle towed to a workshop or Volvo retailer. 4. Connect the electrical wire to the nearest 12-volt socket in the vehicle. 5. Start the vehicle's engine. 6. Check the tire's inflation pressure on the gauge (9). NOTE In dark conditions, switching on the tire sealing system's compressor will illuminate the pressure gauge. 7. Inflate the tire to the correct pressure as indicated in the tire inflation tables on pages 156 and 157. If the tire needs to be inflated, start the tire sealing system's compressor. If necessary, release air from the tire by pressing the vent button (8). 8. Turn off the compressor (press switch 2 to the 0 position) when the correct inflation pressure has been reached. CAUTION The compressor should not be used for more than ten minutes at a time to avoid overheating. 9. Unscrew the hose from the tire's inflation valve and reinstall the valve cap. 10. Disconnect the electrical wire from the 12-volt socket. 11. Return the hose and electrical wire to the compartment on the side of the unit. NOTE When the tire sealing system has been used to seal a flat tire, the tank containing the sealing compound, and the hose must be replaced. See the instructions on the following page. Contact a Volvo retailer for replacement parts. 174 07 Wheels and tires Tire sealing system Replacing the sealing compound container
-
 1
1 -
2
-
3
-
4
-
5
-
6
-
7
-
8
-
9
-
10
-
11
-
12
-
13
-
14
-
15
-
16
-
17
-
18
-
19
-
20
-
21
-
22
-
23
-
24
-
25
-
26
-
27
-
28
-
29
-
30
-
31
-
32
-
33
-
34
-
35
-
36
-
37
-
38
-
39
-
40
-
41
-
42
-
43
-
44
-
45
-
46
-
47
-
48
-
49
-
50
-
51
-
52
-
53
-
54
-
55
-
56
-
57
-
58
-
59
-
60
-
61
-
62
-
63
-
64
-
65
-
66
-
67
-
68
-
69
-
70
-
71
-
72
-
73
-
74
-
75
-
76
-
77
-
78
-
79
-
80
-
81
-
82
-
83
-
84
-
85
-
86
-
87
-
88
-
89
-
90
-
91
-
92
-
93
-
94
-
95
-
96
-
97
-
98
-
99
-
100
-
101
-
102
-
103
-
104
-
105
-
106
-
107
-
108
-
109
-
110
-
111
-
112
-
113
-
114
-
115
-
116
-
117
-
118
-
119
-
120
-
121
-
122
-
123
-
124
-
125
-
126
-
127
-
128
-
129
-
130
-
131
-
132
-
133
-
134
-
135
-
136
-
137
-
138
-
139
-
140
-
141
-
142
-
143
-
144
-
145
-
146
-
147
-
148
-
149
-
150
-
151
-
152
-
 153
153 -
 154
154 -
 155
155 -
 156
156 -
 157
157 -
 158
158 -
 159
159 -
 160
160 -
 161
161 -
 162
162 -
 163
163 -
164
-
165
-
166
-
167
-
168
-
169
-
170
-
171
-
172
-
173
-
174
-
175
-
176
-
177
-
178
-
179
-
180
-
181
-
182
-
183
-
184
-
185
-
186
-
187
-
188
-
189
-
190
-
191
-
192
-
193
-
194
-
195
-
196
-
197
-
198
-
199
-
200
-
201
-
202
-
203
-
204
-
205
-
206
-
207
-
208
-
209
-
210
-
211
-
212
-
213
-
214
-
215
-
216
-
217
 |
 |
