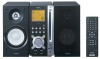
AIWA AWP-ZP5 Operating Instructions
AIWA AWP-ZP5 Manual
 |
View all AIWA AWP-ZP5 manuals
Add to My Manuals
Save this manual to your list of manuals |
AIWA AWP-ZP5 manual content summary:
- AIWA AWP-ZP5 | Operating Instructions - Page 1
4-253-925-13(1) Operating Instructions Owner's Record The model and serial numbers are located on the rear of the unit. Record the serial number in the space provided below. Refer to them whenever you call upon your Aiwa dealer regarding this product. Model No Serial No ©2004 Sony - AIWA AWP-ZP5 | Operating Instructions - Page 2
. This symbol is intended to alert the user to the presence of important operating and maintenance (servicing) instructions in the literature accompanying the appliance. CAUTION The or modifications not expressly approved in this manual could void your authority to operate this equipment. 2GB - AIWA AWP-ZP5 | Operating Instructions - Page 3
If you have any questions about this product, you may call; Aiwa Customer Information Service Center 1-800-289-2492 or http://www.us.aiwa.com/ The Number below is for the FCC related matters only. or registered trademarks of their respective holders. • ™ and ® marks are omitted in this manual. 3GB - AIWA AWP-ZP5 | Operating Instructions - Page 4
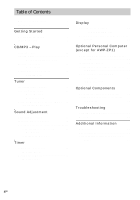
Preset Tuning - Manual Tuning Using the driver 23 Listening to audio files on a personal computer 26 Connecting an optional USB component 27 (AWP-ZP5 only) Optional Components Hooking up optional components......... 28 Listening to audio from a connected component 29 Troubleshooting Problems - AIWA AWP-ZP5 | Operating Instructions - Page 5
How to use this manual This manual mainly explains operations using the remote, but the same operations can also be performed using the buttons on the system having the same or similar names. Playable discs You can play - AIWA AWP-ZP5 | Operating Instructions - Page 6
not been correctly finalized. For more information, see the operating instructions for the recording device. • Discs recorded on CD-R/CD-RW condition or the driver's characteristics. • CD-R and CD-RW discs recorded in multisession that have not ended by "closing the session" are not supported. • The - AIWA AWP-ZP5 | Operating Instructions - Page 7
Getting Started Hooking up the system Perform the following procedures 1 to 4 to hook up your system using the supplied cords and accessories. AWP-ZP5 is used for illustration purpose. AM loop antenna FM lead antenna Right speaker Left speaker 1 Connect the speakers. Connect the right and - AIWA AWP-ZP5 | Operating Instructions - Page 8
antenna, then connect it. Inserting two R6 (size AA) batteries into the remote AM loop antenna AM LOOP (CFOMA7X5IAΩL) Extend the FM lead antenna horizontally Note possible damage from battery leakage and corrosion. Tip When the remote no longer operates the system, replace both batteries with new - AIWA AWP-ZP5 | Operating Instructions - Page 9
Getting Started Setting the clock Use buttons on the remote for the operation. 1 Press ?/1 to turn on the system. 2 Press CLOCK/TIMER SET. 3 Press . or > repeatedly to set the hour. 4 Press ENTER. 5 Press . or > repeatedly - AIWA AWP-ZP5 | Operating Instructions - Page 10
CD/MP3 - Play Loading a disc Insert a disc in the disc slot with the label side facing right. Playing a disc - Normal Play/Shuffle Play This system lets you play audio CDs and discs with MP3 audio tracks. Example: When playing a disc Track number When you play a disc, insert it with the label side - AIWA AWP-ZP5 | Operating Instructions - Page 11
media used at the time an MP3 audio track is recorded, you may encounter such problems as disabled playback, sound interruptions, and noise. Tip When disc access takes a long track you want using the remote during Normal Play. Press the number button(s). Playback automatically starts. 11GB - AIWA AWP-ZP5 | Operating Instructions - Page 12
Playing repeatedly - Repeat Play You can play all the tracks or a single track on a disc repeatedly. Press REPEAT repeatedly during playback until "REP" or "REP1" appears. REP: For all the tracks up to five times. REP1: For a single track only. To cancel Repeat Play Press REPEAT repeatedly until - AIWA AWP-ZP5 | Operating Instructions - Page 13
preset number. Automatic tuning preset You can automatically tune in all of the stations that can be received in your area and then manually store the radio frequency of the desired stations. 1 Press TUNER BAND (or FUNCTION repeatedly) to switch the function to tuner. 2 Press TUNER BAND - AIWA AWP-ZP5 | Operating Instructions - Page 14
steps 2 through 7 to preset other stations. Other operations To Do this Tune in a station Follow the procedure described with a weak signal in "Manual tuning preset" (page 14). Set another station to the existing preset number Start over from step 2. After step 5, press . or > repeatedly to - AIWA AWP-ZP5 | Operating Instructions - Page 15
repeatedly until "PRESET" appears in the display. 4 Press . or > repeatedly to select the desired preset station. Listening to non-preset radio station - Manual Tuning 1 Press TUNER BAND (or FUNCTION repeatedly) to switch the function to tuner. 2 Press TUNER BAND repeatedly to select "FM" or "AM - AIWA AWP-ZP5 | Operating Instructions - Page 16
Tuning). Using the Radio Data System (RDS) (European model only) What is the Radio Data System? Radio Data System (RDS) is a broadcasting service that allows radio stations to send additional information along with the regular program signal. RDS is available only on FM stations.* Note RDS may not - AIWA AWP-ZP5 | Operating Instructions - Page 17
To cancel the sound effect Press EQ repeatedly until "OFF" appears. Mixing the sound on a personal computer with another sound source - PC Mixing (except for AWP-ZP1) You can mix the sound on a personal computer with another sound source. Press PC MIXING. Each time you press the button, the mixing - AIWA AWP-ZP5 | Operating Instructions - Page 18
can wake up to music at a preset time. Make sure you have set the clock (see "Setting the clock" on page 9). Use buttons on the remote for the operation. 1 Prepare the sound source you want to play. • CD: Load a disc. To start from a specific track, make a program (see "Creating your own - AIWA AWP-ZP5 | Operating Instructions - Page 19
about 15 seconds before the preset time, the Play Timer will not be activated. • You cannot use the optional component connected to MD jacks or USB port (except for AWP-ZP1) as the sound source for Play Timer. Timer 19GB - AIWA AWP-ZP5 | Operating Instructions - Page 20
Display Turning off the display - Power Saving Mode The demonstration display (display window and buttons lighting and flashing even when the system power is off) and the clock display can be turned off to minimize the amount of power consumed during standby (Power Saving Mode). Press DISPLAY - AIWA AWP-ZP5 | Operating Instructions - Page 21
Checking the total playing time and titles (CD/MP3) Press DISPLAY in stop mode. Each time you press the button, the display changes cyclically as follows: x When a CD/MP3 is in Normal Play mode TOC display1) or total album number of the disc2) or total track number of the current album3) t Volume - AIWA AWP-ZP5 | Operating Instructions - Page 22
Optional Personal Computer (except for AWP-ZP1) Connecting a personal computer to the system Use the supplied USB cable for the connection. You can • USB port that supports USB 1.1 or higher • IBM PC/AT compatible or Macintosh • Operating System installed at the factory: - For Windows users Windows - AIWA AWP-ZP5 | Operating Instructions - Page 23
differs according to the OS type. Also see the operation manual supplied with the computer. For Windows 98 Second Edition/Windows Millennium Edition To install the USB driver 1 Connect the system to the computer with the supplied USB cable (see page 22). 2 Start up the computer. 3 Press ?/1 to - AIWA AWP-ZP5 | Operating Instructions - Page 24
In this case, follow the instructions and set the CD-ROM in the drive. • Do not disconnect or connect the USB cable during detection. To the icons, it means the respective device driver is not installed or recognized by the OS. In this case, install the device driver again. 5 Click [OK] to close - AIWA AWP-ZP5 | Operating Instructions - Page 25
AWP-ZP1) For Windows 2000 Professional or Windows XP Professional/Home Edition To install the USB driver 1 Connect the system to the computer with the supplied USB disconnect or connect the USB cable during detection. Tip To not install the driver, follow the instructions appearing on the monitor. - AIWA AWP-ZP5 | Operating Instructions - Page 26
10.1 to 10.3 To install the USB driver 1 Connect the system to the computer with the supplied USB cable (see page 22). 2 Start USB cable (supplied), be sure to first quit the software. • The sound may skip or there may be noise depending on the computer environment. • Also see the operation manuals - AIWA AWP-ZP5 | Operating Instructions - Page 27
Personal Computer (except for AWP-ZP1) Connecting an optional USB component (AWP-ZP5 only) This system has two USB hub ports. By using this system's USB hub ports, you can operate USB components from a computer through this system. You can connect an optional USB component with a maximum current - AIWA AWP-ZP5 | Operating Instructions - Page 28
Components Hooking up optional components To enhance your system, you can connect optional components. Refer to the operating instructions provided with each component. AWP-ZP5 is used for illustration purpose. Optional analog component From the audio output jacks of an optional analog component - AIWA AWP-ZP5 | Operating Instructions - Page 29
Optional Components Listening to audio from a connected component 1 Connect audio cords. See "Hooking up optional components" on page 28. 2 Press FUNCTION repeatedly (or MD* on the unit) until "MD" appears. Start playing the connected component. * AWP-ZP1 only 29GB - AIWA AWP-ZP5 | Operating Instructions - Page 30
problem in the troubleshooting checklist below and take the indicated corrective action. If the problem persists after doing all of the above, consult your nearest Aiwa sounds are heard when functions other than PC are selected (except for AWP-ZP1). • Set PC Mixing to off. There is severe hum or - AIWA AWP-ZP5 | Operating Instructions - Page 31
Remove the obstacle. • Move the remote closer to the system. • Point the remote at the system's sensor. • • Contact your Aiwa dealer or local authorized Aiwa service facility. The disc does not eject. • Consult your nearest Aiwa dealer. Play displayed correctly. Troubleshooting continued 31GB - AIWA AWP-ZP5 | Operating Instructions - Page 32
and other components. • Consult your nearest Aiwa dealer if the supplied AM antenna has come the AM antenna. Personal computer (except for AWP-ZP1) There is no sound. • Connect the the connected component. • Refer to the operating instructions supplied with the connected component and start playing. - AIWA AWP-ZP5 | Operating Instructions - Page 33
the timer function when the Play Timer is not set. TIME NG! The Play Timer start and end times are set to the same time. Troubleshooting 33GB - AIWA AWP-ZP5 | Operating Instructions - Page 34
personnel before operating it any further. • AC power cord must be changed only at the qualified service shop. On placement • Do not place the system in an inclined position. • Do not place . If you have any questions or problems concerning your system, please consult your nearest Aiwa dealer. 34GB - AIWA AWP-ZP5 | Operating Instructions - Page 35
Notes on discs • Before playing, clean the disc with a cleaning cloth. Wipe the disc from the center out. • Do not use solvents such as benzine, thinner, commercially available cleaners or anti-static spray intended for vinyl LPs. • Do not expose the disc to direct sunlight or heat sources such as - AIWA AWP-ZP5 | Operating Instructions - Page 36
: Approx. 3.8 kg net per speaker Supplied accessories Remote commander (1) R6 (size AA) batteries (2) AM loop antenna (1) FM lead antenna (1) Speaker cables (2) USB cable (except for AWP-ZP1) (1) USB Hub Port Information (AWP-ZP5 only) (1) Design and specifications are subject to change - AIWA AWP-ZP5 | Operating Instructions - Page 37
3 (23, 26) PHONES jack qd Remote sensor 5 TUNER/BAND 41)6 (13, 15) TUNING +/- 9 (13, 15) USB hub ports3) qf (27, 28) USB STATUS lamp3) qg (27) VOLUME control pause) qk (11) x (stop) ql (11, 14) 1) AWP-ZP1 only 2) Except for AWP-ZP1 3) AWP-ZP5 only 1 23 4 56 7 Additional Information 8 ql 9 qk qj - AIWA AWP-ZP5 | Operating Instructions - Page 38
Remote control ALPHABETICAL ORDER A - H ALBUM +/- 8 (11, 12) CD qf (10, 12, 14 8 (11) N (play) 9 (11) x (stop) qa (11, 14) X (pause) qd (11) * This button is not available for AWP-ZP1. AWP-ZP5/ZP3 AWP-ZP1 w; 13 1 ql 2 ql 2 qk 3 qk 7 4 6 qj 5 qj 5 6 6 qh 7 qh 7 8 8 qg 9 qf 9 - AIWA AWP-ZP5 | Operating Instructions - Page 39
- AIWA AWP-ZP5 | Operating Instructions - Page 40
Sony Corporation Printed in China
-
 1
1 -
 2
2 -
 3
3 -
 4
4 -
 5
5 -
 6
6 -
 7
7 -
8
-
9
-
10
-
11
-
12
-
13
-
14
-
15
-
16
-
17
-
18
-
19
-
20
-
21
-
22
-
23
-
24
-
25
-
26
-
27
-
28
-
29
-
30
-
31
-
32
-
33
-
34
-
35
-
36
-
37
-
38
-
39
-
40
 |
 |

©2004 Sony Corporation
4-253-925-
13
(1)
Operating Instructions
Owner’s Record
The model and serial numbers are located on the rear of the unit. Record the
serial number in the space provided below. Refer to them whenever you call
upon your Aiwa dealer regarding this product.
Model No. ______________
Serial No. ______________