AIWA BMZ-K1 Operating Instructions
AIWA BMZ-K1 Manual
 |
View all AIWA BMZ-K1 manuals
Add to My Manuals
Save this manual to your list of manuals |
AIWA BMZ-K1 manual content summary:
- AIWA BMZ-K1 | Operating Instructions - Page 1
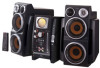
Mini Hi-Fi Component System BMZ-K1/BMZ-K2 4-246-647-02 (1) - AIWA BMZ-K1 | Operating Instructions - Page 2
Trade name: SONY Model No.: BMZ-K1/BMZ-K2 Responsible Party: Sony Electronics Inc operating and maintenance (servicing) instructions in the literature manual could void your authority to operate this equipment. Note to CATV system installer: This reminder is provided to call the CATV system - AIWA BMZ-K1 | Operating Instructions - Page 3
. If you have any questions or problems concerning your stereo system, please consult your nearest Aiwa dealer. TABLE OF CONTENTS PREPARATIONS 4 PARTS AND CONTROLS 5 ADJUSTMENTS BEFORE OPERATION .......... 8 SOUND ADJUSTMENTS 9 CD OPERATIONS 10 MP3-CD OPERATIONS 13 TUNER OPERATIONS 15 TIMER - AIWA BMZ-K1 | Operating Instructions - Page 4
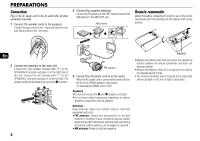
commander Detach the battery compartment lid at the rear of the remote commander and insert two R6 (size AA) batteries with correct polarity. En 2 Connect the speakers to the main unit. Connect the right speaker (marked with "R") to the SPEAKERS R terminals and place it on the right side of the - AIWA BMZ-K1 | Operating Instructions - Page 5
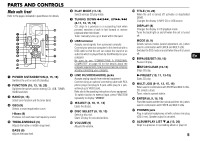
and MULTI JOG, CD: selects a track. Tuner: selects a preset station. ^ ENTER (8, 9, 15, 16) Fixes the modes and the time (clock and timer, etc.) when used in combination with ENTER and MULTI JOG. & PHONES jack Plug in optional headphones set with a stereo mini plug (∅3.5 mm). Speaker output is - AIWA BMZ-K1 | Operating Instructions - Page 6
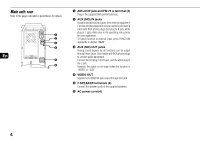
L jack). Refer also to the operating instructions for your equipment. To switch function to jacks. Use a cable with RCA phono plugs to connect audio equipment. Connect the red plug to the R jack, SPEAKER terminals (4) Connect the speaker cords of the supplied speakers. 6 AC power cord (4) 6 - AIWA BMZ-K1 | Operating Instructions - Page 7
Remote commander Refer to the pages indicated in parentheses for details. 1 8 2 9 3 4 0 5 ! 6 @ 7 Buttons with the same or similar names on the main unit basically have the same function. 1 POWER (8, 16) 2 1-9,0/10, +10 (10, 11, 13, 15) CD: selects a track of the specified number. Tuner: - AIWA BMZ-K1 | Operating Instructions - Page 8
(POWER on the remote ). Alternatively, press BAND, DISC SELECT (1-5). Playback will start automatically if a disc is loaded. ECO OFF: Power economizing mode is cancelled. When the unit turns off, the clock display appears. Initial mode is ECO OFF. Standby power consumption BMZ-K1 Turning the unit - AIWA BMZ-K1 | Operating Instructions - Page 9
") To cancel equalization, select "GEQ OFF". Setting a curve manually 1 Press GEQ repeatedly to display "USER". 2 Turn TREBLE/MIDDLE and BASS to adjust the sound level. On the remote, press SOUND repeatedly to select "BASS", "MIDDLE" and "TREBLE", and then press r or t to adjust the level. 3 Hold - AIWA BMZ-K1 | Operating Instructions - Page 10
eject it. In addition, this unit does not support the CD adaptor. •Discs with non-standard shapes (e.g., heart finalized CD-R/RW discs as well as audio CDs. 1 Press FUNCTION repeatedly to select the CD 2 Press c (c/d on the remote) to start CD play. You can start CD play by pressing one of DISC - AIWA BMZ-K1 | Operating Instructions - Page 11
DISC and SHUF: plays all the tracks on one desired disc in random order. 2 Press c (c/d on the remote) CD to start play. To cancel shuffle play In stop mode, press PLAY MODE on the remote repeatedly until the "SHUF" indicator disappears. Repeat play In repeat play mode the unit repeatedly plays all - AIWA BMZ-K1 | Operating Instructions - Page 12
and then the unit will turn itself off automatically. 3 Disconnect the AC power cord from the wall outlet. Notes on CDs •Do not tilt the unit with a disc inserted. • Discs recorded on CD-R/RW drives may not be played back because of scratches, dirt, recording condition or the drive's characteristics - AIWA BMZ-K1 | Operating Instructions - Page 13
disc slot, and the DISC SELECT button of selected disc slot lights in green. Do not insert a disc forcibly. 2 Press c (c/d on the remote) to start CD play. You can start CD play by pressing one of DISC SELECT (1-5) on the main unit. Playback starts from the first track and the elapsed playback time - AIWA BMZ-K1 | Operating Instructions - Page 14
remote). Descriptions of MP3 En An MP3 file stores audio data compressed using MPEG1/2, the audio layer-3 file-coding scheme. In this manual, CDs, CD-R discs and CD etc. Notes on creating MP3 discs •When converting audio data to MP3 The unit supports MP3 files with a sampling frequency of 16, 22 - AIWA BMZ-K1 | Operating Instructions - Page 15
ENTER s SHIFT BAND TUNER MODE t f,g ENTER Manual tuning 1 Press BAND (hold down SHIFT and press BAND on the remote) to select a band. The unit switches /step. If you use this unit in an area where the frequency allocation system is 9 kHz/step, change the tuning interval. Hold down TUNER/BAND and - AIWA BMZ-K1 | Operating Instructions - Page 16
10...70 If you set to "AUTO", the unit turns off automatically when the current CD finishes playback or elapsed 100 minutes. To check the remaining time until the unit turns off Press SLEEP on the remote. The remaining time is displayed for 6 seconds. To cancel the sleep timer Press SLEEP on - AIWA BMZ-K1 | Operating Instructions - Page 17
Notes • The timer playback performs every day at the specified time unless you cancel it. •You cannot set the same time for timer-on time and timeroff time. "SET NG" is displayed if you do that. In this case, reset the time. •The timer playback will not begin unless the unit is turned off first. En - AIWA BMZ-K1 | Operating Instructions - Page 18
you connect a personal computer, see also "Set up Manual" in the supplied CD-ROM. Before Starting the Installation Before installing the software on the supplied BMZ USB Driver CD, check to be sure that your system meets the following system requirements. PC IBM PC/AT compatible Free hard disk - AIWA BMZ-K1 | Operating Instructions - Page 19
and game controllers" > "USB Audio Device" •"Universal Serial Bus controllers" > "AIWA BMZ USB- Device" •"Human Interface Devices" > "HID-compliant consumer control device" If these devices do not appear, the USB driver has not been recognized. Reinstall the USB driver. If your operating system is - AIWA BMZ-K1 | Operating Instructions - Page 20
back audio file software Follow the procedure below to remove the software from your PC. 1 In the Control instructions that appear on the screen to remove the program selected in step 3. Adjust the volume When playing back with the Winamp, it is possible to operate even with the main unit or remote - AIWA BMZ-K1 | Operating Instructions - Page 21
. En Troubleshooting If your unit fails to perform properly, check the following guide and the relevant sections of the Operating Instructions. First check that the AC power cord and the speakers are connected correctly and firmly. Should any problem persist, consult your nearest Aiwa dealer - AIWA BMZ-K1 | Operating Instructions - Page 22
from other electric appliances and cords. CD player The CD does not play. •The CD is dirty. •The CD is inserted label side left. •Moisture condensation has built up. Remove the CD and leave the system turned on for about an hour until the moisture evaporates. Speakers Sound comes from one channel or - AIWA BMZ-K1 | Operating Instructions - Page 23
15 × 16 5/8 in.) Mass CX-BK1: Approx. 8.6 kg (19 lbs) CX-BK2: Approx. 9.6 kg (21 lbs 3 oz) Supplied accessories: FM antenna (1) AM antenna (1) Speaker cords (2) USB cable (1) Remote commander (1) Batteries (2) Application CD-ROM (1) En Specifications and external appearance are subject - AIWA BMZ-K1 | Operating Instructions - Page 24
de conformidad Nombre comercial: SONY Nº modelo: BMZ-K1/BMZ-K2 Grupo responsable:Sony Electronics Inc. Dirección: BACK). NO USER-SERVICEABLE PARTS INSIDE. REFER SERVICING TO QUALIFIED y (2) o modificación no aprobado expresamente en este manual podría invalidar la autoridad del usuario para - AIWA BMZ-K1 | Operating Instructions - Page 25
•Esta unidad reproduce discos compactos de audio (CDs), discos CD-R/CD-RW con datos de audio (CD-R/RW) y discos CD-R/CD-RW con archivos MP3 (discos compactos ngase en contacto con su distribuidor Aiwa más cercano. ÍNDICE PREPARACIONES 26 PARTES Y CONTROLES 27 AJUSTES ANTES DEL FUNCIONAMIENTO ... - AIWA BMZ-K1 | Operating Instructions - Page 26
compartimento de las pilas en la parte posterior del control remoto e inserte dos pilas R6 (tamaño AA) con la polaridad correcta. R6(AA) E 2 Conecte los altavoces a la unidad principal. Conecte el altavoz derecho (marcado con "R") a los terminales SPEAKERS R y colóquelo en el lado derecho de la - AIWA BMZ-K1 | Operating Instructions - Page 27
PARTES Y CONTROLES Unidad principal: panel frontal Para más información, consulte las páginas indicadas entre 2 FUNCTION (32, 35, 40, 42) Cambia la función activa entre CD, USB, TUNER, VIDEO y AUX. 3 BAND (30, 35) Selecciona emitir el sonido de un archivo de audio que se reproduzca con Winamp3 en su - AIWA BMZ-K1 | Operating Instructions - Page 28
blanca a la toma L). Consulte también el manual de instrucciones de su equipo. Para cambiar la cable con clavijas fonográficas RCA para conectar al equipo de audio. Conecte la clavija roja a la toma R y la clavija #SPEAKER (26) Conecte los cables de los altavoces suministrados. 6 Cable de alimentación - AIWA BMZ-K1 | Operating Instructions - Page 29
Control remoto Para más información, consulte las páginas indicadas entre paréntesis. 1 8 2 9 3 4 0 5 ! 6 @ 7 Los botones con nombres similares o idénticos en la unidad principal realizan básicamente la misma - AIWA BMZ-K1 | Operating Instructions - Page 30
reloj. El modo inicial es ECO OFF. Consumo de energía en modo de espera BMZ-K1 ECO ON: 0,25 W ECO OFF: 20 W BMZ-K2 ECO ON: 0,25 W ECO OFF: 24 W Ajuste del reloj 1 Pulse CLOCK/TIMER SET en el control remoto. Consulte las indicaciones siguientes sobre cómo ajustar el reloj. 2 Pulse r o t para ajustar - AIWA BMZ-K1 | Operating Instructions - Page 31
de una curva") Para cancelar la ecualización, seleccione "GEQ OFF". Ajuste manual de una curva 1 Pulse repetidamente GEQ hasta que se visualice "USER". 2 Gire TREBLE/MIDDLE y BASS para ajustar el nivel de sonido. En el control remoto, pulse repetidamente SOUND para seleccionar "BASS", "MIDDLE - AIWA BMZ-K1 | Operating Instructions - Page 32
Esta unidad reproduce discos finalizados CD-R/RW y discos compactos de audio. 1 Pulse repetidamente FUNCTION para seleccionar la función CD y cargue el/los disco . No inserte un disco forzadamente. 2 Pulse c (c/d en el control remoto) para iniciar la reproducción de un disco compacto. Puede iniciar - AIWA BMZ-K1 | Operating Instructions - Page 33
las pistas de todos los discos en orden aleatorio. - 1 DISC y SHUF: reproduce todas las pistas de un disco deseado en orden aleatorio. 2 Pulse c (c/d en el control remoto) CD para iniciar la reproducción. Para cancelar la reproducción aleatoria En modo parada, pulse repetidamente PLAY MODE en el - AIWA BMZ-K1 | Operating Instructions - Page 34
rotura del mecanismo del disco compacto. 1 Extraiga todos los discos compactos. 2 Mantenga pulsado s en la unidad principal durante 5 segundos en función CD cuando la unidad esté encendida. "MECHA LOCK" aparecerá en la pantalla y, a continuación, la unidad se apagará automáticamente. 3 Desconecte el - AIWA BMZ-K1 | Operating Instructions - Page 35
(o gire MULTI JOG). 1 Pulse repetidamente FUNCTION para seleccionar la función CD y cargue el/los disco(s). Pulse DISC SELECT (1-5) e inserte un disco un disco al interior del aparato. Para cambiar el disco en el control remoto Pulse repetidamente DISC SKIP. Cada vez que pulse el botón, cambiar - AIWA BMZ-K1 | Operating Instructions - Page 36
pistas. 5 Pulse c (c/d en el control remoto). Descripciones de un disco MP3 Un archivo MP3 contiene datos de audio comprimidos mediante MPEG 1/2, programa de codificación de archivos "audio layer-3". E En este manual, los discos compactos, los discos CD-R y los discos CD-RW se citan como "discos - AIWA BMZ-K1 | Operating Instructions - Page 37
DEL SINTONIZADOR POWER BAND f,g 1-9,0/10,+10 a,s,c MULTI JOG r ENTER s SHIFT BAND TUNER MODE t f,g ENTER Sintonización manual 1 Pulse BAND (mantenga pulsado SHIFT y pulse BAND en el control remoto) para seleccionar una banda. La unidad cambiará al sintonizador desde cualquier otra funci - AIWA BMZ-K1 | Operating Instructions - Page 38
en los pasos 3 y 4. 6 Pulse r o t para seleccionar la fuente (CD y TUNER), y pulse ENTER. 7 Prepare la fuente. Para reproducir un disco compacto, comprobar el ajuste del temporizador Pulse repetidamente CLOCK/TIMER SELECT en el control remoto hasta que se visualice "DAILY". La hora de activación - AIWA BMZ-K1 | Operating Instructions - Page 39
Consejo: El ajuste del temporizador se mantiene aunque se cancele el temporizador. La próxima vez que se active el temporizador, podrá cambiar los ajustes anteriores o sencillamente utilizar de nuevo los mismos ajustes. Notas •La reproducción con temporizador se activa cada día a la hora - AIWA BMZ-K1 | Operating Instructions - Page 40
Manual de configuración" en el CD-ROM suministrado. Antes de iniciar la instalación Antes de instalar el software del disco compacto suministrado BMZ USB Driver El puerto USB de esta unidad es un desarrollo conjunto de Sony Corporation y Micronas Semiconductor Holding AG. • Otros nombres de sistemas - AIWA BMZ-K1 | Operating Instructions - Page 41
los siguientes epígrafes. •"Controladores de sonido, vídeo y juegos" > "Dispositivo USB de audio" •"Controladores de bus serie universal" > "Dispositivo AIWA BMZ USB" •"Dispositivos de interface humana" > "Dispositivo de control de usuario compatible con HID" Si estos dispositivos no aparecen, el - AIWA BMZ-K1 | Operating Instructions - Page 42
computadora personal Esta unidad puede emitir el sonido de un archivo de audio que se reproduce mediante el Winamp3 en su computadora. En primer Para desinstalar el software Siga el procedimiento indicado a continuación para desinstalar el software de su PC. 1 En el panel de control, haga doble clic - AIWA BMZ-K1 | Operating Instructions - Page 43
audio esté ajustada a un dispositivo diferente. Compruébelo en "Multimedia" o "Sonido y multimedia" del Panel de control de nuevo el software del CD del controlador USB BMZ. P. PLAY LIST relacionadas del Manual de a su distribuidor Aiwa mas cercano. General terminal SPEAKERS. Si inserta la porci - AIWA BMZ-K1 | Operating Instructions - Page 44
ón con temporizador" en la página 38 y 39. El temporizador no funciona. •Ajuste el reloj correctamente. El control remoto no funciona. •Hay un obstáculo entre el control remoto y la unidad. •El control remoto no está apuntando en la dirección del sensor de la unidad. •Las pilas se han agotado - AIWA BMZ-K1 | Operating Instructions - Page 45
CX-BK1 0,08 % (90 W, 1 kHz, 6 Ω) CX-BK2 0,08 % (120 W, 1 kHz, 6 Ω) Entrada LINE IN VIDEO : 1,0 Vp-p (75 Ω) LINE IN AUDIO : 1,1V AUX (MD) IN : 1,1V Salidas SPEAKERS mensurable SISTEMA DE ALTAVOCES SX-BK1 para BMZ-K1/ SX-BK2 para BMZ-K2 Sistema de altavoces SX-BK1 3 vías, reflejo de - AIWA BMZ-K1 | Operating Instructions - Page 46
Sony Corporation Printed in Malaysia http://www.aiwa.com
-
 1
1 -
 2
2 -
 3
3 -
 4
4 -
 5
5 -
 6
6 -
 7
7 -
8
-
9
-
10
-
11
-
12
-
13
-
14
-
15
-
16
-
17
-
18
-
19
-
20
-
21
-
22
-
23
-
24
-
25
-
26
-
27
-
28
-
29
-
30
-
31
-
32
-
33
-
34
-
35
-
36
-
37
-
38
-
39
-
40
-
41
-
42
-
43
-
44
-
45
-
46
 |
 |
Mini Hi-Fi Component System
4-246-647-
02
(1)
BMZ-K1/BMZ-K2