AIWA CA-DW635 Operating Instructions - Page 13
Dubbing, A Tape, Setting, The Clock
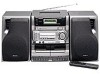 |
View all AIWA CA-DW635 manuals
Add to My Manuals
Save this manual to your list of manuals |
Page 13 highlights
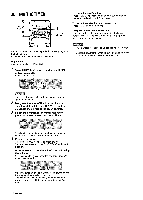
DUBBING A TAPE SETTING THE CLOCK 1 5 4 6 2 3 4 q Note that recording is done on only one side of the tape. q Use Type I (normal) tapes only. 1,3,5 ;14 When the AC cord is connected for the first time, the time on thle display flashes. Set the time as follows while the power is off. 1 Press TAPE. 2 Insert a tape to be recorded on into deck 1 with the side to be recorded on facing out. 3 Insert a tape to be played into deck 2 with the side to be played facing out, 4 Press 11 PAUSE then press q REC on deck 1 to enter recording pause mode. F PLAY is pressed simultaneously. 5 Press DUB SPEED to select a dubbing speed. HI-DUB is displayed: Dubs at high speed. HI-DUB is not displayed: Dubs at normal speed. 6 Press P PLAY on deck 2. 11 PAUSE on deck 1 is released and recording starts. To stop recording, press W4 STOP/EJECT on deck 1. Press 11 SET. The hour flashes. (12-hour standard) g 8 Press 44 DOWN or FF UP to designate the hour. Press II SET to set the hour. The hour stops flashing and the minute starts flashing. Press U DOWN or minute. UP to designate the Press II SET to set the minute and complete m the setting. The minute stops flashing on the display and the clock starts from 00 seconds. 10 correct the current time F'ress POWER to turn the unit off and press II SET twice. Then, carry out steps 2 to 5 above. 10 switch to the 12124-hour standard While the power is off, press the II SET button twice until the hour flashes and then press s . VVhen the display switches, carry out steps 2 to 5 above to set the clock again. If the clock display flashes while the power is off This is caused by a power interruption. The current time needs to be reset. Ii power is interrupted for more than approximately 12 hours, all settings stored in memory after purchase need to be reset. During operation 11 and s on the remote control are also available instead of II SET and s PRESET on the main unit respectively. ENGLISH 13
-
 1
1 -
2
-
3
-
4
-
5
-
6
-
7
-
 8
8 -
 9
9 -
 10
10 -
 11
11 -
 12
12 -
 13
13 -
 14
14 -
 15
15 -
 16
16 -
 17
17 -
 18
18 -
19
-
20
-
21
-
22
-
23
-
24
-
25
-
26
-
27
-
28
-
29
-
30
-
31
-
32
-
33
-
34
-
35
-
36
-
37
-
38
-
39
-
40
-
41
-
42
-
43
-
44
-
45
-
46
-
47
-
48
-
49
-
50
-
51
-
52
 |
 |
