AIWA CA-DW635 Operating Instructions - Page 4
Power, Supply, Connections
 |
View all AIWA CA-DW635 manuals
Add to My Manuals
Save this manual to your list of manuals |
Page 4 highlights
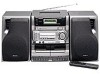
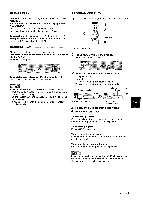
POWER SUPPLY Connect the AC cord as illustrated m below. . V~ to the AC inlet of the unit ~+ ~ to an AC outlet CAUTION Use only the supplied AC cord. Use with other cords may result in the risk of fire. CONNECTIONS IMPORTANT q Make sure that the AC cord is disconnected and batteries are removed before connecting speakers. q Do not connect other than the supplied speakers. 1 Position the speakers. To couple with the speakers, slide each speaker down into the guide brackets on the center unit until the height is level with the unit. To separate the unit from the speakers, slide the speakers up and off, while pressing the speaker release knob. Open the lid of the battery compartment on the rear and insert eight R20 (size D) batteries, not supplied, as illustrated below. Then close the lid. To switch from AC power supply to battery power supply, disconnect the AC cord from the AC inlet. Batteries wear excessively when the cord is connected. p. *D) 2 Connect the s~eakers. Connect the righ~ speaker cord to the R terminals, and the left speaker cord to the L terminals. Connect the speaker cord with the white broken line to 0 and the other cord to O. I \ o ~~ The batteries need to be replaced when: The OPE/BATT indicator becomes dim, the tape speed slows down, volume decreases, or sound is distorted during operation. Notes on batteries To avoid damage from leakage or explosion, observe the following: q Insert the batteries with the 0 and O marks correctly aligned. q Do not mix different types of batteries or old batteries with new ones. q Never recharge the batteries, apply heat to them or take them apart. q Remove dead batteries. If liquid leaks from the batteries, wipe thoroughly to remove. Sound signals can be input to this unit through the AUX/ VIDEO jacks. Use a cable with RCA phono plugs (not supplied) to connect the external equipment. Connect the red plug to the R jack, and the white plug to the L jack. 4 ENGLISH To listen to the external source Press AUX and play the equipment. Refer also to the operating instructions equipment for details. of the connected
-
 1
1 -
 2
2 -
 3
3 -
 4
4 -
 5
5 -
 6
6 -
 7
7 -
 8
8 -
 9
9 -
 10
10 -
11
-
12
-
13
-
14
-
15
-
16
-
17
-
18
-
19
-
20
-
21
-
22
-
23
-
24
-
25
-
26
-
27
-
28
-
29
-
30
-
31
-
32
-
33
-
34
-
35
-
36
-
37
-
38
-
39
-
40
-
41
-
42
-
43
-
44
-
45
-
46
-
47
-
48
-
49
-
50
-
51
-
52
 |
 |
